Posted in creativity, journalling, lifestyle, memory keeping, Planning and journaling, reflective journalling, TN journaling, Traveler's Notebook, Traveler's Notebook Spreads

How I journal about my holidays: creative ways to record travel adventures

(N.B. image heavy post this time)

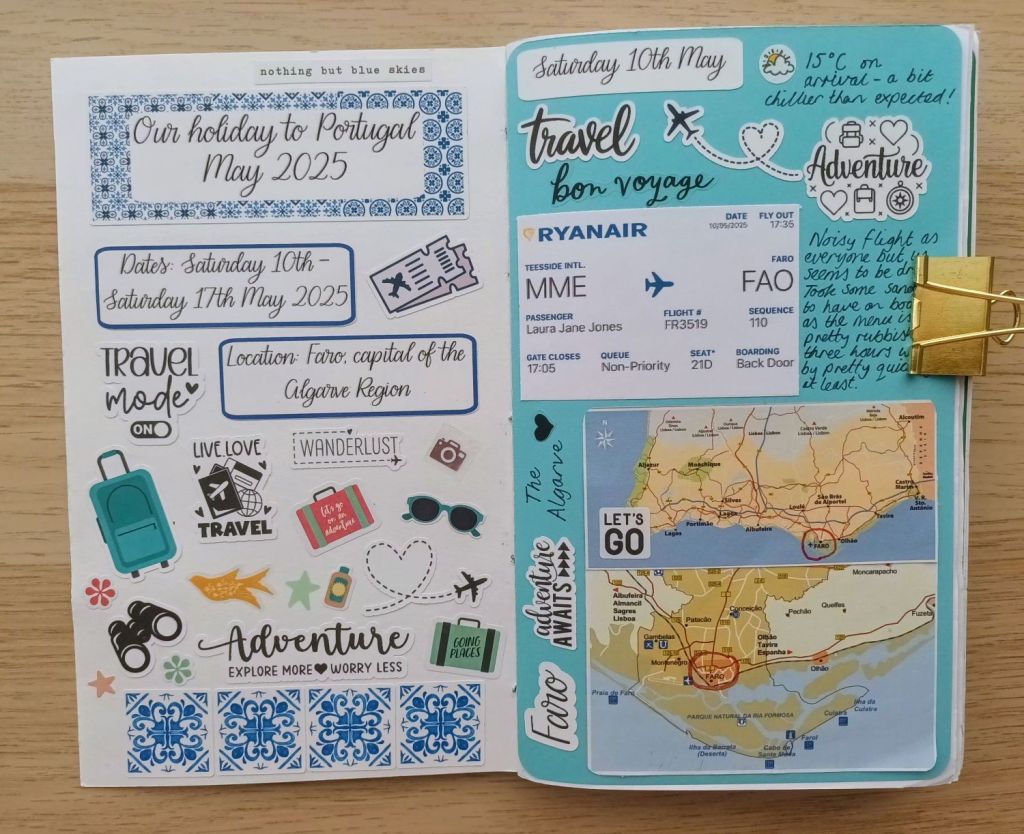
Last month, we spent a lovely week in Faro, the capital of the Algarve region of Portugal. Whilst I usually do a double page traveler’s notebook spread each month, documenting the main highlights, when we go on holiday somewhere new, I will dedicate a whole notebook to the trip which includes journalling, lots of photographs, ephemera and general momentoes which can be stuck in. Today, I’m sharing how I prepare for my journal before I go and whilst away and I’m also including examples of double page spreads showing the different creative ways I document my holiday.

What I do prior to and whilst I’m away

So, let’s start with my preparations so that working on and completing my journal is much easier when I get back home. These are key to ensuring I have all the information and need and key details that I might otherwise have forgotten.

Before I head off on my holiday

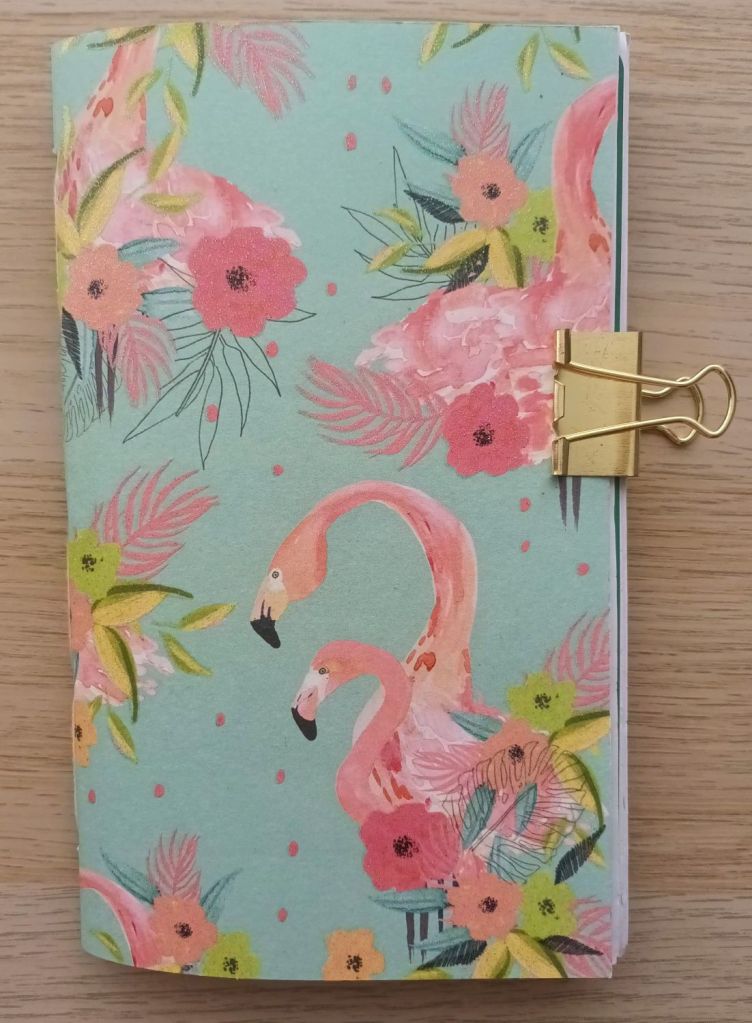
Before I go, I make the journal itself. I create a TN wide size insert choosing colours, patterns or images on the scrapbooking paper which suit my coming trip. So, for example, this time, I opted for a bright and cheerful flamingo, flower and leaf themed paper from the Paradise Crush collection of 12×12 papers (200gsm heavyweight cardstock even though referred to as paper). This was because I had read that there are flamingoes to be seen in the lagoon (Ria Formosa). I love selecting the cover paper myself and then hand-stitching blank white paper for the inside. I choose quite thin white paper so the journal doesn’t get so thick that it won’t close properly when I add to my pages.

Photo credit: Laura Jones for Keeping It Creative

Shortly before travel, I add a small notebook to my handbag and make sure I have a pen too. This is useful for writing details during my holiday so I don’t forget things when I return. Just a word of warning if you’re going on a flight though – be sure to select your pen carefully as the liquid ink in my V5 Pilot Hi-Tecpoint pen must have expanded whilst in the air and when I got it out to write with on arrival the pen came apart and I got covered in ink! Luckily, it was just my hands that got ink all over them, not my clothes.

The final thing I take with me is something to store ephemera (collectable bits and pieces) in. This time, I took a popper wallet and it came in very useful for keeping papers flat. I do wish I’d opted for a slightly bigger folder though as I had some bigger things that I had to fold up to ensure they fit.

During my holiday

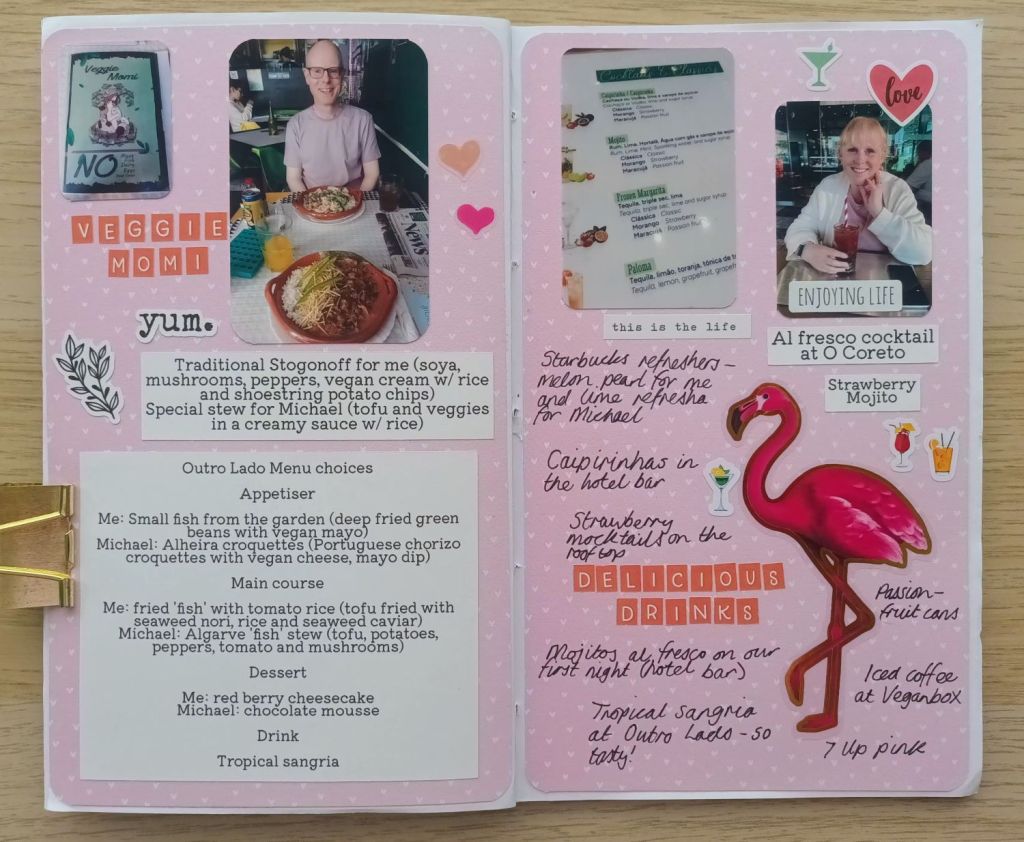
Notetaking Throughout the holiday, I make notes and reflect on my day. This is easy to do in the little notebook I mentioned earlier which comes with me wherever I go. This could include the name of a place we visited, my menu choices in a restaurant or cafe, timings of events during the day, a funny anecdote or how I felt in a particular place.

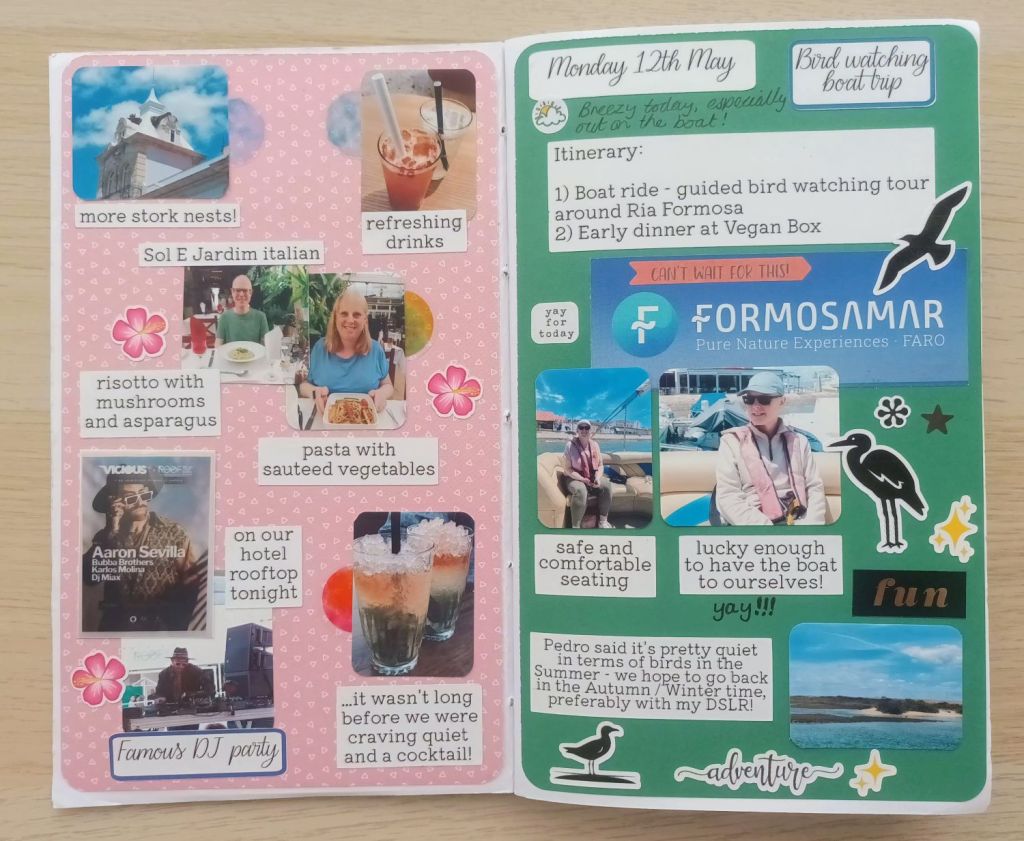
Taking photographs I take lots and lots of photographs whilst we’re away – better to have too many than not enough, right? However, for me, it’s not just about taking photos of each other and things my husband and I see or do, it’s also very much an aide memoire of various elements of our trip too. For example, when in Faro and on our day trips, I took photos of menus from the various eateries we went to, a screenshot of the weather for the week, close up shots of cocktail descriptions, shop fronts where I made my souvenir purchases and screenshots of locations of places we planned to go later on in the week. Also, talking of photos, I took my selfie stick so that we could take shots of the pair of us together rather than having to ask other tourists to take them for us.

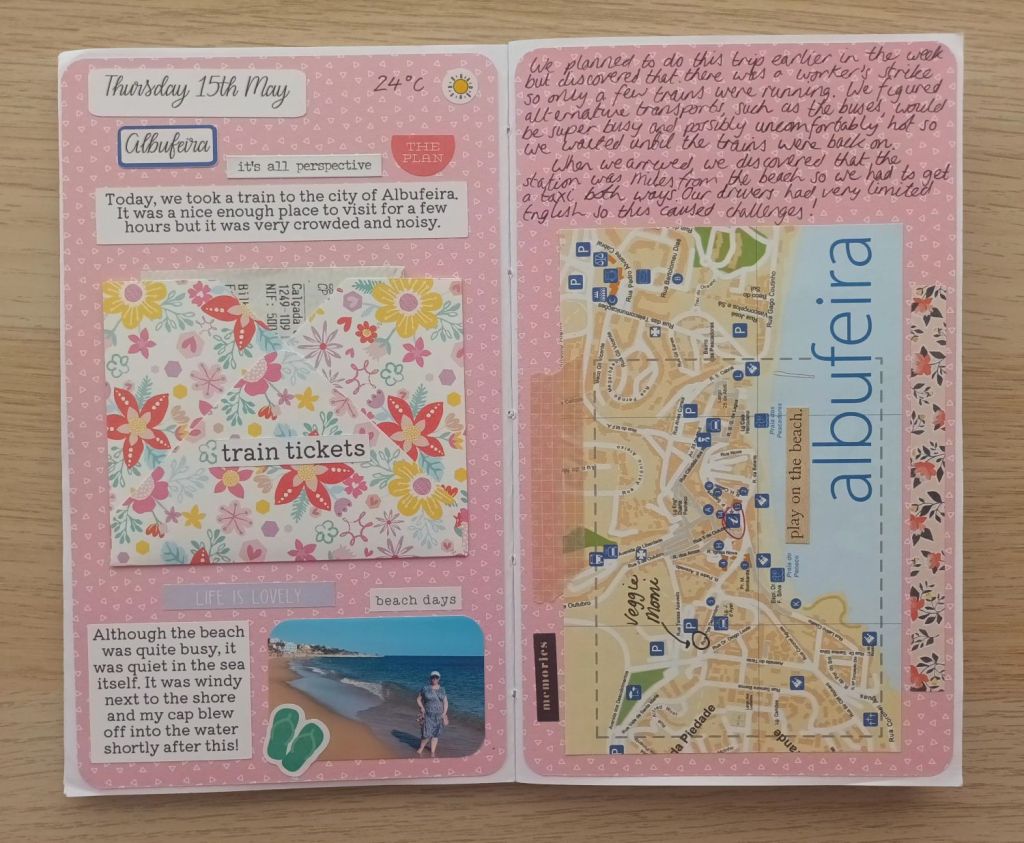
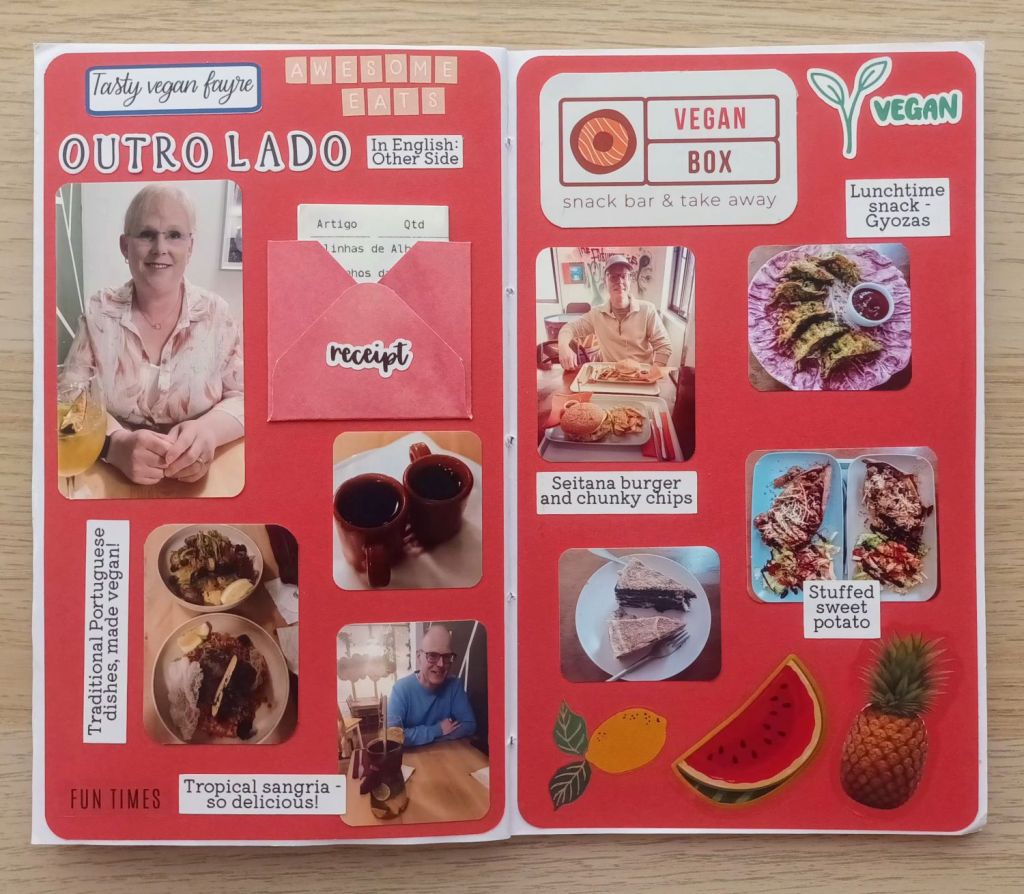
Collecting ephemera In the traditional sense of memory keeping journalling, ephemera usually refers to stickers and die cut paper and card images which can be glue or stuck into the journal pages. However, for me, it means anything and everything which could be stuck in as a memory of our holiday. On our trip to Portugal, I collected and saved business cards for cafes and restaurants, maps picked up at the Tourist Information places, leaflets such as the one advertising our boat trip so I could cut out letters for titles, small images or bits of information, receipts from shops and eateries, paper tickets (e.g. entry to the cathedral and for our train ride to Albufeira), samples from paper bags we were given to house our souvenirs in and even the cup cover for our glasses in our hotel room. Some of the things I didn’t end up using but at least I was well prepared with paper goodies I did want to add. I also only used parts of my items sometimes, so, for example, I trimmed a large map down to fit on a double page spread and I cut the logo from a business card of a place called Veganbox we ate in a few times.

Creating my travel journal

It’s up to you how you do your journalling and the elements you include within the pages but here’s some ideas:

  • travel information including modes of transport and tickets
  • the weather whilst you’re away
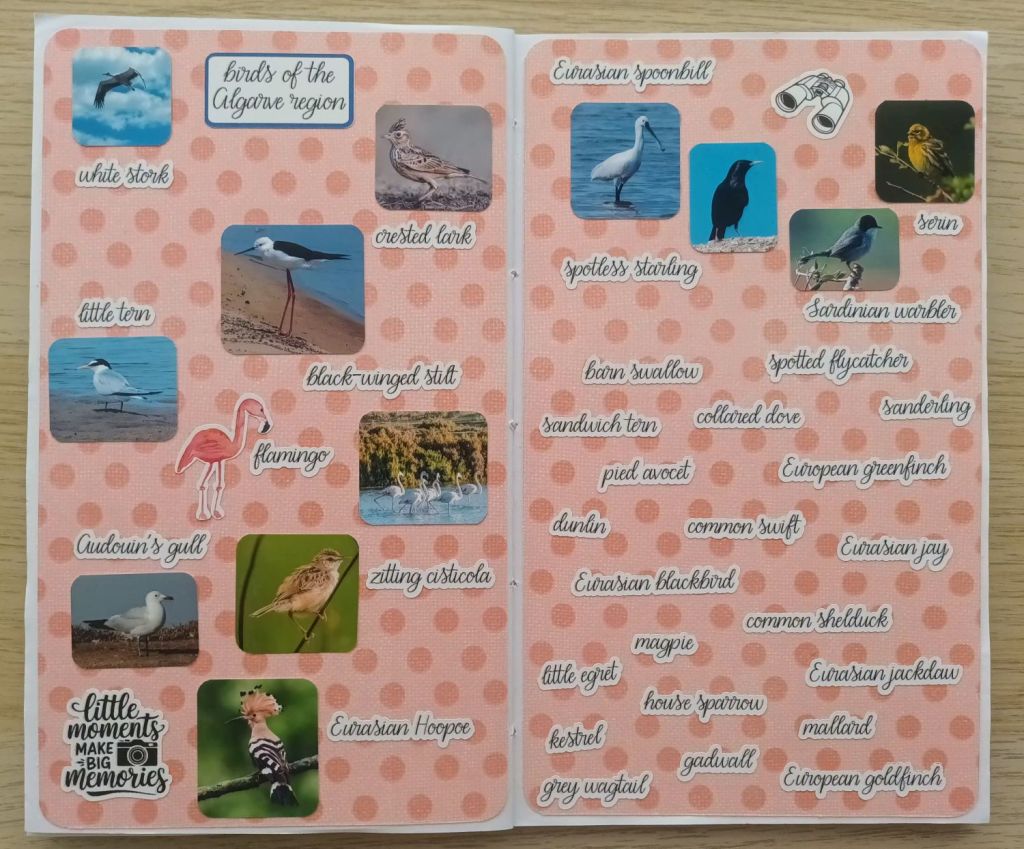
  • places of special interest you visited
  • photos of the accommodation you stayed in
  • maps of the place you stayed and other areas that you visited
  • meals, snacks and drinks enjoyed plus related ephemera
  • photos of scenes, selfies, family, food and drinks enjoyed etc
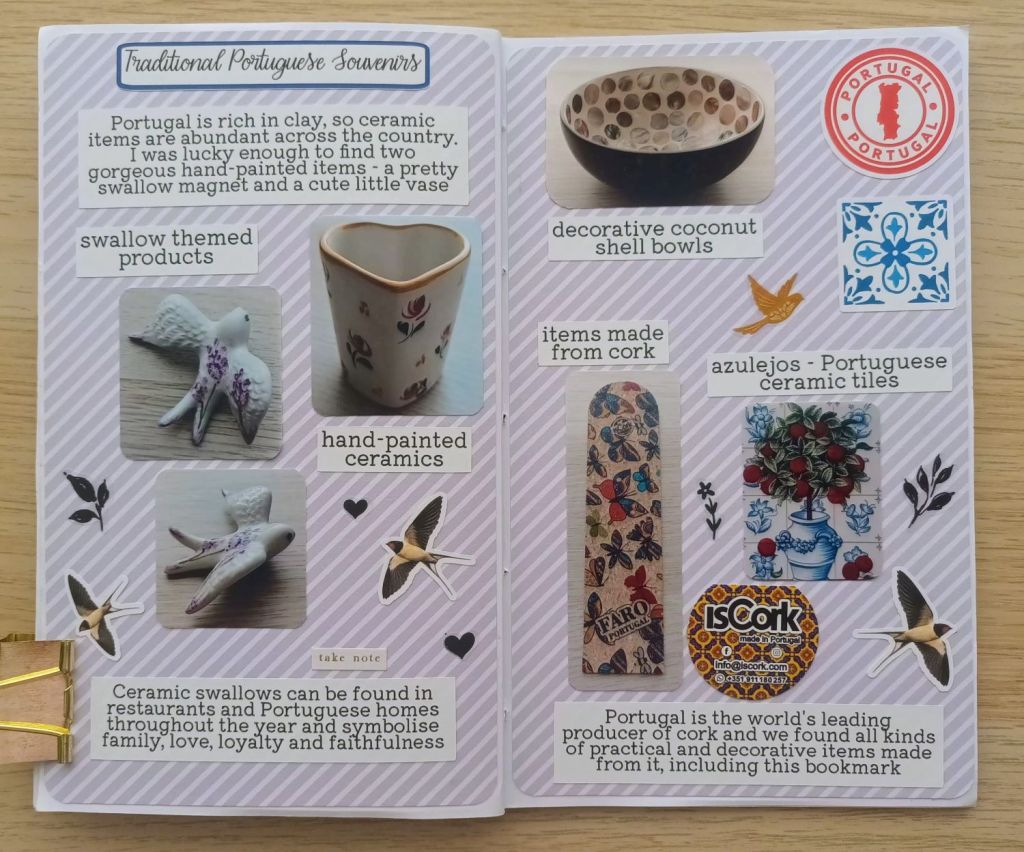
  • souvenirs and why you chose them
  • information about any traditions of the place / country you went to
  • an explanation of something new that you learned whilst you were there
  • activities you did and what you did to relax

Supplies that I find useful and you might too:

  • roller glue – I use tonnes of this stuff and have two rollers – permanent (to ensure things stick really well and removeable (for when I might want to reposition elements on a page)
  • stickers – from a variety of larger and small businesses online (purchased from Amazon or businesses such as Papermaze, or Etsy to support small UK sellers), or made myself in Cricut Design Space and printed and cut
  • We R Memory Keepers 1,2,3 punch board – for making the mini envelopes I included
  • Washi tapes – I have collected so many of these over the years and use them in my memory keeping as well as my bullet journal planner
  • Die cuts – I didn’t use any this time but small ones of these are useful as decor on pages
  • Pens – biros or gel ink and possibly coloured pens for writing straight into the journal

I’ll let the photos of my pages do the talking now but if you have any questions, feel free to get in touch with me.

Photo credit: Laura Jones for Keeping It Creative

Final words…

Times are certainly changing with creative journalling and memory keeping. A few years ago (maybe a few more!), everything used to be paper based, but now, many things that I would usually stick in to my journal, such as flight information, boarding passes, entry tickets to places and for excursions and so on are often completely digital. To make sure I can still include at least some of these, my husband has to screenshot the e-tickets on his phone and then forward the images to me in WhatsApp so I can print them off. It’s not the same, but at least it provides some sort of record and adds to the memories stored within my travel journals.

I hope you’ve enjoyed reading about my travel journalling process and seeing photos of my actual pages. There’s quite a lot of work involved in the journals I produce, but you could cut down the time involved by just adding photos and short captions. You could also choose to draw elements of what you see and do on your travels and this would be another lovely way to make the process both creative and therapeutic too.

Thanks for reading and I hope I’ve inspired you to create your own travel journal to document holidays (A.K.A. vacations),

Posted in Blogging, crafting, intentional living, journalling, lifestyle, memory keeping, reflective journalling

Currently… Life update March 2025

It feels like it’s quite a while since I did a life update and with signs of spring emerging, including the sunshine which is currently streaming through my craft room window, I thought I’d do another one to share what’s going on for me right now. Before I start my next paragraph, I’m going to open a new window (on my computer rather than in my room as it’s still pretty chilly today) and look back at my last similar post to see how things have changed.

Currently reading…

…a family mystery called The Midnight Hour by Eve Chase. The book, which is mainly set in Notting Hill, London, swaps between two timelines – (one in the late 1990s and the other, the present day, twenty years later) and tells the story of Maggie and her little brother Kit. It’s the second book I’ve read by this author, and, although it’s not a total page turner like my usual murder mystery and police procedural books generally are, there are a few twists and turns and the storyline is holding my interest well. Unfortunately, it’s taking me a good while to finish any of my books at the moment as when I clamber into bed at around 10.30pm, I’m usually so tired that I can barely keep my eyes open to read a couple of chapters.

This year, I’ve got into audio books and although I haven’t purchased the above one on Audible, the next novel I have lined up was only £1.99 on Kindle and then £2.99 for the accompanying audiobook so good for my tight budget. Plus, it’s set in the USA, so I figured it would be nice to hear some of it read in an American accent. For my first audio book, Geneva by Richard Armitage, I read the whole thing on Kindle and then listened to the audiobook, whereas for my second read, I alternated between reading bits and listening to bits and I think I’ll probably do this for my next read too.

Currently loving…

…addictive word games. I’m a real fan of any kind of word game and a couple of months ago, I was introduced to Wordle and have loved playing ever since. The app, which I have on my mini tablet, features a web based word game where you are given six chances to guess a five letter word. Each time you guess a letter correctly, it turns yellow if it’s in the word but in the wrong location or green if it’s in the correct place within the word. There’s a daily puzzle which I enjoy doing straight after my breakfast to get my brain going and I also regularly compete against other players to be the first to get 25 points by guessing in as small a number of tries as possible. A good understanding of word patterns is put to use as you play and I find it great fun, particularly if I manage to guess the word within a couple of attempts.

Currently making…

…infusible ink projects to get more use out of my Cricut EasyPress 2. One of my goals for this year is to make a number of infusible ink and iron of projects using Cricut Design Space, my JoyXtra and my Easypress 2 medium. I’ve had a blank tote bag for a while now and also bought a set of 3 cosmetic bags in different sizes. I made a little bag for my niece last year but I wanted to do some designs for myself. This week, I’ve added a design to the tote bag using a gorgeous deep purple galaxy infusible ink paper. It didn’t turn out perfect as the ink didn’t completely transfer properly the first time, so I had to re-do it by trying to line the sheet up again, but it’s okay and I love the positivity of the sentiment.

I’m not sure that the photo shows off the colours and the sparkles too well but I experimented with hanging the bag in different locations and this was the best I could do without resorting to using my DSLR camera and Photoshop.

Photo credit: Laura Jones for Keeping It Creative

Currently working on…

… completing the initial chapter of my Marie Kondo Tidying Companion workbook. This was one of my goals for February but I didn’t realise how time consuming it would be. At the moment, I’m taking lots of photos of the storage we have upstairs and downstairs in out home, plus lots of snaps of the before of our home. My final task, when I’ve cropped and stuck in all of the photographs, is to pencil in a tidying timeline, set some intentions and record how I’m currently feeling about the process of decluttering my home.

Currently planning…

…a big garden tidy up, setting seeds, chitting our seed potatoes ready for planting and adding some more spring colour to our beds. I put my back out doing some (supposedly helpful) stretches in bed last week and it’s just starting to get back to normal after having to take co-codamol regularly for a number of days. Next week, my husband and I are hoping to schedule in some time to do some gardening jobs including clearing up brown and shrivelled leaves from the beds, mowing the lawn (which disgustingly is currently covered in bird poo from visiting woodpigeons) and cutting back various dead bits of plants. The council will soon be starting brown garden waste bin collections so we want to make the most of our payment for this service. I also want to get some new primulas to add a bit more bright colour as some of ours got killed off last year (who knows why!).

Final words…

I hope you’ve enjoyed reading my mini life update and it has inspired you to reflect on all of the things that you have going on right now. If you don’t have your own blog on which to share your “currently…” you could maybe try make a few notes in a journal under your own headings that you can look back on in the future to see how your life changes over time and with the seasons.

Wishing you a wonderful springtime,

Posted in creativity, journalling, memory keeping, reflective journalling

Creating my February highlights pages in my new journal

Over the years, I’ve tried lots of different ways of creative journalling in Traveler’s Notebook inserts that I’ve purchased or made myself. I’ve loved completing different pages and layouts but I’ve often found myself trying to record too many different things in far too much depth. This has meant many collections of photos and ephemera in various bits and pieces of storage which never got journalled about (I didn’t even get started on them), half finished pages (often with photos and decor stuck in with spaces to journal about events and experiences and numerous blank pages (where I’ve penciled in what is to go on there) left to fill in later. It’s also been the case in the past that, during periods of bipolar illness, I’ve struggled to get motivated to do any journalling when depressed or taken on too much when I’m high, leading to tonnes of half finished or barely started creative projects.

Although my bipolar disorder is better managed now, and my mood is much more stable, I still wanted to find a way to record things whilst at the same time ensuring that journalling does not become too onerous a task. I think I’ve now found a method that works and I’m excited to share what this looked like for February this year.

In January, I started a new TN wide journal insert as a memory keeping project for 2025 (and if it continues to work for me, beyond this). Each month, I intend to create a double page spread with the main highlights on including events, trips out, purchases and general happenings. I set up the pages at the beginning of the month with a background paper and the title and then work on filling it in just after the particular month has ended. Today I’m sharing my pages for February which I’ve just finished this week and a little explanation of how I set about doing them.

Monthly Highlights Journalling

The idea of doing monthly journalling came from Kelseyleigh over at My Abiding Journal on YouTube. She’s been doing summary spreads of each month for quite a few years now and I’ve picked up lots of tips and ideas from watching her videos so I definitely recommend subscribing to her channel and watching some from the archives as well as tuning in to the livestream of her process which offers so many ideas and the opportunity to purchase stickers to use if you join her on Patreon.

Personally, I’ve not joined Kelseyleigh’s paid tiers as I like to make my own stickers and ephemera using my Cricut machine. However, she has some lovely ideas for each month of the year and I think her members get to suggest ‘bucket list’ items for inclusion on her sheets.

A few tips for success

As well as picking up some tips from Kelseyleigh, I’ve also developed my own systems for collecting bits and pieces, photographs and ephemera. As a Canva Pro and Cricut Design Space user, I’ve also got into the habit of designing a set of stickers each month too. Here’s what I’ve learnt so far and what is working for me:

  • If you want to have a background to your pages like I have, it helps to choose a simple patterned paper and adhere it prior to doing your journalling. I’ve also found that adding the letters of the month using small stickers that I create using Cricut Design Space helps in seeing how much space you have to work with. If you don’t have alpha stickers, you could try hand lettering a title, stamping the letters or use a letter stencil, depending on your craft supplies and how you want your pages to look.
  • As you engage in different activities during the month, think about photos you could take (or source) which would provide a good record in your journal. For example, I’ve screenshot and then cropped online images of items I’ve purchased if I want to include a very small photograph of a product that I’ve been excited to buy. I’ve also tried to consider photos that I could take which aren’t too busy so as to be able to shrink them enough to add as part of multiple photos on my dedicated two page spread.
  • Throughout the month, consider items that you could stick into your journal (tip ins) for example a business card, parts of some packaging, your menu choices when you go out for a meal, a section of a leaflet or map etc.
  • Use a small envelope to collect mini photographs, patterned paper, tip ins (e.g. maps, business cards, packaging labels as mentioned above), stickers and ephemera for the month and store it in the back pocket of your BuJo or other planner.
  • Create a notes page in your journal or on your phone to store information about events and happenings you want to record, ideas for captions, stickers you want to add to fill spaces on your pages and any other creative thoughts you have during the month.
  • Create a folder on your phone to add any photos you want to use in your journalling. This means you don’t have to spend ages searching your photos, screenshots, downloads, uploads and other resources when the time comes to work on your pages.
  • Use Canva or the PicCollage app to add small photographs that can fit together to create a single image to print. I have a 4×6 and 6×4 inch template on Canva for this purpose as that’s the size that my Canon Selphy prints at.
  • Consider purchasing an instant photo printer such as a Selphy, Instax or Sprocket so you can easily add to your photo collection and make mini versions of images you want to include. Check online reviews for the pros and cons and different price points so you can choose the right one to suit your needs and budget. I have a Canon Selphy which I’ve been using for years but you might prefer photographs that have a sticky back so you can put them straight in to your journal without needing to cut them out and add adhesive.

My February highlights pages

As I’m currently trying out the monthly recording system, I’ve picked out a notebook that I had already made and which fits in to my Carpe Diem Traveler’s Notebook that I’ve been using for journalling for a few years. So far, I’ve found that not everything I want to record will fit into the double page spread in my TN wide insert but I want to trial using this size for the full year to see if I always have too much stuff to include. It’s helping me to decide which are the main highlights and is good at making me condense things down or just let a photo do the talking (wholeheartedly embracing the saying that a picture is worth a thousand words). I may, in future use a larger blank notebook but I need to make sure that I’m still able to fit in the time at the beginning of the next month to create the pages.

Photo credit: Laura Jones for Keeping It Creative

Final thoughts…

One of the main problems I’ve found with creative journalling is wanting to document all of my life in detail using photos captions and lengthy bits of writing. Although I love working on my pages, it’s impossible to cover everything and trying to can lead to lots of overwhelm and feeling like you can’t keep on top of it. Creative journalling should be an enjoyable experience and if it starts to stress you out, I think it’s really important to do some self reflection on why. Although I’ve only done January and February so far, the pages were a pleasure to work on and only took a few hours to finish. My only issue now is you decide which highlights to include and which to miss out.

If you’re struggling to keep up with your creative journalling and feel like you’re always behind and desperately trying to get up to date, monthly highlight journalling might be a good way forward. Also, there’s nothing to stop you doing an extra couple of pages if you want to document something like a wedding, birthday, holiday or other special event in more depth before returning to a double page per month.

I hope you’ve found today’s post useful and it has helped you to see the benefits of doing a monthly summary if you have minimal time to work on your spreads. If you would like me to share future finished pages please do let me know in the comments.

Posted in bullet journal, Bullet journaling, creativity, memory keeping, planner girl, planner lifestyle, Planning and journaling, reflective journalling

Setting up my BuJo for August 2024 – Birthday theme

Next month, I share my birthday with my niece, Lexi. She’s turning 13 and becoming an official teenager, and I’m going to be slightly older than that! So, I decided to go for a birthday theme for August. I seem to recall that I’ve chosen this particular theme before, but I haven’t even checked back to see my BuJo pages from that occasion, so I’m sure they’ll be completely different.

I hope you enjoy looking through my pages and that they inspire you to do something similar for your own birthday month.

The front cover

My cover was inspired by an image I found in Cricut Design Space. My birthday cake turned out quite different, but the basic shape with two tiers and four candles with stripes is the same.

When I’d finished the design, I outlined it using a Pigma Micron in 0.2 and this helped to detract from the bumpy marks where I shaded places that had a piece of ephemera on the page overleaf. I still felt something was missing and decided to add hundreds and thousands onto the iced cake, which I think made it look more special. I’m pleased with how it turned out despite initially being disappointed because of the marks on the right hand side.

Photo credit: Laura Jones for Keeping it Creative

The calendar

I found a few pieces of ephemera in my stash to add to these pages, and I then made a few more images to glue in using Cricut Design Space. I created the stars to add to the page to complement the ones on the cover.

Photo credit: Laura Jones for Keeping It Creative

Finances

This is my usual income and expenses tracker that I use to help monitor my spending with a few pieces of birthday themed ephemera for decoration. In August, I want to try to keep my purchases to only essentials in order to save money whilst I’m not doing university sessions over the Summer.

Photo credit: Laura Jones for Keeping it Creative

Record keeping and journalling pages

When Michael and I are taking a short holiday from work, the focus of my bullet journal pages tends to be recording events and places visited, plus a little bit of reflective journalling. I’ve set up a page for the dates around my birthday for the left hand side of the spread and a cute frame for a photograph of the two birthday girls, a number of decorative pieces from my stash and a little room for me to journal about bits and pieces from our celebrations.

Photo credit: Laura Jones for Keeping it Creative

Final words…

Thank you for visiting my blog today to have a look at my bullet journal set up for August 2024. I hope my pages have provided inspiration and ideas for planning, memory keeping and journalling for your own birthday or the celebrations of family.

Wishing you a healthy and happy August and don’t forget to plan in some ways to enjoy the summer now it has eventually arrived in the UK even if it has waited until the last month of the season!

Posted in Bullet journaling, goal setting, life hacks, lifestyle, memory keeping, planner girl, planner lifestyle, Planning and journaling

Creating a bright and colourful Summer Bucket List spread in my Bullet Journal

Last autumn, I set myself the challenge of creating a bucket list for each of the four seasons and making a Traveler’s Notebook journal for each in which to record all of my experiences across the year. This week, I finished setting up my final double page spread for the summer season in my Bullet Journal and I’m super pleased with how it turned out. The aim was to produce something inspirational using bright summer colours and images which embody the summer season. I enjoyed the process from start to finish and thought I’d share with you my finished product, explain a bit about how I went about setting it up and give a step by step guide to help you make your own.

Photo credit: Laura Jones for Keeping It Creative

Defining the season

The first step I took was decide on the dates for summer – I chose to base my seasons on the meteorological start and end which is June 1st to August 31st, but I could have opted for the astronomical period which cites the beginning as Thursday 20th of June to Sunday 22nd September. It’s obviously up to you which you go with and you probably already have your own idea when summer falls.

Brainstorming ideas

Initially I look at a range of bucket list ideas on Pinterest and noted down any which appealed. I also spent some time thinking about what summer means to me e.g. going to the beach and activities I enjoy doing such as birdwatching, photography, tasting summer fruits and going for walks in nature. As we’re off on holiday to Wales for a week next month, I then researched places to go and things to do in the local area which I could add to my list.

If you end up with a huge, long list of ideas, think about which activities most excite you, which fit in with your priorities for this year (e.g. relaxation, having fun, being adventurous, learning new things etc.) and which feel most realistic.

Setting some achievable goals

Whilst adding items to my list, I tried to make sure that there we’re some quick and easily achievable goals and some which will take more planning and organising. It’s also important to consider your budget, time constraints and any other commitments you have. It’s no good writing that you want to do a hot air balloon ride if you have no idea of the cost and haven’t researched locations from which these are available.

Creating a visual representation

For my bullet journal inspiration board, I selected some stickers from my stash and made some in Cricut Design Space. I even chose to add some real photographs of the places we would like to go, so I have an image of my local beach, and pictures I found online of Yorkshire Lavender and the two National Trust places we intend to visit during our holiday in Wales. I also found some tiny stickers to fill in the gaps between the bucket list items.

Of course, you don’t have to create a concrete visual representation for display. You might choose to simply close you eyes and picture yourself doing the activities and thinking about how they would make you feel or you might just write your list and put it somewhere you can regularly refer to.

Planning the details

For each activity, I’m now spending time fleshing out the details. So, for example, I’ve found what looks to be a simple and tasty recipe for strawberry lemonade and added it to Notion. I’ve written down the postcodes and travel times for the National Trust places and the RSPB reserve and have done some reading so I know what to expect when we go. I’ve also noted costs involved for different items and have purchased my summer novel on Kindle (for 99p!) and seasonal jigsaw puzzle already.

Final words…

I hope I’ve inspired you to make your own bucket list for summer 2024 full of exciting activities you’d like to try and maybe some old seasonal favourites. Creating a plan which is unique to you, is a great way to explore possibilities for the upcoming months so as to ensure you make the most of all of the free time you have available to you.

Wishing you a fun summer,