As August is fast coming to a close, my thoughts have turned to the approaching Autumn and what I’d like to achieve and have fun doing over the next three months. My mind is brimming with ideas, and, as has become my routine for the last couple of years, just prior to the beginning of a new season, I work on writing a bucket list, planning things to ensure I live intentionally and in line with my core values.
In today’s post, I’m excited to share my bullet journal pages in which I’ve created a bright and colourful double page spread for my Autumn 2025 bucket list which serves as a reminder of my plans and provides inspiration to keep me on track. I’m also going to explain a little bit about the process I go through to come up with the best, personalised ideas which reflect what I want in my life currently. Finally, I thought it might be helpful to provide some detail about each of the items on my list and why I chose them.
How I prepared myself for creating my autumn bucket list
- Reflection and reconnect – I took plenty of time to look at previous bucket lists and plans. I asked myself lots of reflective and orientating questions such as – what did I enjoy in the summer time? are there any activities that I would like to continue doing? what did I focus on in previous autumns – do I want to revisit any activities, or, are there things on my lists that I didn’t get around to but would still love to try? I also checked in with my vision board for the year, again asking more probing questions including what are my priorities and intentions for 2025? what kind of seasonal activities fit in with these? which classic activities and pastimes do I associate with autumn? what do I most love about the autumn season? what memories do I hope to create? what do I need emotionally right now? (e.g. comfort and cosiness, connection with others, rest and recuperation, creativity and expression, a fresh perspective, a new sense of purpose, self compassion etc) which activities are likely to instill these?
- Gather inspiration – I asked friends and family members to share their favourite autumn traditions and talk about what they look forward to the most about the season. I also went online seeking ideas – Googling ‘autumn bucket list ideas’ checking out Pinterest for all things autumnal and searching tags on Instagram including #autumnaesthetic, #autumnvibes, Finally, I took time to explore what’s on in my local area over the coming months and if there were any events I’d like to attend.
- Jot down anything that resonates with me – as I did the above, I jotted down anything that came to mind or resonated with me, include activities to try out, things to start doing this autumn, moods or vibes I want to create and how I wish to feel.
My Autumn 2025 Bucket List illustrated in my BuJo
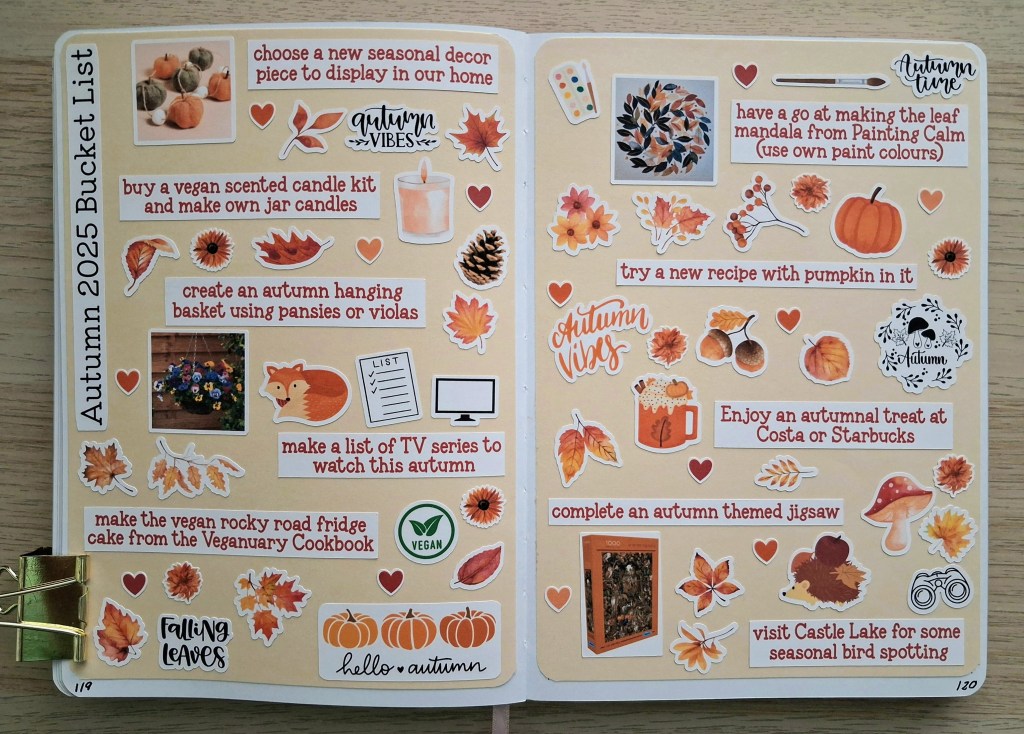
I chose a neutral colour background from the 12×12 paper pack I purchased Dovecraft to ensure all of the items on my bucket list and the decorative stickers I made stoodout and created the most impact. I also selected a colour palette of deep red plus shades of orange, yellow and brown to give the pages an autumnal feel.
My chosen bucket list items explained
- Choose a new seasonal decor item to display in our home – I love changing up our home decor each season and I’ve got quite a collection of autumnal items to display. I do think it’s nice to pick out one or two new items to add each year and I’ve already been looking online for inspiration. Although it’s not quite autumn yet, I’ve already spotted a pumpkin garland on the Lisa Angel website that would make a lovely addition (okay, I might have cheated and ordered it already but it won’t go up until September 1st!).
- Buy a vegan scented candle kit and make own jar candles – I love scented candles and I’ve been wanting to have a go at making my own for a while now. I’ve found various suitable beginner kits and I think candle making is a really nice, cosy activity to do with my husband one weekend. Crafting together is always fun and a wonderful way to strengthen our emotional bond. I’ll be opting for a scent that I associate with winter time so that we can use our handmade items later in the year.
- Create an autumnal hanging basket using pansies or violas – We’ve been making our own summer hanging basket arrangement for the past couple of years and I love the charm that it brings to the front of our house. I thought it would be nice to have a go at making an autumn one this year in rich seasonal colours, and my mum said that pansies or violas would be good choices.
- Make a list of TV series to watch this autumn – There are always lots of great dramas on the TV as the nights draw in and to ensure we don’t miss any must sees, I like to make a list in my bullet journal. My husband and I both enjoy crime and psychological dramas and watching an hour of TV together is a nice way to relax after a busy day.
- Make the vegan rocky road fridge cake from The Veganuary Cookbook – In January, I made a vision board for the year and something I wanted to do in 2025 was eat more plant based. We’ve made lots of recipes from the cookbook so far, but until recently, we’ve mainly done main courses. After flicking through the dessert and bakery chapters in our cookbook I found the perfect quick and easy to make recipe that I can’t wait to try.
- Have a go at making the leaf mandala from Painting Calm (using own paint colours) – I found a lovely book in a National Trust shop last year which focuses on connecting to nature through the art of watercolour and my husband bought it for me for Christmas. There are so many different exercises and projects to try and, as I’m keen to spend more time developing my watercolouring skills, I’ve added an autumnal idea to my bucket list.
- Try a new recipe with pumpkin in it – For almost a year now, my husband and I have enjoyed the taste and health benefits of lots of home cooking. As part of this, we try as much as possible to eat seasonally. During the autumn, the supermarkets are full of nutrient rich pumpkins and other squashes and we love trying different varieties and experimenting with different recipes.
- Enjoy an autumnal treat at Costa or Starbucks – Going to a cafe for coffee and cake is a regular pastime of ours but we tend to opt for the same drinks and sweet treats each time. It’s always good to try something different and both of these chains bring out seasonal flavoured drinks and limited edition bakery items so there’s bound to be something new to try.
- Complete an autumn themed jigsaw – There are so many benefits of doing jigsaw puzzles and I find them great for helping me to maintain good mental health. I’ve already browsed a range of autumn themed jigsaws online and I’ve picked one out to treat myself to next month so I made a sticker from the Amazon image and added it to my bullet journal spread.
- Visit Castle Lake for seasonal bird spotting – My husband and I love spending time in nature and one of our favourite outdoor activities is bird spotting. Last week, I was looking online to see if I could find any nature reserves that we haven’t yet visited, and I came across a place called Castle Lake. Their conservation group website describes the place as ‘a haven for wildlife enthusiasts and nature lovers’ and promises an enjoyable circular walk so I added it to my list straightaway!
Final words…
I hope you’ve enjoyed seeing my bucket list for this autumn and reading about why I picked each of the items on it. During the season, I will look at my bullet journal double page spread regularly when planning out my weeks and days. For any items that fall into the project category (such as candle making), I’ll sit down and do some goals planning, such as turning them into SMART goals and outline key action steps. I also like to tick off items as I go along (yes I made myself some little tick stickers on my Cricut!), whilst at the same time remembering that my list isn’t something to work through and ensure I get finished by the end of November, but simply a collection of intentional living ideas to help me and my husband make the most of the coming autumn months.
Wishing you an amazing autumn season,