Hi all, I hope you’re doing really well and enjoying the Springtime with its (slightly) warmer weather, bright and cheerful daffodil displays on verges and in gardens, morning bird song and emerging butterflies and bees appreciating the sight of the first flowers. In today’s post, I’ll be sharing my bullet journal pages for April in which I had great fun creating bright and colourful bee themed spreads. I’ve seen quite a few insects over the last few weeks including ladybirds, butterflies and bees and I love to watch them exploring our garden so this is where my inspiration came from for the upcoming month. I’m really pleased with how the pages turned out and I hope you enjoy looking at them too. I’ve provided minimal explanation but if you have any questions, I would be more than happy to answer them.
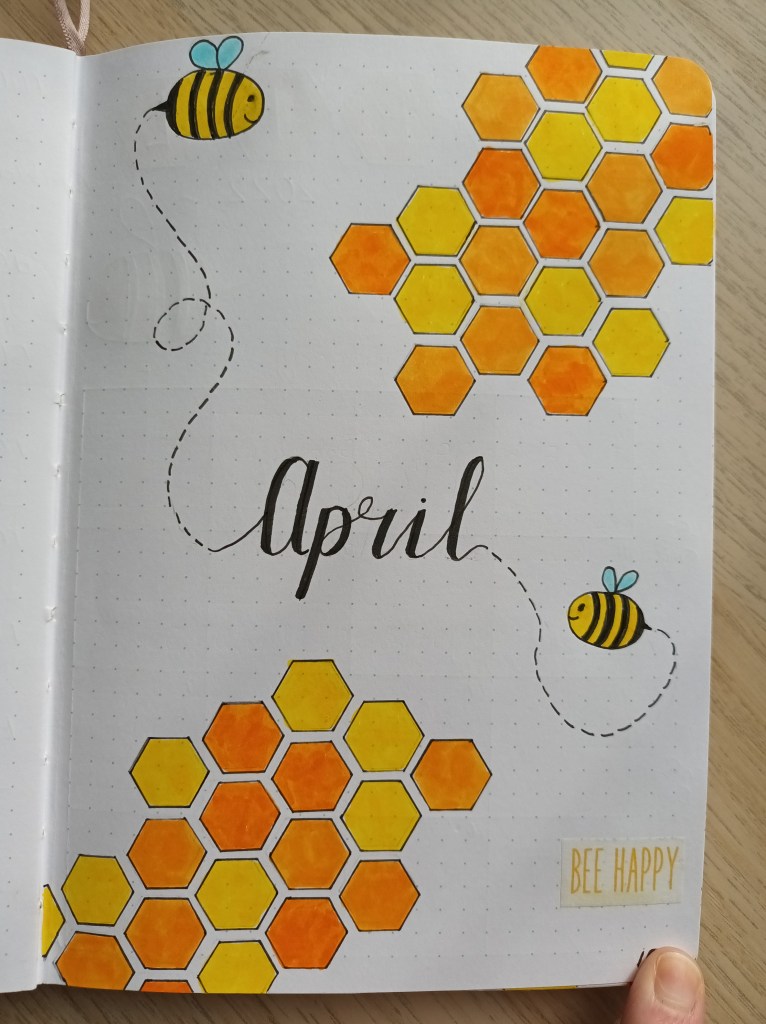
Cover page
Now I’m feeling better, I’ve gone back to creating cover pages for each month and decorating all of the spreads. This one uses two different yellow colours of Tombow dual tip pens (055 and 985) and a Crayola Supertip. The hexagons were drawn using a Helix stencil so it didn’t take me too long to do lots and colour them in. As I’m not too great at drawing, I went for a cute cartoon style bee!
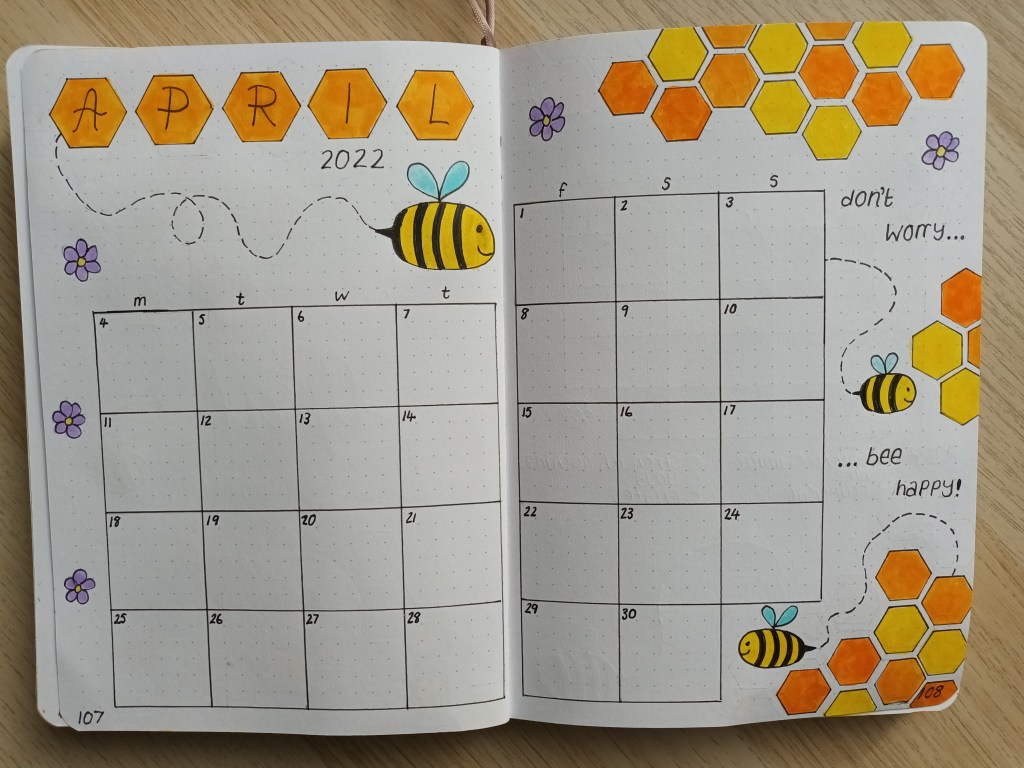
Monthly Calendar
This is my usual layout with 6×6 boxes which leaves plenty of space for decor around the edges. I also added some flowers to go with the bees and honeycomb, filling in a few bits of white space nicely.
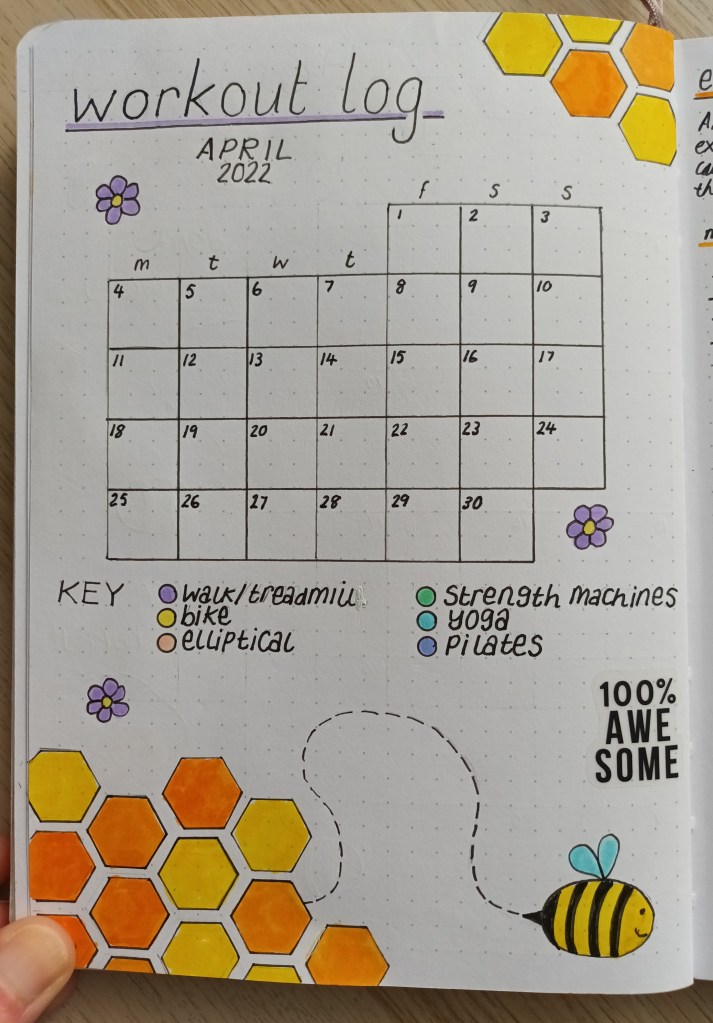
Workout log
As one of my current goals is to work on toning by body, I decided to keep a record of all of my different workouts. At the moment, I’m doing cardio at the gym on Monday, Wednesday and Friday mornings, plus one session a week using the strength and muscle toning weight machines. I’m also continuing to do yoga five days a week and have put myself on the waiting list for Iyengar yoga and Pilates at the wellness centre (it’s proving to be really hard to get onto the classes as they’re so popular).
I’ve created a small calendar spread which is big enough to record multiple workouts per day. I’m going to add a coloured dot each time I do a particular workout. In May, I might also track the time I spent doing each activity but for now I’m just going to log each kind of exercise I do.
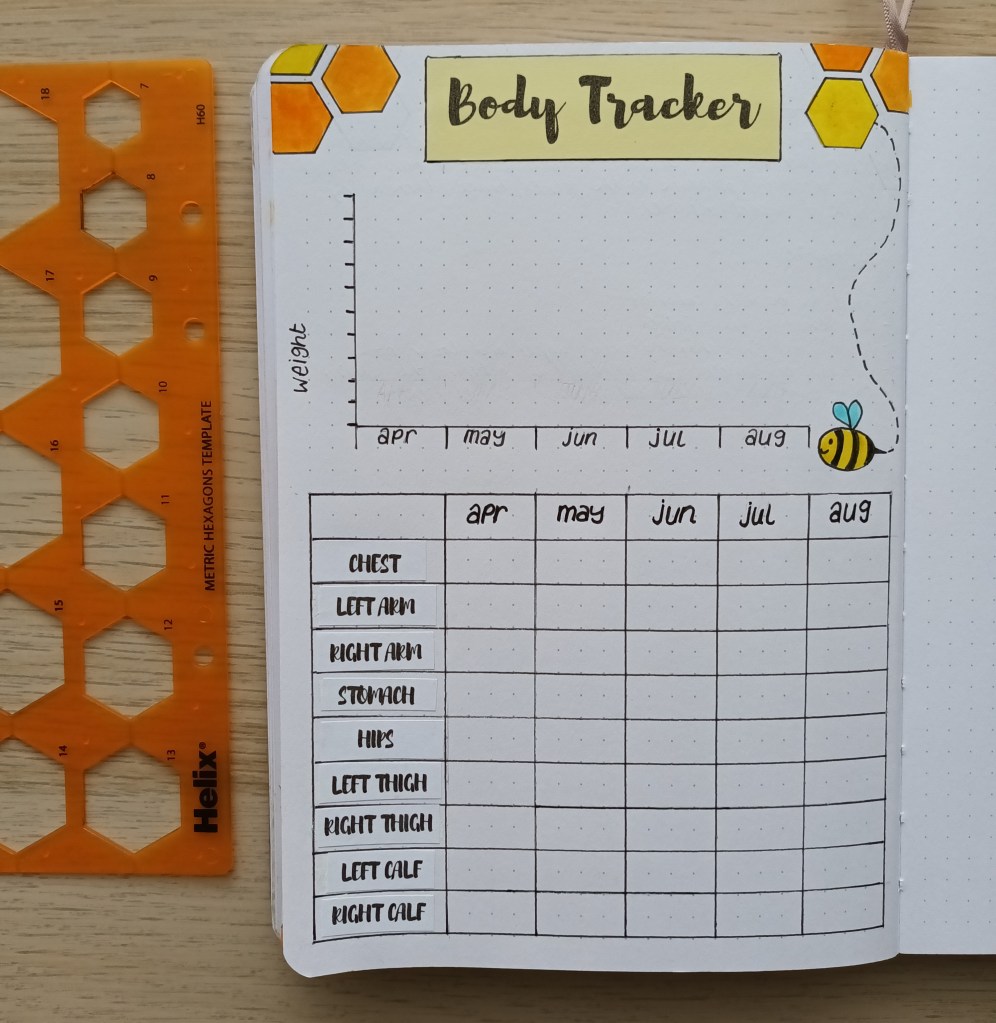
Body Tracker
Earlier this week, I mentioned I was using the SMART goal framework, to help me come up with detailed plans of my current goals. As well as measuring my weight to see how many pounds I’ve lost each month, I’m also going to take my body measurements regularly so I can see progress in this area too.
Missing spreads
I’ve chosen not to include a gratitude log and yoga session tracker for April as they’re time consuming to set up and I want to focus on my gym workouts and improving my fitness levels. When I’m well (not too high and not feeling low), I tend to spend time reflecting on what I’m grateful for anyway so I figured it’s okay to take a little break from writing things down. Also, I can see which online yoga workouts I’ve done recently by checking my YouTube history. It won’t be as easy to see the variety of sessions, to make sure they’re well balanced, but it will still give me some idea of what I’ve done. I can always put them back in place in May if I miss filling them in.
Final words…
I hope you’ve enjoyed seeing my BuJo spreads for April. They’re certainly bright and colourful and better to look at than today’s grey skies and snow showers! Let me know in the comments what theme you’ve chosen for the upcoming month and if you’ve shared your pages on your blog, I’ll be sure to check them out.
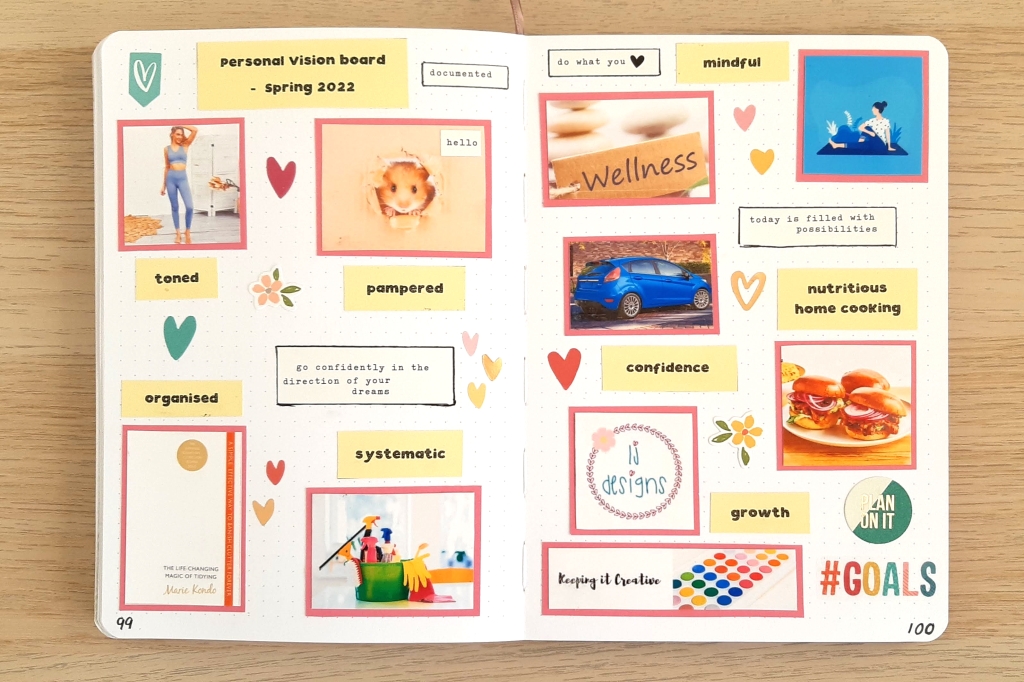
When I start to feel better after a period of depression and anxiety, I tend to have lots of ideas for how I want my life to be now and what I want for my future. To avoid becoming overwhelmed, stressed and potentially causing a hypomanic episode (due to having bipolar disorder), I like to spend time taking a step back, really thinking about what I want for myself and asking myself some big questions. After reflecting, I like to create a visual reminder in the form of a vision board. In today’s Monday Matters I thought I’d present a beginner’s guide to vision boards and show you how I design and create mine in my bullet journal so that you can make one too.
What is a vision board?
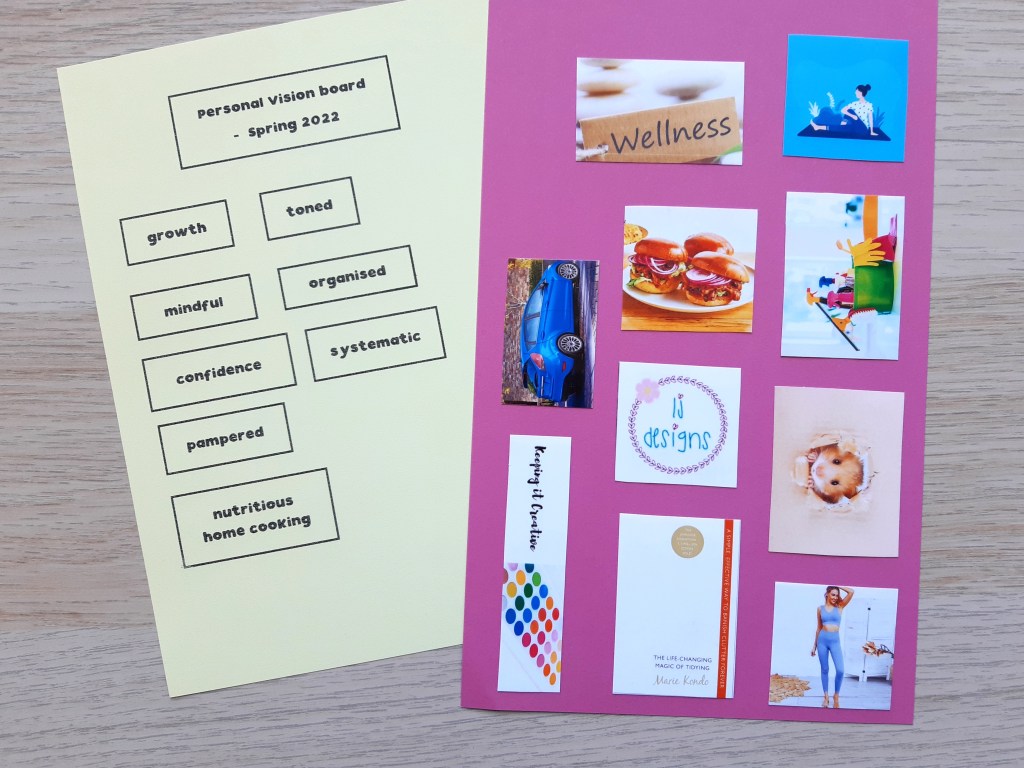
A vision board is a collage of images and words which represent your current wishes and goals. It is used as a reminder of what you hope to achieve and aims to provide motivation and inspiration. Vision boards can be paper based or digital. They can contain as many words and images as you want but I find they work best if they’re relatively simple as then you are only working towards a small number of goals. Whereas a digital vision board works best if it fits onto your computer screen, a paper based vision board can be any size of your choosing. I created a large A1 sized board for my business and have the images and words pasted onto a black piece of card which is inside a clip frame. The vision board is on the wall in my craft room and I love looking at it regularly. My personal vision boards are usually created in my bullet journal on a double page spread and contain words and images from magazines as well as printouts from online resources like Pinterest. Click here to see an example of one I created during lockdown.
Your vision board can have a particular theme e.g. health and wellbeing, your word of the year etc, or it can be more general and include personal and/or professional related goals. Whichever style you choose, you need to spend some time reflecting on what you want your life to be like now and what you hope your life to look like in the future.
Some key questions to ask yourself:
What is most important to me in my life right now? (e.g. happiness, good health, work-life balance etc)
What are my core values? (e.g. family, creativity, self confidence, education, happiness, growth, self awareness etc)
What did I used to do in the past that I would like to start doing again now? (e.g. have lots of fun, meet friends for coffee, go to the gym, spend quality time with family etc)
What experiences would I like to have in the future? (travel the world, start a family, learn to swim, attend an art course etc)
What are my current interests or hobbies? (e.g. sewing, bullet journalling, watercolour painting, hiking, getting fit, baking etc)
Do I currently spend plenty of time engaging in things I enjoy? (e.g. I don’t feel I dedicate enough time to having fun, I always make time for my hobbies and interests etc)
What bad habits do I want to break? (drinking too much alcohol, going to bed late, eating unhealthy snacks, too many takeaways, spending too much time on social media etc)
What good habits do I want to instill? (e.g. exercise for 30 minutes 5 times a week, drink more water, eat more fruit and vegetables, starting a gratitude practice, meditating each morning, read one self help book each month etc)
What little things do I want to put in place right now? (e.g. daily gratitude, healthy breakfast, in bed by 10.30pm etc)
What are my big dreams for the future? (e.g. to write a book, to be a minimalist, to own a 3 bedroom home, to move to Australia, to travel the world, to have a family etc)
What can I do now to help me work towards my dreams / goals?
How will I feel when I achieve my goals / dreams? (proud, happy, confident, calm, successful etc)
How do vision boards work?
Vision boards only work if you do! By this, I mean that choosing representational images and words to describe your desires, goals and dreams is not enough to achieve them. You also need to identify steps to take to work towards what you want and create habits which will help you (or break habits which are not helpful). A vision board provides a useful visual reminder and, when looked at on a daily basis, can be used as a prompt to spend time evaluating and reflecting on your progress towards your specific goals and wishes, looking at any obstacles that have come up and how you will remedy problems. It can also help to motivate you into action – especially if the images and words you have chosen are exactly what you desire and spark great attraction.
What I find useful is to accompany my vision board with a page of notes. I write down what each image represents and also record what I need to do or not do to work towards achieving my vision. I can then move on to identify the baby steps I need to take to have the best chance of achieving my goals. Reflecting on your progress regularly and setting new small goals is also really important if you vision board is to have the best chance of working.
Designing your vision board
The design of your vision board should suit you and your lifestyle. If you prefer to work digitally, you could create a vision board to display on the desktop of your computer or even create a vision board on Pinterest using attractive images and motivational sayings and quotes. If you like to get creative, you might do a cut and paste from your favourite magazines – try flicking through them and see what resonates with you. You can even cut out individual letters or words to put together to make motivational phrases (a bit like a ransom note but full of positivity instead!). Use pictures which sum up exactly what you want, for example an image of someone who is smiling can represent wanting to feel happier in life, a big house in the countryside can show that you would love to live in a more rural location, a passport and pictures of key locations in a Paris e.g. The Eiffel tower and a cruise boat on the River Seine, would be good to remind you that you really want to visit the capital of France.
I like to create a double page spread in my bullet journal as this is something I look at multiple times a day and use morning and night. You can read about the process of setting up my vision board below.
Creating a vision board in your bullet journal
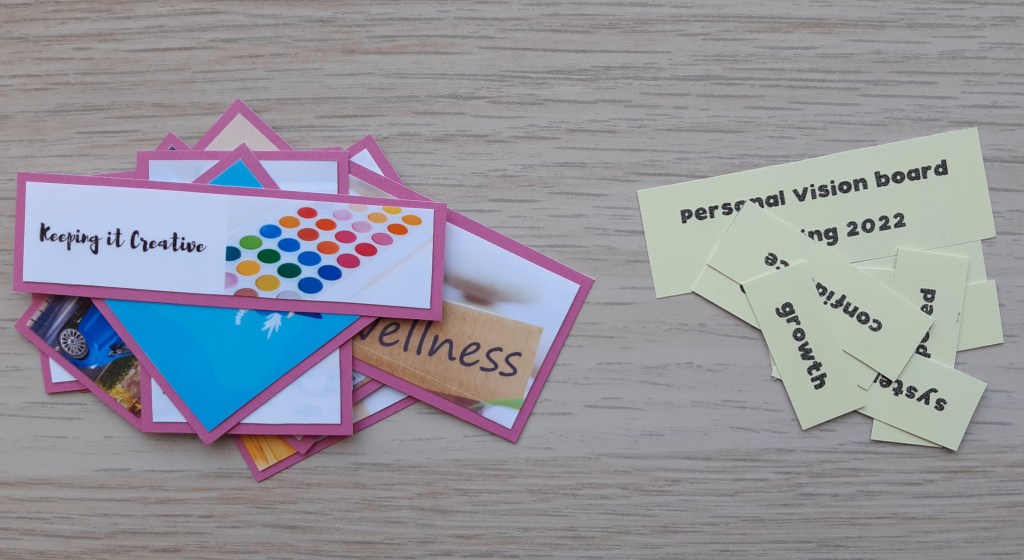
Image selection I find the best way to create my vision board in my bullet journal is to use photographs which are available online. If you use images from magazines, they may be vastly different in size. If you search chosen key words online you can spend time looking through the different pictures and find one which is suitable for what you want and then resize it to fit (I make the width of my images around 4cm – 6cm). I placed the photos into a document on MS Publisher which was 4x6in and then printed the pages out on photo paper of the same size using my Canon printer.
After that, I cut them out using my small Fiskars guillotine and backed them on mid pink coloured paper to make them stand out. The backing of the photos was rather time consuming, especially as you really need to use double sided tape for photograph paper. The process could be speeded up using a roller tape but if you’re limited for time, you could just stick the images straight in to you BuJo. I left a tiny border of pink as I wanted the photos to take centre stage.
Motivational words Again, I create the words myself in a MS Publisher document rather than looking through magazines so I can play around with the sizing, font and specific word classes e.g. verb, adjective, noun etc. I also chose to print them on coloured paper so that they stood out from the white paper just like my photos. It’s up to you how you produce your words – you could create stickers, stamp them onto paper, cut them out and stick them in or hand letter them for example.
Playing around with placement Once you’ve got your images and words ready, it’s time to try out different placements until you’re happy with how they’re arranged. It’s a good idea to experiment with different layouts and then take a quick photo of your double page spread each time so you can always revert back to a previous arrangement. Once your happy you can paste everything in. You might choose to add some decorative elements to any spaces, for example, if you’re creating your vision board for the Springtime, you might add flowers, hearts in Spring colours, butterflies, motivational words etc. This could be in the form of stickers and ephemera like mine or, if you’re good at drawing, you could create something using spring coloured felt tip pens or coloured pencils.
My finished vision board in my bullet journal
Final words…
I hope today’s blog post has inspired you to create your own vision board as a motivational tool for working towards your goals and dreams. Remember that vision boards are a great way for clearly identifying what you want for yourself now and in the future but as well as creating this attractive and motivational tool, you also need to identify progressive steps going forward and also dedicate time to work on making your hopes a reality.
Do you currently use a vision board or is it something you would like to have a go at creating? What would be the most prominent image or idea on your board? Let me know in the comments below.
This month, I moved into a new bullet journal – a gorgeous handcrafted linen notebook from Notebook Therapy. The journal is completely blank so I set up the usual index, future log and grid spacing cheat sheet. Then I decided that I wanted to create a spread which was full of messages of support and encouragement to help me whilst I’m struggling with my mental health. The idea is that I read all of the positive content each morning a bit like you would a list of affirmations. It took me quite a while to make but I’m really pleased with how it turned out so I thought I’d share the results on here and talk a little about the process.
Creating the background
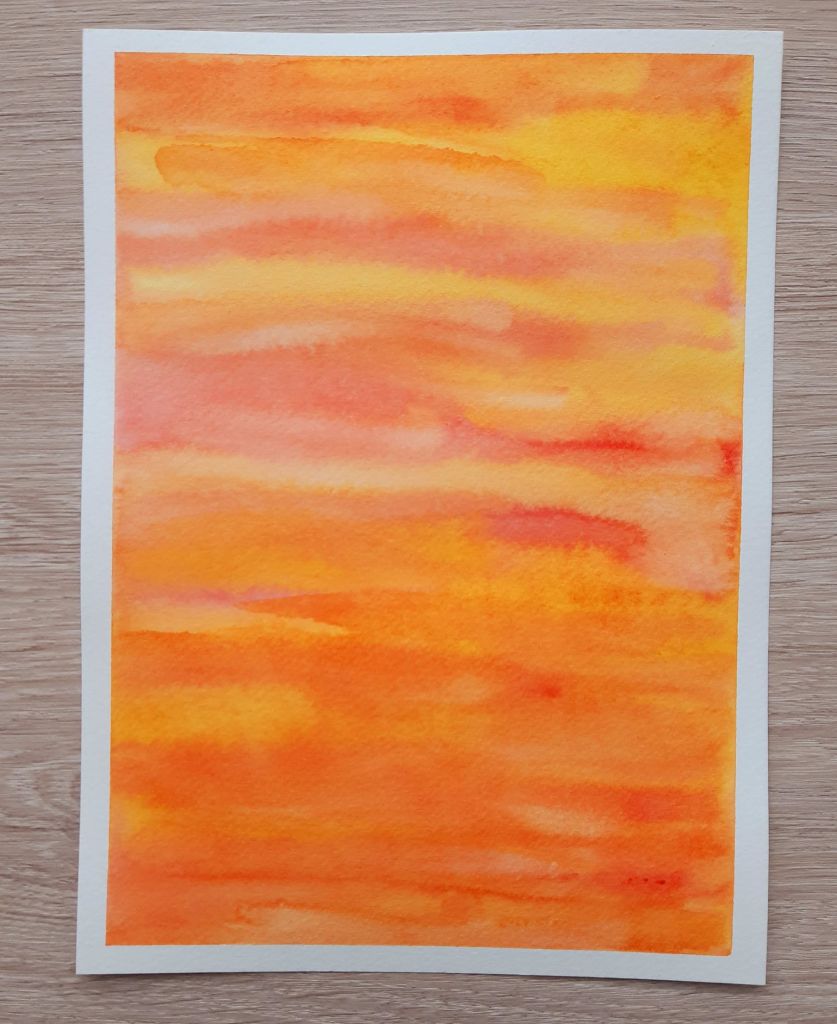
A watercolour wash
I wanted something bright and cheerful for the background so I decided to create a wet on wet variegated wash using just two of my Winsor & Newton Cotman watercolour tubes – cadmium red and gamboge yellow hue. I used an A5 piece of Aquafine smooth paper and taped the edges down so I got nice clean lines. After coating the paper with water, I swished the first colour back and forth from the top to the bottom, leaving gaps between the paint strokes. I then did the same with the second, filling in the gaps but also sweeping over the first colour slightly so that they nicely blended together. I was really pleased with the effect I achieved. When the paint was dry, I removed the tape and then scanned the piece in using my printer/scanner. I then printed it off twice, trimmed the papers so that they would fit perfectly in my bullet journal and stuck them in using double sided tape.
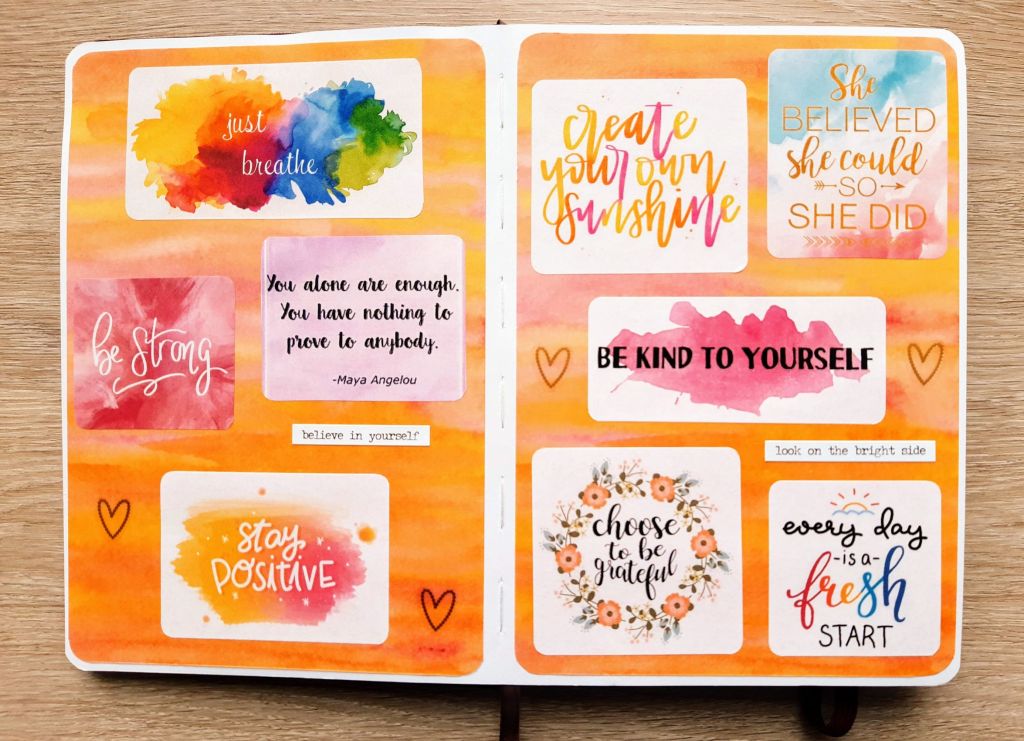
Finding the supportive messages
When I’d created my backgrounds and stuck them in, it was time to find some messages to stick on the pages. I spent a while thinking about what I’m struggling with at the moment and some words of positivity that I could focus on. So, for example, I’m being really hard on myself and self critical so I chose a ‘be kind to yourself’ message and a quote about being enough. Most of the images were found online by typing them into an image search (a lot of them are actually phone wallpapers cropped to size). I also got a few from a Tim Holtz Small Talk idea-ology sticker book but you could just as easily type onto plain paper and cut and stick them. I created a MS Publisher document to add the images to and cropped them and altered the size until they would all fit into the double page spread. I then printed them onto an A4 sticker sheet to make it easier to stick them in but you could easily use an A4 sheet of paper and cut them out using a paper trimmer.
What you choose to put in your spread or board would depend on the particular difficulties you’re facing. For example, you might need some confidence boosters, help with dealing with anxiety, messages to encourage you to manage your depression or some little reminders about positive body image and loving the skin you’re in. Here’s some ideas to get you started:
Confidence boosting – You’ve got this. You’re more powerful than you think. Inhale confidence. Exhale doubt. Believe in yourself. Self confidence is a super power. Once you start believing in yourself magic starts happening. I can and I will.
For dealing with anxiety – Everything is going to be alright. I can’t control everything and that’s okay. I am stronger than my struggles. Just breathe. My anxiety does not control me.
Managing depression – I am strong. I can get through this. Life is tough but so are you. Keep going. I’m enough. Stay positive. Choose to be grateful. Think positive and positive things will happen. Everything’s going to be okay.
Body positivity – Happy, beautiful and strong. Your body loves you. Love it back. My body. My goals. My happiness. Be kind to your body. All bodies are good bodies.
Final words…
I made a spread in my bullet journal because it’s somewhere I look every day. However, if you’re not into bullet journaling, you could just as easily create a board out of a piece of coloured card to go up on your wall or some other place to look each morning. As an alternative to searching online, you might choose to use post it notes to write messages to yourself or cut small pieces of paper and use brightly coloured pens for your reminders. The most important thing is to make sure you look at what you’ve made frequently so you can try to take on board the supportive statements.
I hope you have found today’s post interesting and it’s inspired you to have a go at creating a similar ‘Words of encouragement’ spread. Let me know in the comments what you think you would benefit from telling yourself each day.
At the end of April, as part of my post on self-awareness and self-acceptance, I mentioned the usefulness of mood trackers as a way of learning more about how your mood changes and about different things which impact your mood. Although there are hundreds of examples of bullet journal spreads featuring decorative, pretty and colourful trackers (just type #moodtracker into Instagram or search Pinterest), I find that many are a little basic and are more about aesthetics than being an effective learning tool which helps you manage your mood. So, today, I’m going to explore why mood tracking is helpful and discuss some more useful ways of tracking your mood which go beyond colouring in shapes to show if you’re happy, sad or neutral.
Why track your mood?
You might simply track your mood to see if you spent more time feeling happy than sad during any given month but there are so many more benefits to be had such as:
It can help you to better understand your triggers and their impact – as well as genetic and physical factors affecting your mood, social and environmental factors play a big part too. By learning about your triggers, you can take steps to minimise the effect and work on developing healthy coping mechanisms.
Enables you to identify patterns – after you’ve tracked your mood for a while, you can start to look for patterns, so for example, you might notice that you always feel particularly stressed or down on a Monday after a weekly meeting at work, or anxious in the build up to going supermarket shopping on a Tuesday, or you might notice that a period of depression always kicks in at the end of Autumn and lifts when the weather starts to become brighter in the Springtime.
Helps you to develop strategies for managing your moods – when you’ve established patterns, you can then work on developing strategies to combat the effects of various triggers, such as working on positive self talk, doing relaxing breathing meditations, scheduling in something fun on a Monday evening, connecting with nature or getting a little Winter sunshine.
Helps you to track your progress – once you’ve put the various strategies in place, long term mood tracking can help you to see if what you’ve put in place actually works. And if you know specific things are really useful, you can do more of them!
Can help you to get an accurate diagnosis or appropriate self help strategies – you can take the information you’ve collected when you see a mental health practitioner such as a community psychiatric nurse (CPN) or your psychiatrist and then can use this to help you get an accurate diagnosis or to to make suggestions on how to manage your symptoms more effectively.
In fact, mood tracking is a key element of CBT (Cognitive Behaviour Therapy) and related exercises are often given as homework due to the fact that they can really help you manage your mental health much more effectively.
Issues I’ve had with keeping a basic one page per month mood tracker in my bullet journal
One of the first issues I had with a basic mood tracker was that my mood changed so much throughout the day that I wanted to record it all and ended up splitting the shape or section for that day into about 4 different colours e.g. I was tired first thing, then I was annoyed about something someone had said, then a little later in the day, I received some great feedback and I was happy, then by the end of a busy day I was either exhausted or extremely stressed at the amount of work I had to do the next day. A more useful idea is to record each time your mood or emotional state changes and what has made it change (i.e. the trigger or circumstances). Then you can come up with some strategies to combat the moods which are causing difficulties e.g. developing relaxation techniques, reframing particular thoughts and feelings, talking about things that are causing you to feel stressed etc.
Also, I think that a lot of mood trackers become restrictive when they only have a set number of moods such as happy, sad, neutral, tired and stressed. What if you feel embarrassed and it had a huge impact on your mood? What if something someone said has made you feel completely inadequate and this leads to feelings of self doubt and lots of negative self talk? There are so many different moods and I think it’s important to recognise them all. I downloaded and laminated a mood wheel a while back now and have found it really useful to find the words to pinpoint exactly how I feel. There’s lots of these available online and this one is available here.
A wheel showing every mood and feeling you could possibly think of!
Finally, recording your mood is more useful if you also take the time to journal about what caused the mood / emotion and the impact it had in terms of thoughts and subsequent behaviour. Then, you can come up with ways of going forward.
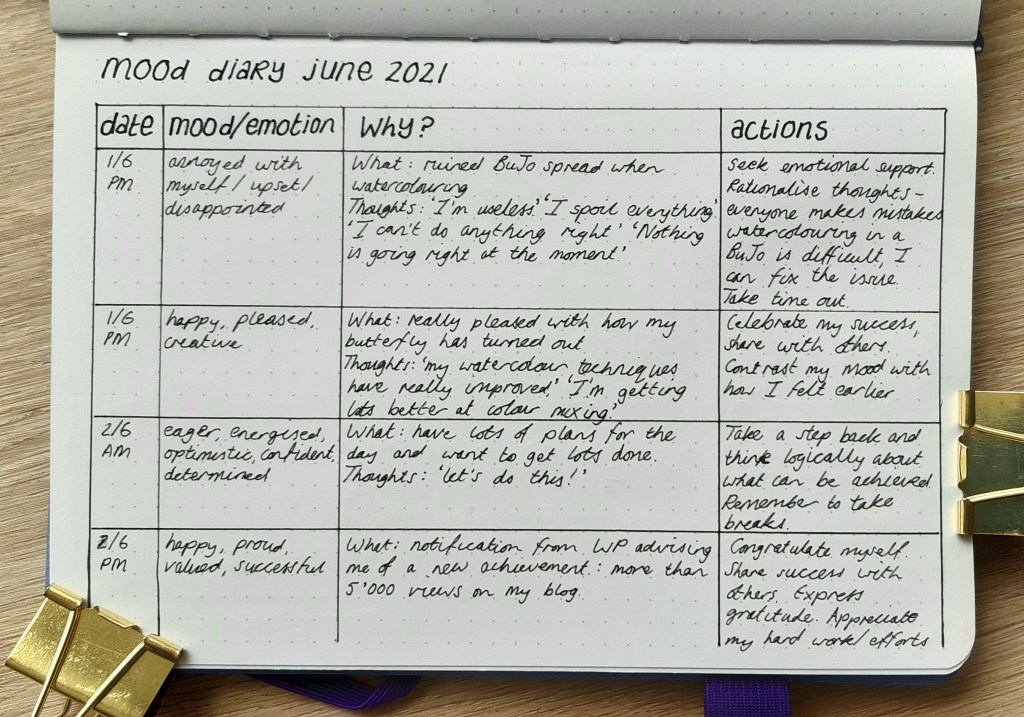
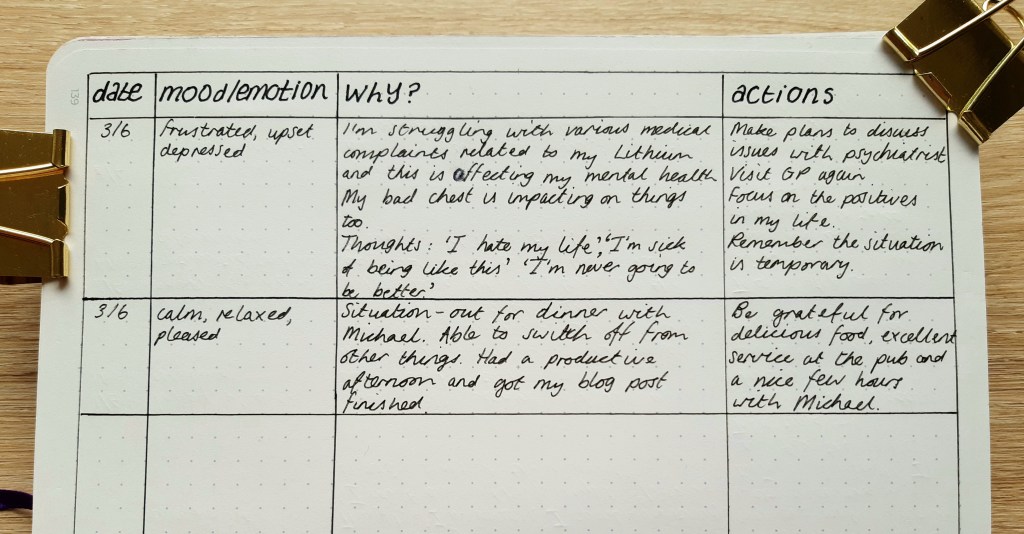
My idea for a more useful mood chart for your bullet journal
It took me a while to come up with a set up which isn’t too onerous but is helpful in identifying moods and emotions and can also be used to record action techniques such as those I learnt in CBT, Compassion and Mindfulness sessions to manage the moods. The main focus, I guess, is on negative moods but it’s also important to recognise positive moods so that you can try to find ways to inject more positivity whilst making sure that you don’t get too high if you are inclined toward mania or hypomania.
Obviously, this is an idea that I think will probably work for me so bear in mind that it might not suit you, but I hope that it might give you an idea for a layout which you can modify to fit your own needs. You might also think that the chart is time consuming, and yes, it does take time, but, if it helps you deal with your moods effectively, I think it’s well worth doing.
The date and mood/emotion columns are pretty self explanatory and I’m using the above wheel to help me best describe how I feel. The ‘why’ column can be used to identify the circumstances which caused the mood such as lack of sleep, a particular situation that you faced, a comment made by someone or an event which has occurred or may be about to happen. You might also like to record your related thoughts as these can really impact on things too. The final column ‘actions’ could be used to identify ways of improving your mood or providing a remedy to high levels of stress or excitement. Some ideas include:
work on reframing the thought that made you feel bad in some way
take it to court to consider the evidence for your thoughts / beliefs – this is a great CBT technique and you can find related PDFs here.
plan in some relaxing activities to combat stress / help you relax
talk to someone about what has happened with a view to getting an alternative point of view
go for a walk in nature
find something else to focus on if you’re finding yourself ruminating
A useful way to track bipolar moods
For bipolar disorder symptoms, the free charts from Bipolar UK are great for tracking changing moods so you can recognise signs that you are slipping into a depressed mood or becoming hypomanic or manic. My personal preference would be more room to make notes about triggers, so I would use the first sheet as to record my mood and then create a weekly page for information about events, triggers, wellbeing activities or interactions with others.
Using an app on your phone
If you’re not a fan of pen and paper methods, you could always track your moods on your phone. I’ve found several options and some are more in depth than others. These are all available for both iOS and Android but there are some I’ve read about that are just available for iOS). As with all apps, if you want access to all of the features, you’ll need to pay a subscription for Premium access, but there are some which offer simple ways of recording basic information and tracking things over time.
Daylio This one is particularly popular and, due to it having lots of clickable icons, you can quickly record how you feel, state what your sleep has been like and mark off what you’ve been up to during the day (e.g. hobbies, health related, kindness and compassion related and chores). There’s also the option to add some notes to sum up your mood and your day. I found the mood labels annoying at first as the really happy face one said ‘rad’ but after some exploring, I discovered you could change them to something you would actually say, I chose ‘joyful’. After consistently entering your data over a period of time, you can create graphs to see how your mood has changed over the weeks and you can also see how doing different activities impacts on how you feel. Also, to help you get into the routine of filling in your data, you can set a reminder for a particular time, for example, I tried 8pm so I could reflect each evening.
Bearable This one has loads of bits and pieces that you can record alongside your mood. You can add if you had a headache and if you had an mental health symptoms such as stress, anxiety and depression. You can also identify factors which may have impacted on your day such as how busy you’ve been, if you’ve been to work and how much screen time you had. You can say where you’ve been, how much physical activity you’ve engaged in and if you’ve been socialising and what your sleep has been like. Again you can set reminders and edit what you want to track.
emoods Another app which looks like it might be really helpful for individuals with Bipolar disorder is emoods. Each daily log has a space to record how much sleep you got (in increments of 0.5 hours) and your mood, focusing on the four areas of depressed mood, elevated mood, irritability and anxiety, rating them from none, mild, moderate to severe. Over time, the data you enter can then be made into various graphs so you can see if there are any patterns. You can also record if you had any symptoms of psychosis, if you attended some form of talk therapy and your medications (type and dose). Finally, there’s a box to type in anything else which is relevant and may have had an impact on your mood.
Tracking your moods on your phone has several benefits – you can have lots of data in digital format and it doesn’t take up lots of space like a paper version would and you can get graphs of your data which would be difficult and time consuming to create in your notebook. Personally I found both records to be useful but I much prefer working in my bullet journal.
Making it a habit
If you’re going to go to the effort of making a decision to track your moods and learn from it, you also need to make filling in the diary or using an app. a habit and part of your daily routine. If you use a paper based method, you might choose set times during the day to sit down and do some journaling. It’s helpful if you reflect on things pretty much straightaway so you can complete some action steps but it might not be feasible to make notes there and then so you need to find what works for you. My previous blog post on habit creation might help you with making sure you stick to filling in your chart but a simple way of reminding yourself is to set an alarm on your phone or a reminder with a notification tone in your calendar.
As I said earlier, the apps which I tried include the option of notifications to remind you to fill in your information at various points in the day which can be really helpful as long as you choose useful times for the messages to pop up.
Final words…
I hope you have found today’s post useful and it’s given you the key points about why it’s helpful to track your moods and some ideas for how to go about it. If you are really struggling with your moods, however, I would recommend you consider trying CBT as a trained therapist can help you to you look at your emotions and also teach you key techniques for dealing with unhelpful and negative thoughts.
June is here and the weather is finally starting to warm up and give us blue skies and sunshine. As our gardens start to fill with flowers, we get more and more bees and butterflies visiting and the latter is the focus of my bullet journal this month. Again, I wanted to get my watercolour paints out, this time for a single focal image. I hope you like the results and that they inspire you to give a butterfly theme a go some time. The pages took me quite a while to produce, hence me being a little behind schedule sharing them but better late than never eh?!!
Front cover
One of my favourite butterflies is the peacock butterfly with its bright colours and its spectacular eye spots. I found a photograph online and printed it for reference and also did a black and white copy which I traced so as to get the butterfly looking symmetrical (yes, I cheated but I wanted the focus to be on the watercolour, not drawing!). I spent a while creating the perfect bluey colour and I’m definitely getting much better at colour mixing. The other colours were relatively easy to get right but the painting took a long while as I used tiny brushes for the details. I also used a Pigma Micron to do the stripy detailing along the top and a white gel pen for the spots. I was pleased with the results and the use of pale yellow paper at the top and bottom of the page has nicely hidden a problem I had with water dripping on the page which caused some of the Tombow ink from the calendar page to seep through (I may have cried a little when I messed up though!).
Watercolour peacock butterfly Photo credit: Laura Jones for Keeping It Creative
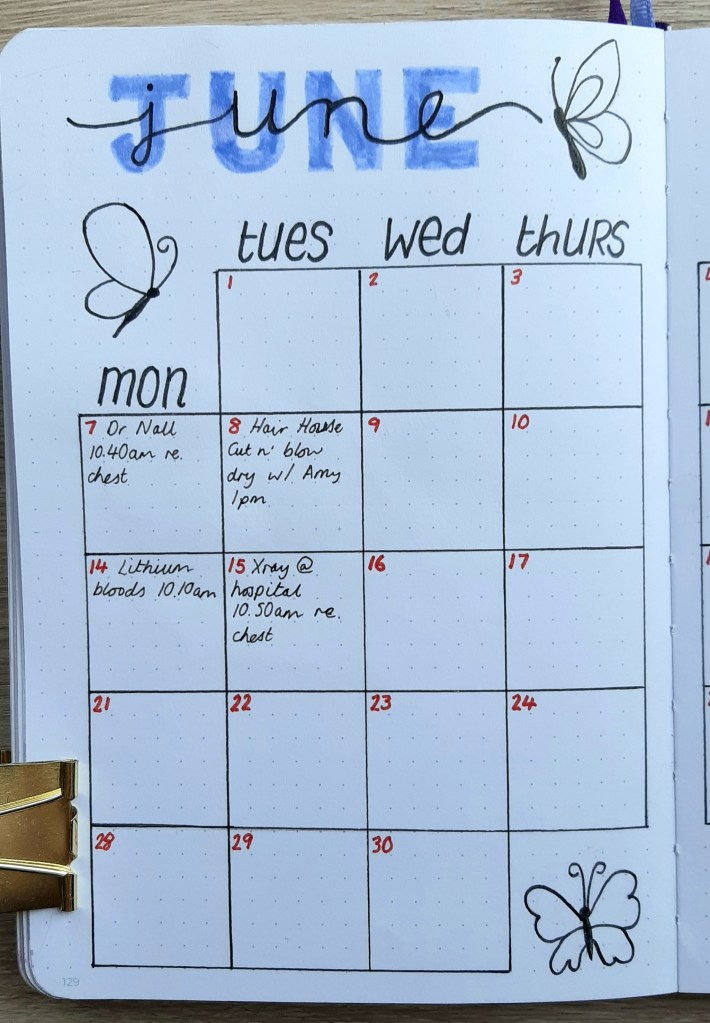
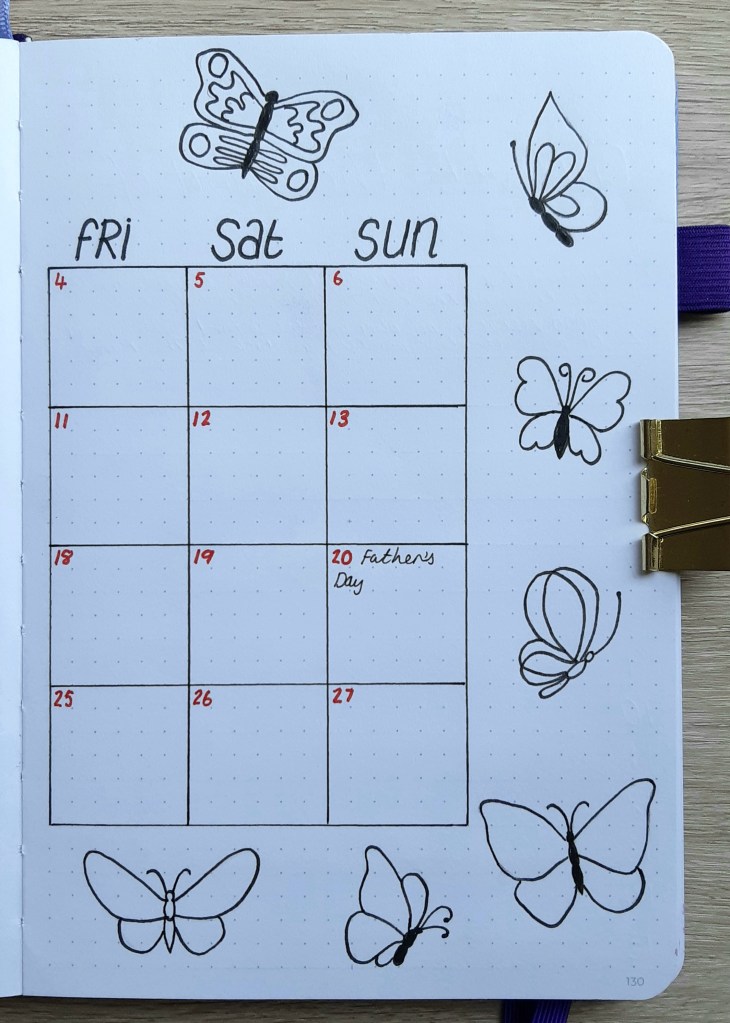
Calendar page
After spending a full afternoon on my front cover, I decided to keep the decoration on the calendar page quite simple. The line drawn butterflies were lightly sketched first to get the wing shapes and symmetry looking okay and then I inked them with a 0.3 Pigma Micron. I was surprised by how long it took me to draw them but then. drawing isn’t a strength of mine.
Photo credit: Laura Jones for Keeping It Creative
Photo credit: Laura Jones for Keeping It Creative
Photo credit: Laura Jones for Keeping It Creative
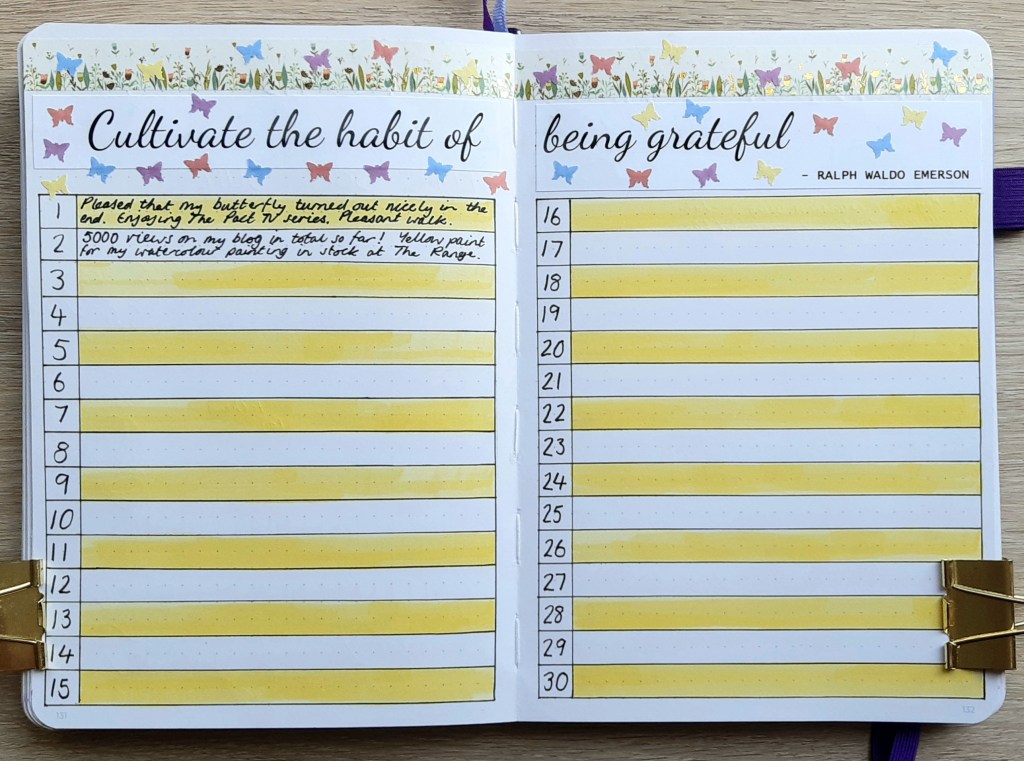
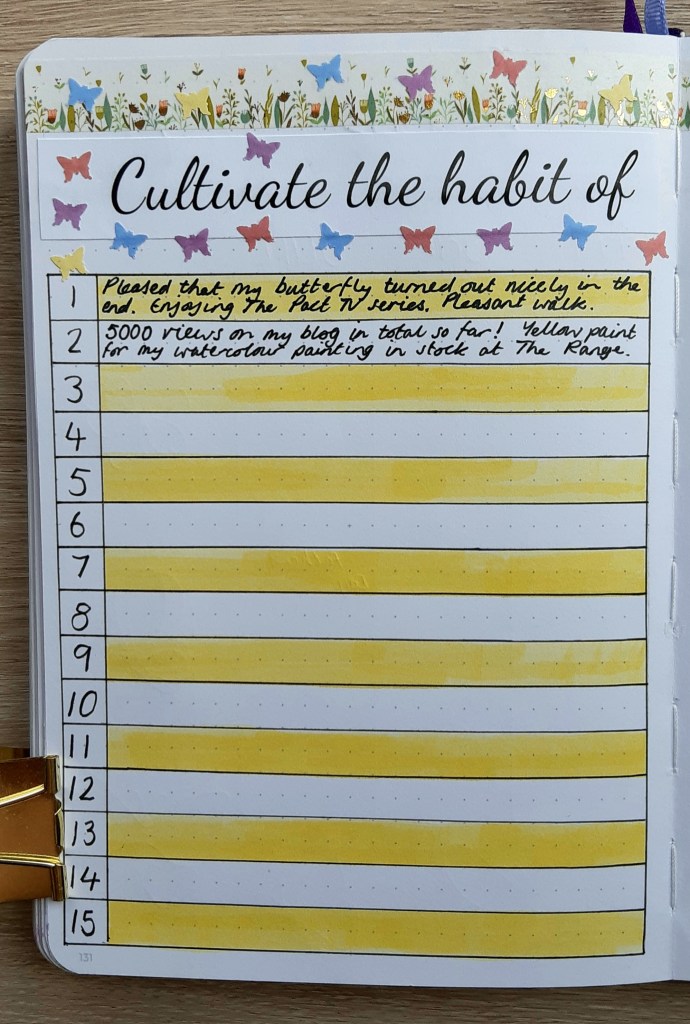
Gratitude pages
If you are a regular reader of my blog, you’ll know that I’ve been doing these gratitude pages for a while now. At the moment, I’m struggling with negativity due to various medical complaints impacting on my mental health and this means that finding things to be grateful for becomes a little more difficult but all the more useful. Sitting down and coming up with two or three things each night, reminds me that there are some good things to be thankful for. I’ve filled in the first two days to give you an idea of the kinds of things I write.
The meadow washi tape with gold accents is a nice addition to the page and I also added lots of tiny punched paper butterflies around the title section. I used a multipurpose glue and a little pin head to apply it to the reverse – time consuming again but they look cute I think.
Photo Credit: Laura Jones for Keeping It Creative
Photo credit: Laura Jones for Keeping It Creative
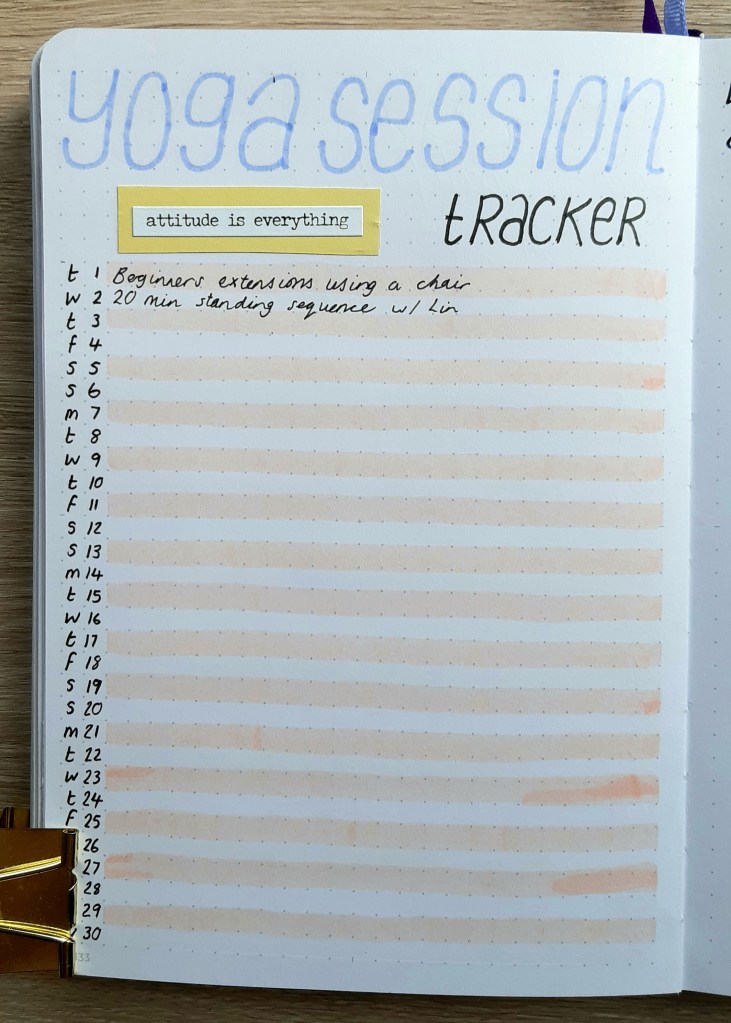
Yoga Session Tracker
Another spread I’ve been doing for a while to record my daily yoga practice. I write down which YouTube yoga routine I’ve done so I can make sure I’m targeting different parts of the body and ensure that I’m not repeating sequences too often. I was keeping a yoga journal too but I seem to have got out of the habit of writing in there at the moment so this will do for now.
Photo credit: Laura Jones for Keeping It Creative
I hope you’ve enjoyed seeing my spreads for this month. I’m also planning on setting up a mood diary but I will hopefully be sharing this in my next Monday Matters post on the 7th. I’m now going to spend half an hour checking out everyone else’s spreads for this month as I love looking at a variety of themes and layout styles – I may have to set a timer though as it’s easy to lose hours on blog posts, Instagram, Pinterest and YouTube as I’m sure you’ll all be well aware!
Just one more thing before I go…
I just want to share this little graphic which popped onto my phone screen yesterday. Thank you so much to all of you who take the time to read my blog – I appreciate every single view, like and comment.