Hi all, I hope you’re doing really well and enjoying the Springtime with its (slightly) warmer weather, bright and cheerful daffodil displays on verges and in gardens, morning bird song and emerging butterflies and bees appreciating the sight of the first flowers. In today’s post, I’ll be sharing my bullet journal pages for April in which I had great fun creating bright and colourful bee themed spreads. I’ve seen quite a few insects over the last few weeks including ladybirds, butterflies and bees and I love to watch them exploring our garden so this is where my inspiration came from for the upcoming month. I’m really pleased with how the pages turned out and I hope you enjoy looking at them too. I’ve provided minimal explanation but if you have any questions, I would be more than happy to answer them.
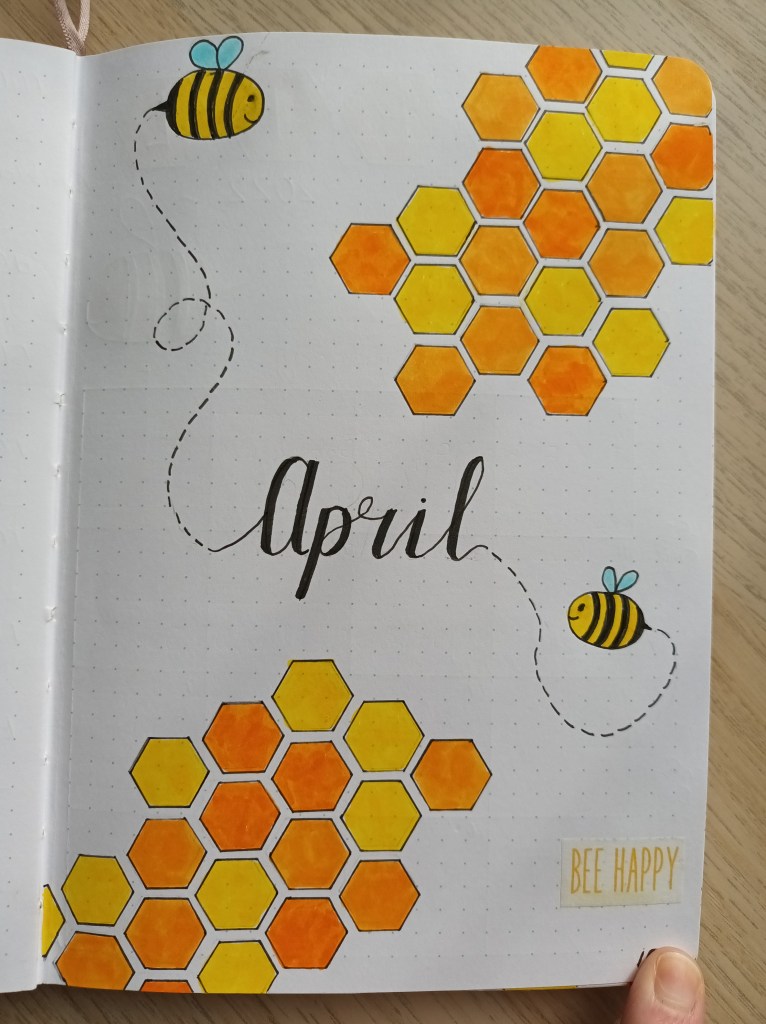
Cover page
Now I’m feeling better, I’ve gone back to creating cover pages for each month and decorating all of the spreads. This one uses two different yellow colours of Tombow dual tip pens (055 and 985) and a Crayola Supertip. The hexagons were drawn using a Helix stencil so it didn’t take me too long to do lots and colour them in. As I’m not too great at drawing, I went for a cute cartoon style bee!
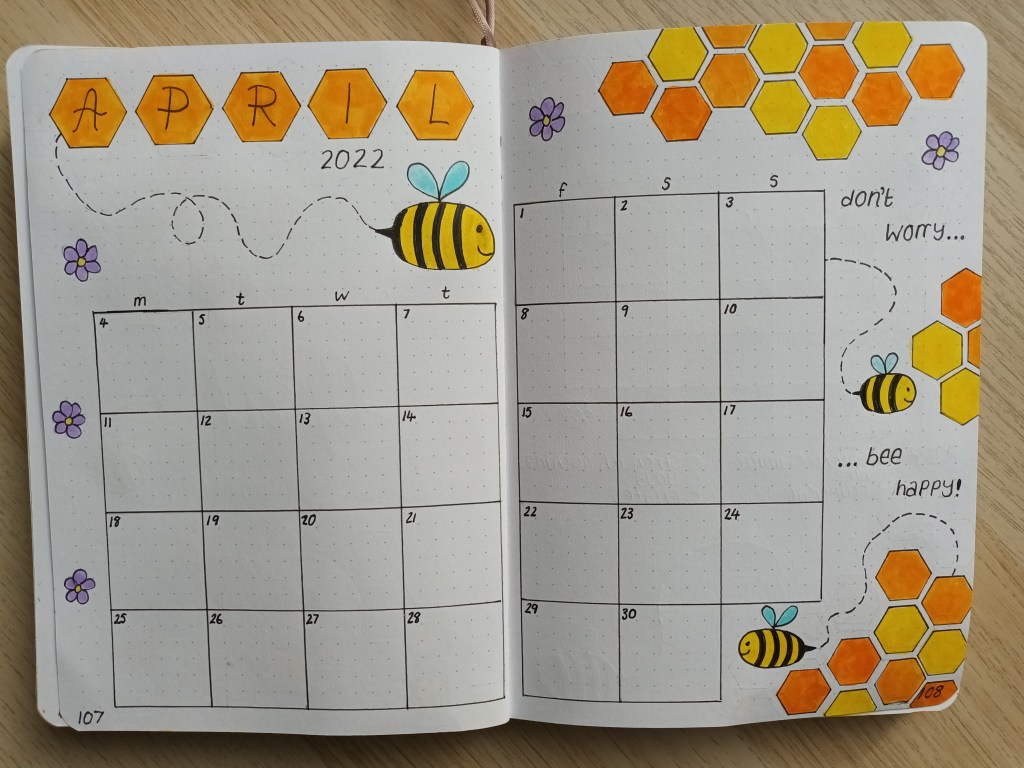
Monthly Calendar
This is my usual layout with 6×6 boxes which leaves plenty of space for decor around the edges. I also added some flowers to go with the bees and honeycomb, filling in a few bits of white space nicely.
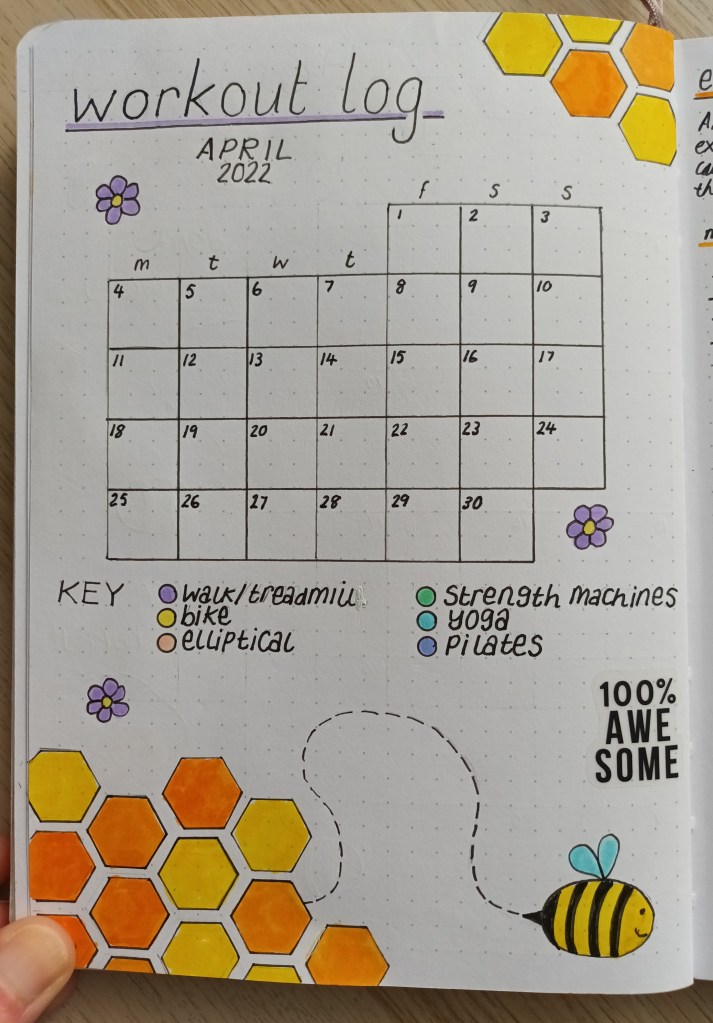
Workout log
As one of my current goals is to work on toning by body, I decided to keep a record of all of my different workouts. At the moment, I’m doing cardio at the gym on Monday, Wednesday and Friday mornings, plus one session a week using the strength and muscle toning weight machines. I’m also continuing to do yoga five days a week and have put myself on the waiting list for Iyengar yoga and Pilates at the wellness centre (it’s proving to be really hard to get onto the classes as they’re so popular).
I’ve created a small calendar spread which is big enough to record multiple workouts per day. I’m going to add a coloured dot each time I do a particular workout. In May, I might also track the time I spent doing each activity but for now I’m just going to log each kind of exercise I do.
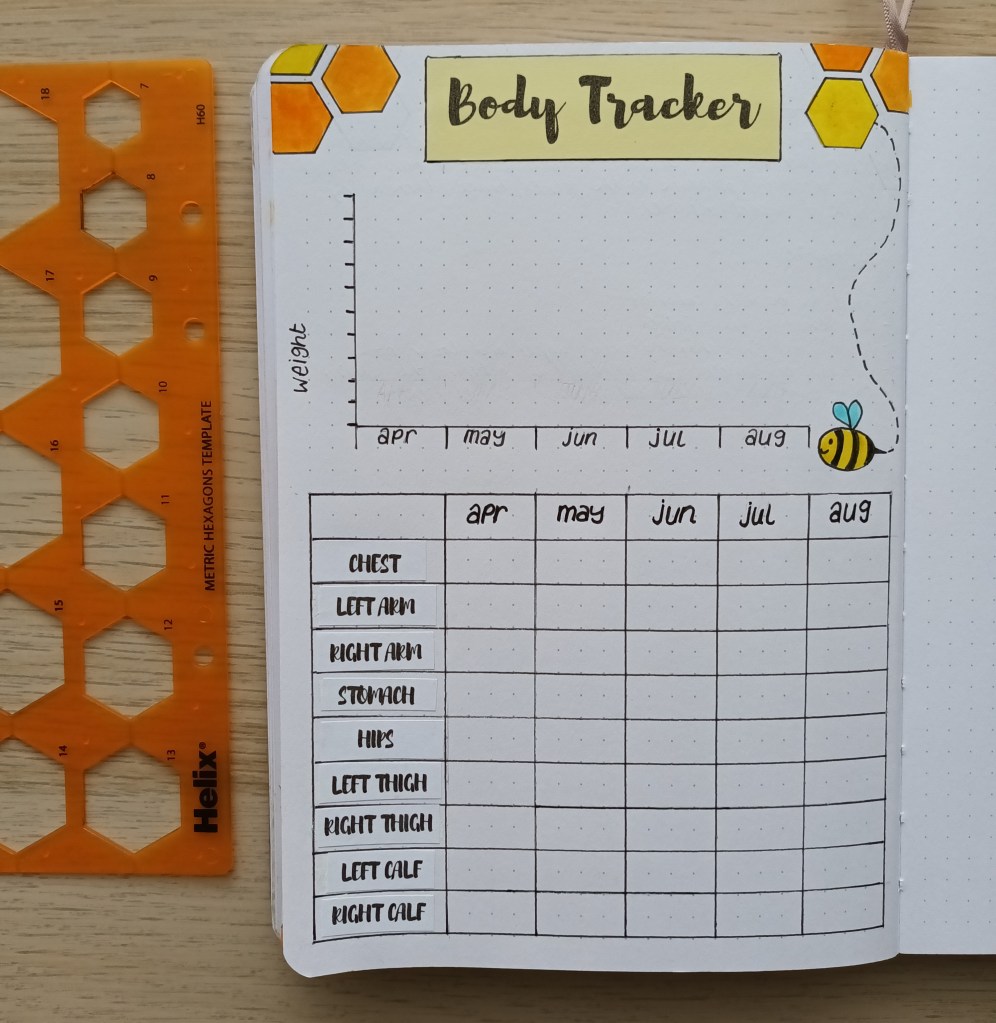
Body Tracker
Earlier this week, I mentioned I was using the SMART goal framework, to help me come up with detailed plans of my current goals. As well as measuring my weight to see how many pounds I’ve lost each month, I’m also going to take my body measurements regularly so I can see progress in this area too.
Missing spreads
I’ve chosen not to include a gratitude log and yoga session tracker for April as they’re time consuming to set up and I want to focus on my gym workouts and improving my fitness levels. When I’m well (not too high and not feeling low), I tend to spend time reflecting on what I’m grateful for anyway so I figured it’s okay to take a little break from writing things down. Also, I can see which online yoga workouts I’ve done recently by checking my YouTube history. It won’t be as easy to see the variety of sessions, to make sure they’re well balanced, but it will still give me some idea of what I’ve done. I can always put them back in place in May if I miss filling them in.
Final words…
I hope you’ve enjoyed seeing my BuJo spreads for April. They’re certainly bright and colourful and better to look at than today’s grey skies and snow showers! Let me know in the comments what theme you’ve chosen for the upcoming month and if you’ve shared your pages on your blog, I’ll be sure to check them out.
When I start to feel better after a period of depression and anxiety, I tend to have lots of ideas for how I want my life to be now and what I want for my future. To avoid becoming overwhelmed, stressed and potentially causing a hypomanic episode (due to having bipolar disorder), I like to spend time taking a step back, really thinking about what I want for myself and asking myself some big questions. After reflecting, I like to create a visual reminder in the form of a vision board. In today’s Monday Matters I thought I’d present a beginner’s guide to vision boards and show you how I design and create mine in my bullet journal so that you can make one too.
What is a vision board?
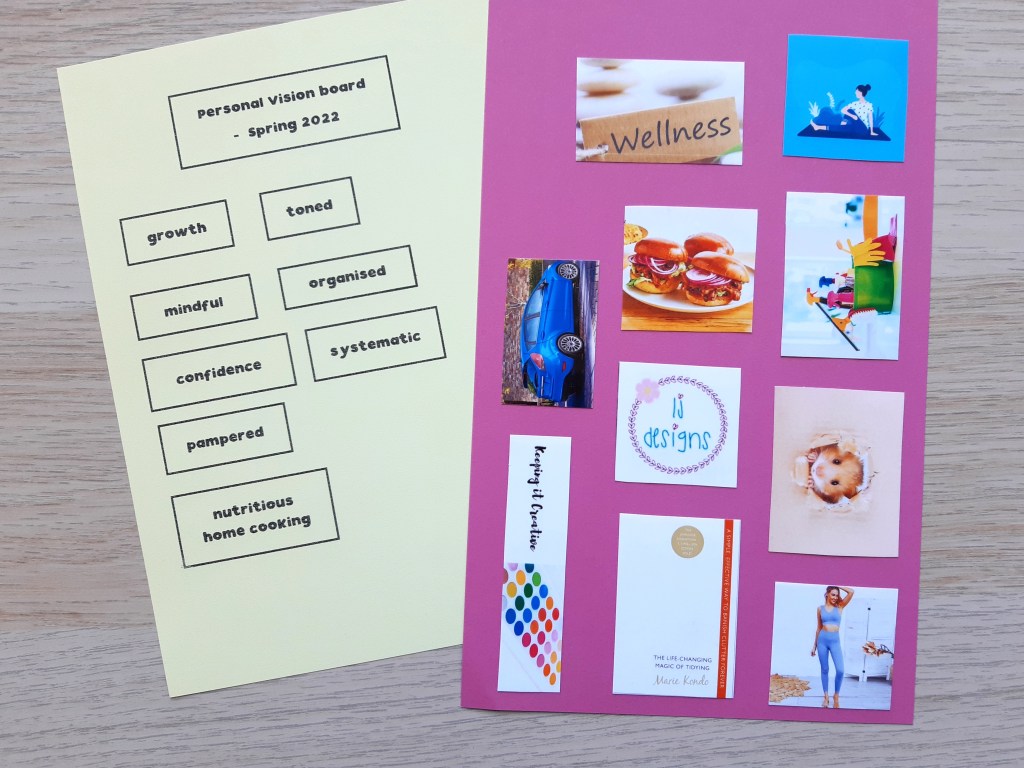
A vision board is a collage of images and words which represent your current wishes and goals. It is used as a reminder of what you hope to achieve and aims to provide motivation and inspiration. Vision boards can be paper based or digital. They can contain as many words and images as you want but I find they work best if they’re relatively simple as then you are only working towards a small number of goals. Whereas a digital vision board works best if it fits onto your computer screen, a paper based vision board can be any size of your choosing. I created a large A1 sized board for my business and have the images and words pasted onto a black piece of card which is inside a clip frame. The vision board is on the wall in my craft room and I love looking at it regularly. My personal vision boards are usually created in my bullet journal on a double page spread and contain words and images from magazines as well as printouts from online resources like Pinterest. Click here to see an example of one I created during lockdown.
Your vision board can have a particular theme e.g. health and wellbeing, your word of the year etc, or it can be more general and include personal and/or professional related goals. Whichever style you choose, you need to spend some time reflecting on what you want your life to be like now and what you hope your life to look like in the future.
Some key questions to ask yourself:
What is most important to me in my life right now? (e.g. happiness, good health, work-life balance etc)
What are my core values? (e.g. family, creativity, self confidence, education, happiness, growth, self awareness etc)
What did I used to do in the past that I would like to start doing again now? (e.g. have lots of fun, meet friends for coffee, go to the gym, spend quality time with family etc)
What experiences would I like to have in the future? (travel the world, start a family, learn to swim, attend an art course etc)
What are my current interests or hobbies? (e.g. sewing, bullet journalling, watercolour painting, hiking, getting fit, baking etc)
Do I currently spend plenty of time engaging in things I enjoy? (e.g. I don’t feel I dedicate enough time to having fun, I always make time for my hobbies and interests etc)
What bad habits do I want to break? (drinking too much alcohol, going to bed late, eating unhealthy snacks, too many takeaways, spending too much time on social media etc)
What good habits do I want to instill? (e.g. exercise for 30 minutes 5 times a week, drink more water, eat more fruit and vegetables, starting a gratitude practice, meditating each morning, read one self help book each month etc)
What little things do I want to put in place right now? (e.g. daily gratitude, healthy breakfast, in bed by 10.30pm etc)
What are my big dreams for the future? (e.g. to write a book, to be a minimalist, to own a 3 bedroom home, to move to Australia, to travel the world, to have a family etc)
What can I do now to help me work towards my dreams / goals?
How will I feel when I achieve my goals / dreams? (proud, happy, confident, calm, successful etc)
How do vision boards work?
Vision boards only work if you do! By this, I mean that choosing representational images and words to describe your desires, goals and dreams is not enough to achieve them. You also need to identify steps to take to work towards what you want and create habits which will help you (or break habits which are not helpful). A vision board provides a useful visual reminder and, when looked at on a daily basis, can be used as a prompt to spend time evaluating and reflecting on your progress towards your specific goals and wishes, looking at any obstacles that have come up and how you will remedy problems. It can also help to motivate you into action – especially if the images and words you have chosen are exactly what you desire and spark great attraction.
What I find useful is to accompany my vision board with a page of notes. I write down what each image represents and also record what I need to do or not do to work towards achieving my vision. I can then move on to identify the baby steps I need to take to have the best chance of achieving my goals. Reflecting on your progress regularly and setting new small goals is also really important if you vision board is to have the best chance of working.
Designing your vision board
The design of your vision board should suit you and your lifestyle. If you prefer to work digitally, you could create a vision board to display on the desktop of your computer or even create a vision board on Pinterest using attractive images and motivational sayings and quotes. If you like to get creative, you might do a cut and paste from your favourite magazines – try flicking through them and see what resonates with you. You can even cut out individual letters or words to put together to make motivational phrases (a bit like a ransom note but full of positivity instead!). Use pictures which sum up exactly what you want, for example an image of someone who is smiling can represent wanting to feel happier in life, a big house in the countryside can show that you would love to live in a more rural location, a passport and pictures of key locations in a Paris e.g. The Eiffel tower and a cruise boat on the River Seine, would be good to remind you that you really want to visit the capital of France.
I like to create a double page spread in my bullet journal as this is something I look at multiple times a day and use morning and night. You can read about the process of setting up my vision board below.
Creating a vision board in your bullet journal
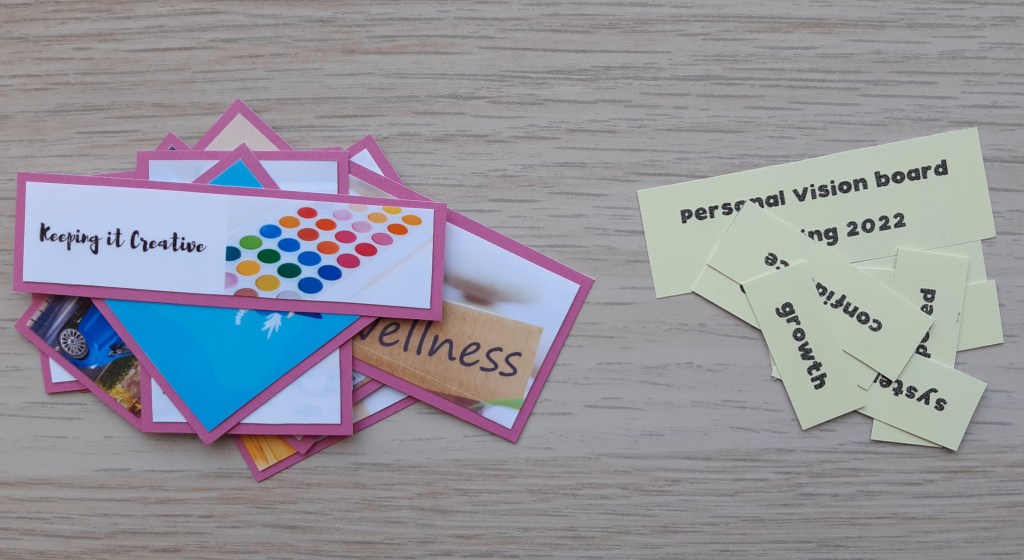
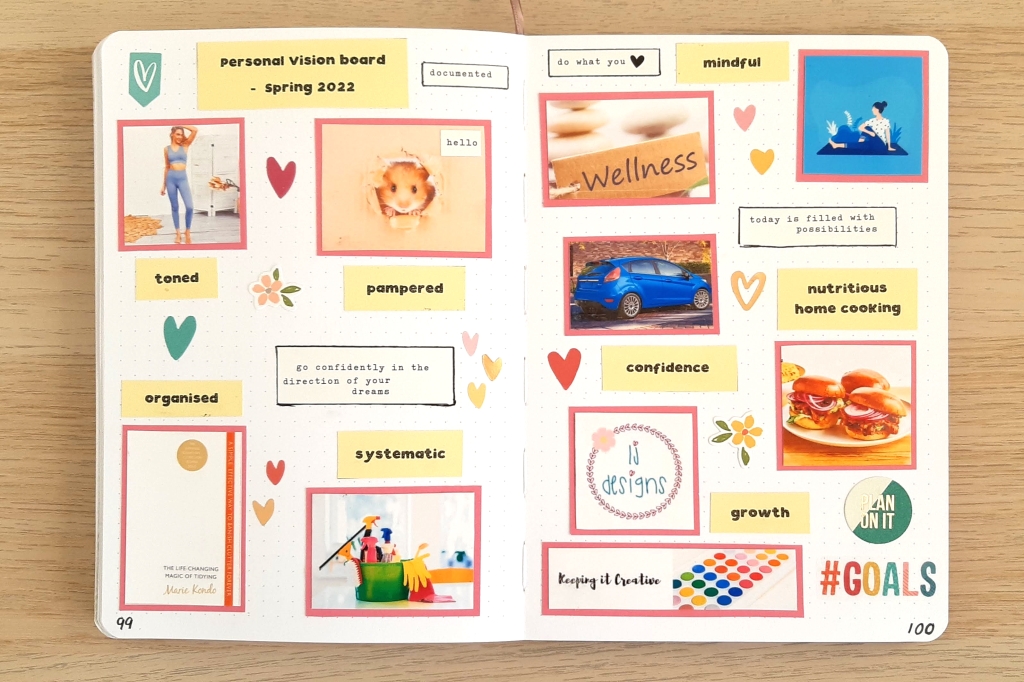
Image selection I find the best way to create my vision board in my bullet journal is to use photographs which are available online. If you use images from magazines, they may be vastly different in size. If you search chosen key words online you can spend time looking through the different pictures and find one which is suitable for what you want and then resize it to fit (I make the width of my images around 4cm – 6cm). I placed the photos into a document on MS Publisher which was 4x6in and then printed the pages out on photo paper of the same size using my Canon printer.
After that, I cut them out using my small Fiskars guillotine and backed them on mid pink coloured paper to make them stand out. The backing of the photos was rather time consuming, especially as you really need to use double sided tape for photograph paper. The process could be speeded up using a roller tape but if you’re limited for time, you could just stick the images straight in to you BuJo. I left a tiny border of pink as I wanted the photos to take centre stage.
Motivational words Again, I create the words myself in a MS Publisher document rather than looking through magazines so I can play around with the sizing, font and specific word classes e.g. verb, adjective, noun etc. I also chose to print them on coloured paper so that they stood out from the white paper just like my photos. It’s up to you how you produce your words – you could create stickers, stamp them onto paper, cut them out and stick them in or hand letter them for example.
Playing around with placement Once you’ve got your images and words ready, it’s time to try out different placements until you’re happy with how they’re arranged. It’s a good idea to experiment with different layouts and then take a quick photo of your double page spread each time so you can always revert back to a previous arrangement. Once your happy you can paste everything in. You might choose to add some decorative elements to any spaces, for example, if you’re creating your vision board for the Springtime, you might add flowers, hearts in Spring colours, butterflies, motivational words etc. This could be in the form of stickers and ephemera like mine or, if you’re good at drawing, you could create something using spring coloured felt tip pens or coloured pencils.
My finished vision board in my bullet journal
Final words…
I hope today’s blog post has inspired you to create your own vision board as a motivational tool for working towards your goals and dreams. Remember that vision boards are a great way for clearly identifying what you want for yourself now and in the future but as well as creating this attractive and motivational tool, you also need to identify progressive steps going forward and also dedicate time to work on making your hopes a reality.
Do you currently use a vision board or is it something you would like to have a go at creating? What would be the most prominent image or idea on your board? Let me know in the comments below.
Over the last few weeks, I’ve been making a start on decluttering and re-organising some parts of our home. So far, I’ve got rid of some unwanted clothes, purged my vast collection of magazines and begun the mammoth task of clearing out and re-organising my craft room. I have a lot of ‘stuff’ and, at times, the process has been overwhelming and stressful but I’m doing a little bit each day and slowly, I’m seeing the difference it’s making. For today’s Monday Matters, I thought I would consider some of the main benefits of decluttering your home as I feel that knowing the effects it can have on health and wellbeing will help me to keep going and also might encourage some of you to dedicate a small amount of time each week to tackle an area of your home or a particular type of clutter. I’ll also offer a few ways to get started including some ideas based on the popular ‘Kondo’ method.
So, let’s start with some of the main benefits which can make a real difference to your life…
You’ll have more energy
A house full of clutter is very draining. There’s always things out of place and constantly seeing your stuff everywhere will likely consume your thoughts as soon as you enter your home or spend time in a particular room. Also, you’ll regularly have to make decisions about where to put things and this can cause stress and deplete your energy levels.
Clutter can make you feel both physically and mentally tired and can also prevent you from relaxing and replenishing your spent energy after a busy day. On the other hand, a tidy and clutter free home lowers stress levels as it is an inviting and calming place to be, where you can fully wind down.
2. Your sleep is likely to improve
A tidy and clutter free bedroom promotes peaceful sleep and allows you to switch off more easily. Whereas a cluttered environment fills the mind with uneasy thoughts and has been found to cause disrupted and less restful sleep. You might think it doesn’t matter if you have lots of stuff in your bedroom because you can’t see it when you turn out the light but your brain will be stimulated as soon as it sees the ‘chaos’ causing feelings of overwhelm and stress.
It’s best to make sure most of the items in your bedroom are put away and that a small number of carefully chosen objects are on display which reflect the style you want to achieve. So, for example, your bedside cabinet or table might have a pretty lamp, your Kindle or book and a single framed photograph.
3. You’ll feel more organised
Having an orderly home will mean that you can find things more easily. If all of your things have a particular home and similar items are grouped together, you’ll feel super organised and you’ll know exactly what you have and where each item is located. Less clutter will help you feel in control whereas an excess of stuff will have the opposite effect.
You’re also likely to feel extremely proud of your home and want to show it off!
4. Fewer allergens will be present
This is a really important one for me as I’m asthmatic and have a condition called allergic rhinitis which is triggered by dust and molds. If you have stuff everywhere, it’s very difficult to keep your home free from dust. Also a build up of clutter has been shown to contribute to poor ventilation in your rooms which can cause mold. Surfaces with only a select few items on them can really help reduce the number of allergens in the air and on your furniture which is great for anyone with asthma and other similar health conditions.
5. Cleaning and tidying will become a breeze!
Whilst I was struggling with depression and anxiety, my support worker helped me to plan some small housework tasks throughout the week to encourage me to contribute to the many chores involved in running a home so I was able to feel a sense of achievement. On one of the days, in my weekly plan, we decided that I would dust and vacuum our bedroom. When asked the next week how I’d got on, I mentioned that I’d got overwhelmed and upset because just tackling my dressing table had been a gargantuan task as there was so much clutter to clear before I even attempted to clean the dusty surface. I ended up just doing the dressing table and my chest of drawers when all of the other furniture really needed doing too.
Having less clutter will make keeping your home clean much easier and so much quicker. I’m not saying that dusting, vacuuming or mopping floors will become enjoyable, but it’s likely to be much less of a chore.
6. You’ll be more productive
If you want to get things done quickly and easily you need an environment with as few distractions as possible. This is why many offices have a tidy desk policy as it promotes efficiency and effectiveness at work. Less clutter in your home has the same impact. It means you can focus on the task at hand rather than being drawn towards your stuff which needs sorting out or has just become too much to deal with.
7. Overall, you’ll feel happier in your home
Clutter is known to fuel depression and anxiety as it promotes feelings such as sadness, stress, guilt, despair, shame or inadequacy. It can also make you feel embarrassed and apologetic if you have any visitors. A clutter free home, however, can have a really positive effect on our mood by freeing us of these negative emotions making us feel more content and generally happier.
As you can see, doing a spot of decluttering can really help improve your physical and mental health and generally make your home a more pleasant place to be. But, getting started isn’t easy, especially if you have a lot of stuff. Here’s a few suggestions to get you going…
Visualise what you want
Once you’ve committed to decluttering, try a little visualisation exercise. Think about your ideal lifestyle and create a picture in your mind of what it looks like. Also, imagine how decluttering will help you work towards or achieve this and how you will feel as a result of your improved home. Perhaps you’ll have a well-ordered space where everything is neat and tidy. Maybe you’ll feel more organised and happier. Or, you might be able to relax more easily when you finish work. You could even find that you have more time to do the things you love with the people you care about. Obviously, this will differ greatly depending on your personal goals and the lifestyle you want. You might even want to write down some of your ideas after visualising so you can re-read them to help you stay motivated. If you prefer pictorial representations, you could make a vision board for your bullet journal or to pin to your wall.
Dedicate some time
It’s a good idea to regularly schedule a block of time in your bullet journal or diary and think about what will work best for you and your lifestyle. You might choose 10 minutes and set a timer for a quick spot of decluttering or an hour on a Sunday afternoon if you want to tackle your entire wardrobe. If you have a family and the stuff doesn’t all belong to you, try to get everyone involved in the process ensuring everyone takes some responsibility and can reap the rewards too. Make sure, whatever timeframe you choose, you stick to it, just like you would any other commitment.
Start small
In her popular first book The Life-changing Magic of Tidying, Marie Kondo identifies a particular order to decluttering your home. She suggests starting with clothes and invites you to get all of your clothing together and work through it to decide what you want to keep based on if each item sparks joy. However, if you have lots and lots of clothes like I do, it might be worth starting much smaller. A good way is to categorise your clothing and just working on, for example, t-shirts or trousers. Working on a small number of items can help to prevent overwhelm and make the process less stressful.
Think about what bothers you the most
Although organising expert Marie Kondo suggests a set order for decluttering, you might want to start with something else or a particular space. For example, if the mess in your living room stresses you out when you sit down to watch TV, you might want to start with visible clutter in there. Or, if the state of your bedroom may be contributing to a less than restful sleep, you could tackle this first. Whatever would have the most impact, as long as it’s not too big a job, may be the best area to start.
Deal with visible clutter first
Also related to impact and choosing what to work on is visible clutter. You might have a cupboard under the stairs which is full of junk but does it bother you all the time or only when you need something from the back of it? You might be best off starting with your desk top, your dressing table, the top of your chest of drawers or floor space if you want to really see your progress. Then, when surfaces are cleared, you can tackle cupboards, drawers and cabinets.
Make a decision about the items you don’t want or need straight away
As soon as you’ve decided what to keep, including what sparks joy and which items are useful in your life right now, make plans for your discard pile. Some of your stuff will be fit for the bin (and you’ll wonder why you still have it!), some might be perfect for donating to charity, and a small number of items could potentially be sold on ebay (but only if you have the time to photograph and list them straightway and then deal with them once they sell / don’t sell). It’s really important to take action on the items immediately, so take the bin bag(s) out as soon as you can, place donations in a box and head straight for the charity shop that same afternoon and create your ebay listings as a matter of urgency. The quicker the items are gone, the sooner you can start enjoying the benefits.
Final words…
I hope you’ve enjoyed reading today’s Monday Matters post and it has prompted you to do some decluttering. Let me know in the comments if you’re already enjoying the benefits of less clutter or if you are keen to get started. It would also be great to hear any other tips you have for beginning the process.
Hi everyone, hope you are all well. This month, I’ve gone for an Autumn theme featuring brightly coloured leaves and acorns. I really enjoyed practising my drawing skills and I’m pleased with how the pages have turned out. I hope you like my spreads and I’m looking forward to seeing everyone else’s chosen themes for October.
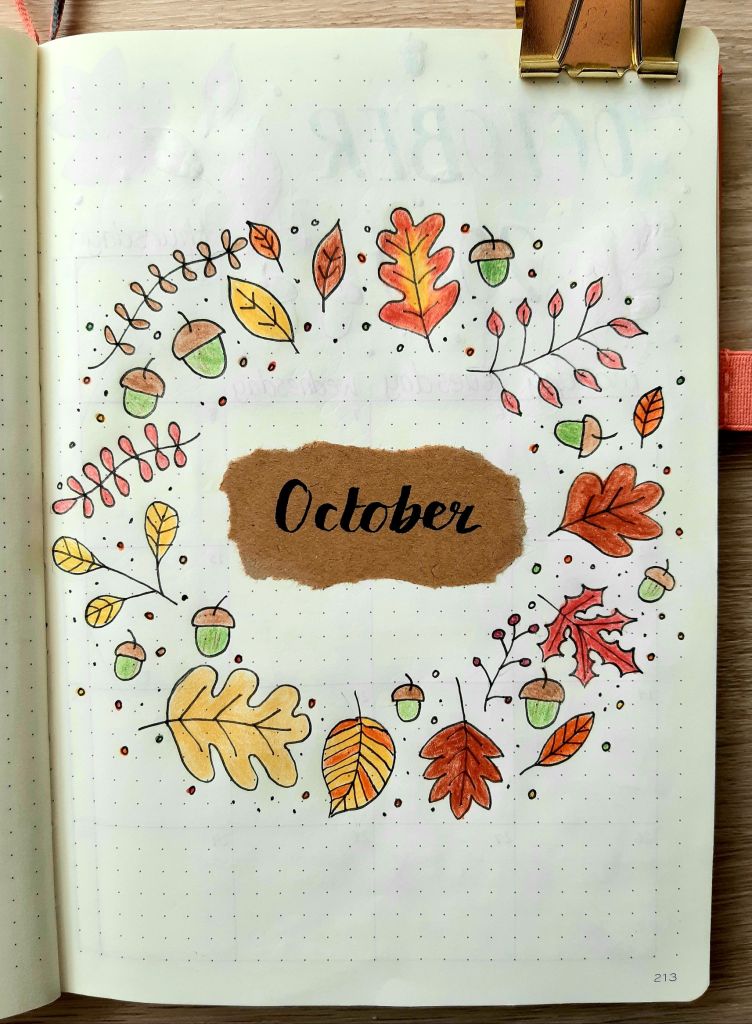
For my cover page, I took inspiration from @lilbrownjournal on Instagram who created a wonderful circular design. Before starting, I spent some time doodling different leaf shapes using a variety of tutorials and images I found on Pinterest. I decided not to use my circle drawing tool this time as I wanted the outline to be quite big, so I took out my compass instead. To ensure that I didn’t end up with a hole in the middle of my page, I placed a few post it notes over the area before making my two circles.
Photo credit: Laura Jones for Keeping It Creative
The leaves and acorns were drawn in pencil and then outlined with a 0.2 Pigma Micron. I decided to use pencil crayons to shade them in to avoid ghosting. The only problem with this is that when you write on the page overleaf, it tends to transfer onto the previous page. It’s easy enough to remove with an eraser though.
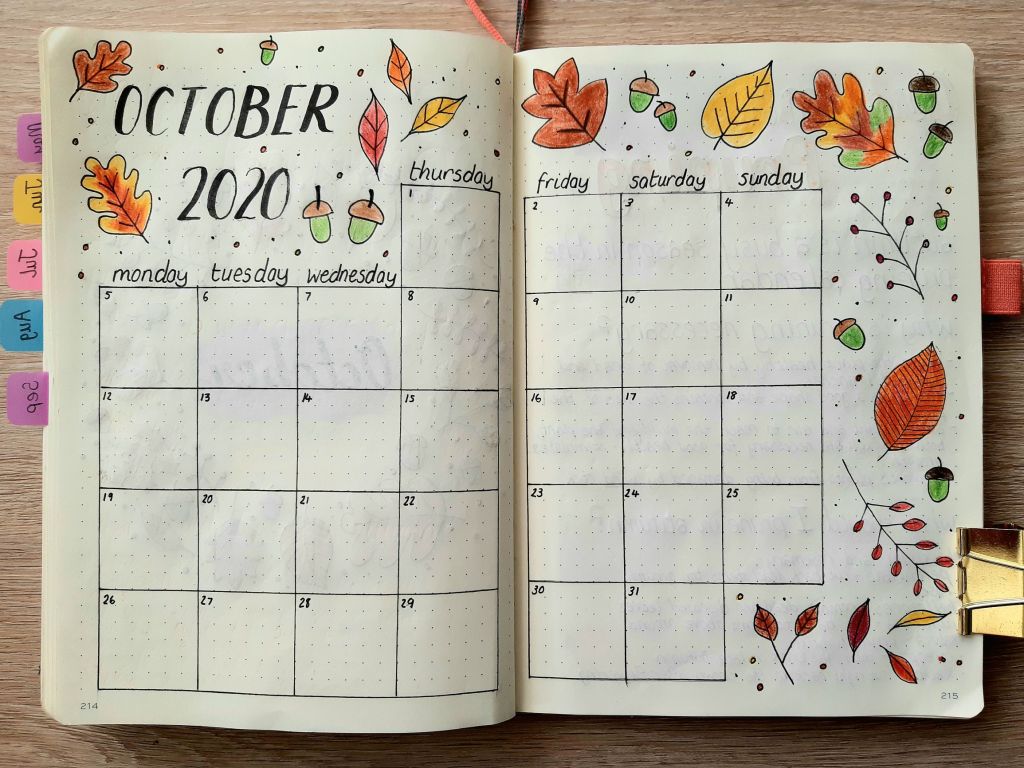
Although I enjoyed using my circular month at a glance, I went back to a two page calendar for this month with 6 dot by 6 dot squares again drawn with my 0.2 Micron pen. Again, I decorated with lots of bright Autumn leaves and acorns.
Photo credit: Laura Jones for Keeping It Creative
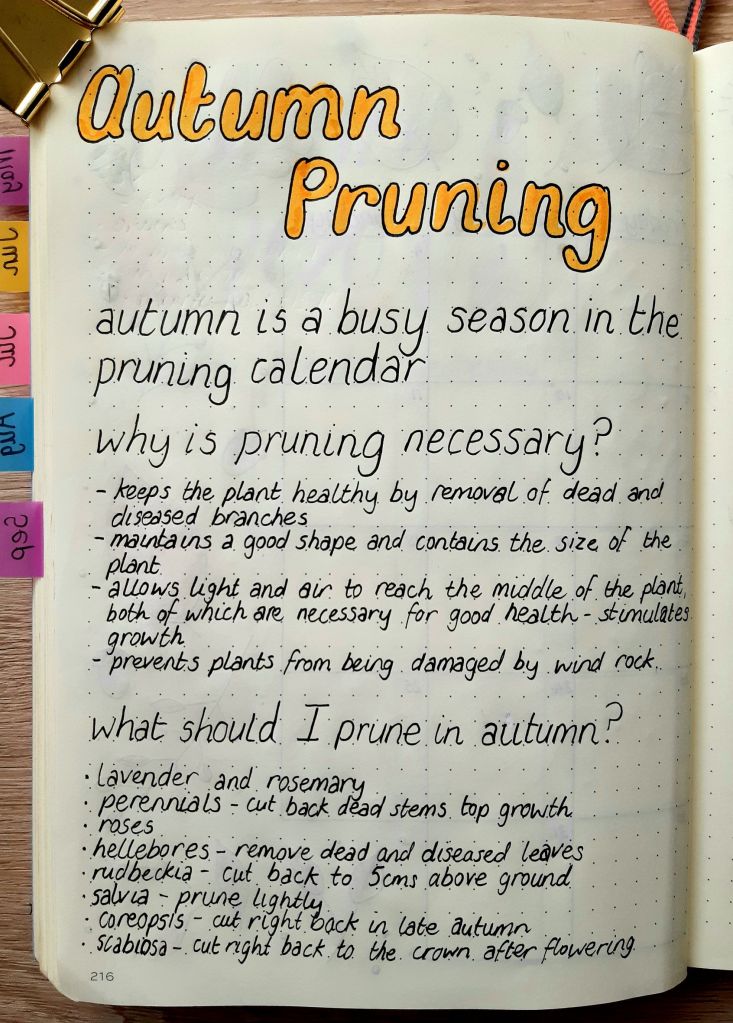
October is a busy month for tidying up in the garden so I spent some time researching what needs to be pruned and then created this spread as a reminder of the benefits of pruning and the plants which need our attention.
Photo credit: Laura Jones for Keeping It Creative
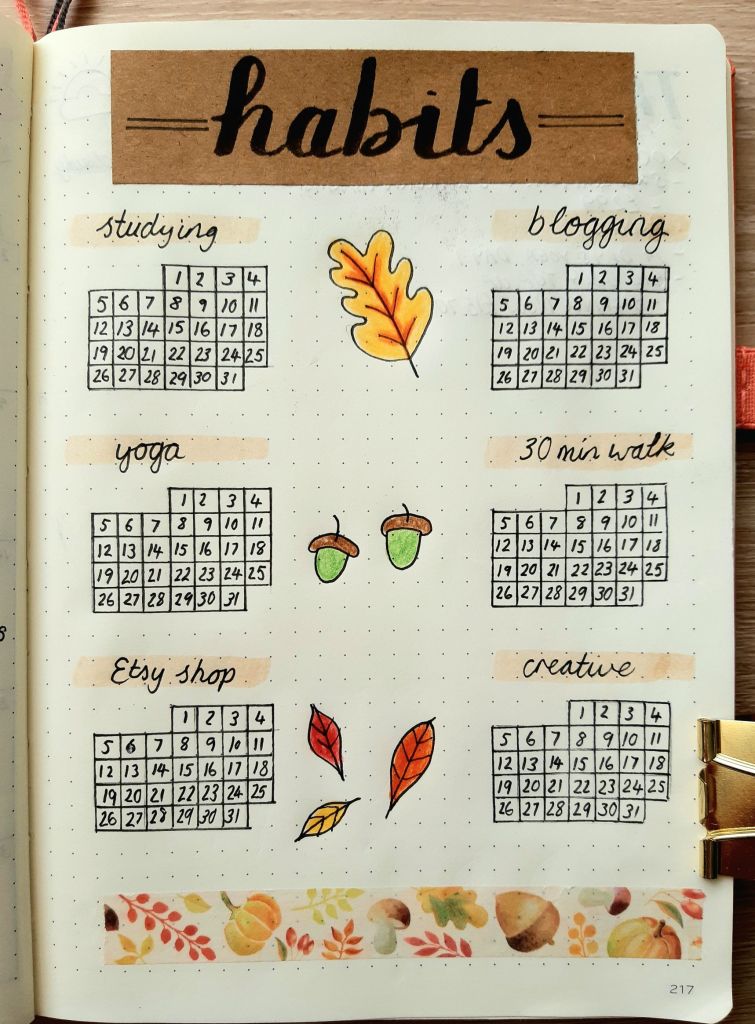
The final page for this month is my habit trackers. I enjoyed the format I chose in September so I kept the layout the same but changed the decoration. I kept some of the same habits and added a few new ones focusing on getting outside for my walk every day and making sure I do my yoga consistently. I added some lovely Autumnal washi at the bottom which was gifted to me by my friend Bev and I think it finishes things off nicely.
Photo credit: Laura Jones for Keeping It Creative
That’s it for this month. I’m getting really low on pages in my Leuchtturm so I think I will probably be moving in to my next BuJo before October is over. I’ve gone back a Scribbles That Matter again as I’ve decided I prefer the thicker, white pages.
As well as my amazing birthday gifts, I was also given some money and I knew straight away what I wanted to spend it on. As well as getting this gorgeous Finetec metallic gold watercolour set, I also ordered the Helix Angle & Circle Maker tool which has been on my wish list for quite a while now. After experimenting with how to make angles and circles, I use my new stationery must have to create a new Level 10 Life assessment wheel and identified some steps and goals for making improvements. In today’s blog post, I’m going to talk about various ways of using the Circle maker in your bullet journal and I will also share my Level 10 life spreads.
The Helix circle and angle maker is great for creating different sizes of circle and angles which makes it really easy to produce circular habit trackers, birthday spreads, mood trackers, monthly calendars (I’m just in the process of setting one of these up for September which I’ll share very soon), a decorative wreath outline or even a future log that’s a little bit different. You can also use the smaller circle templates in your weekly and monthly spreads, for example when labelling the dates in your month at a glance or to add decorative elements. I’ve collected some examples and added them to a new Pinterest board which you can check out here.
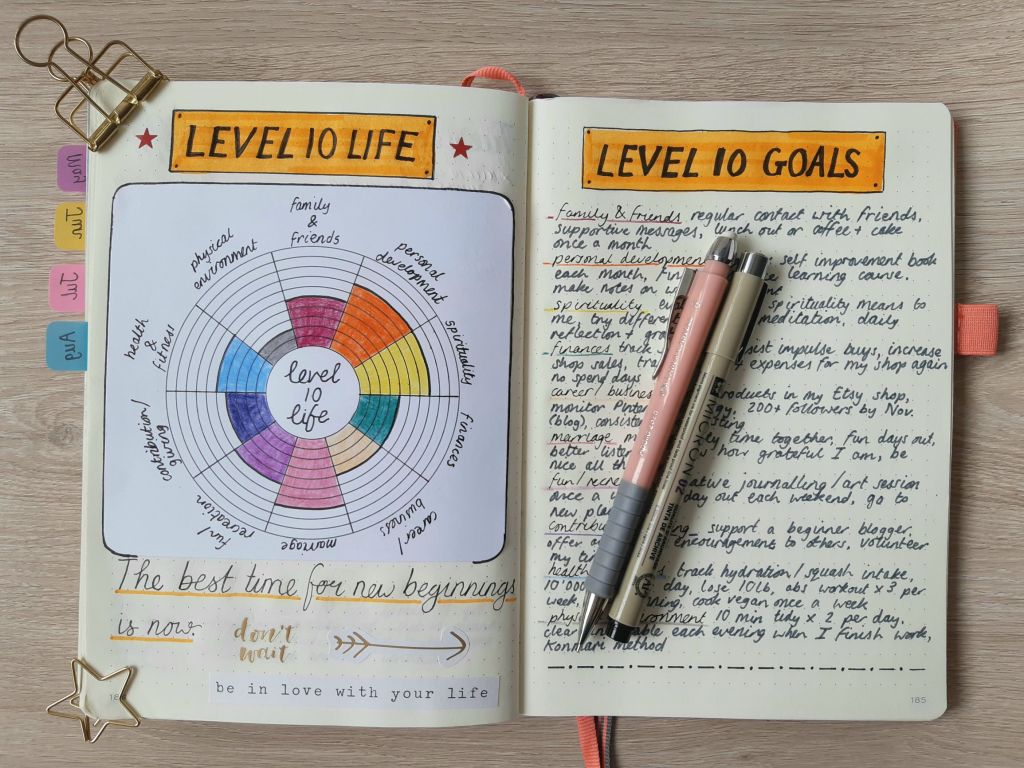
I’m sure many of you who use a bullet journal will already be familiar with the concept Level 10 life. If you’ve not heard of it and have no idea what I’m talking about, basically it’s all about living your best life by evaluating the life you have currently and setting mini goals to maximise a feeling of satisfaction and work towards your best (Level 10) life. The idea was created by popular author and entrepreneur Hal Elrod who outlines it in full in his book The Miracle Morning. He invites you to assess your life in 10 categories (or you can choose your own ideas if you wish) and give each a score out of 10. This can be recorded on a wheel of life so you can see where you stand at the moment. The categories are as follows:
family and friends
personal growth and development (which I labelled as personal development)
spirituality
finances
career / business
significant other / romance (which I labelled as marriage)
fun and recreation
contribution / giving
health / fitness
physical environment (home / office)
I created my wheel of life using my circle drawing tool to create 11 circles which provided me with 10 ring spaces. I began with the hole nearest to the centre and worked outwards. It’s a bit tricky to hold the thing in place but will a little practise on some scrap paper I was confident enough to go straight in with pen. I divided the circles up into segments of 36 degrees each which was easy enough to do with the angle measuring and drawing part of the tool.
When you’ve set up your wheel, you can then evaluate your life under the different headings to see what you’re doing well at and which areas would benefit from some attention. I’ve done one of these diagrams before and it’s best not to spend too long thinking and just go with your gut instinct. Here’s a close up of my scores:
When you’ve established your current scores, you can then work on setting some mini goals or things to do to improve them. I’ve just written my initial ideas here and then I can look into them in more depth later and set some actionable and measurable goals using my thoughts to help me.
When you’ve done these spreads, you can use them to set yourself mini goals for each month – maybe choosing the section with the lowest score to focus on first. Then, as long as you revisit regularly, you should find you make good progress towards your ‘Level 10 Life’. After a given amount of time, say three months, you can either record your progress on the same wheel by colouring further up the segments or you can make a new wheel of life and compare it to your old one.
That’s all for today but if you have any questions about the circle tool or Level 10 Life, feel free to drop them in the comments and I’ll do my best to help.