This month, my husband and I went to a local place called Rainton Meadows which is a nature reserve run by Durham Wildlife Trust. It’s somewhere we go regularly for walks and to spot the variety of flora and fauna there. There’s so much to see, including a variety of water birds on the wetland areas, woodland birds from the new hide, ponies grazing on the grass, dragonflies around the water, along with butterflies and stunningly beautiful wild flowers in the meadows. For my July BuJo spreads, I decided to take inspiration from my visit to the reserve and the flowers and grasses we saw. I did want to take some my grassy and wild flower finds home with me so I could do some observational drawing but unfortunately, it started to rain heavily just before we left and we had to run back to the car. I had, however, taken plenty of photographs and was able to find line drawn images online to help me with my sketching. So, here are my pages for July. I hope you like them.
During lockdown, I’ve been addicted to watching plan with me videos on YouTube and I came across a vlogger who had done something similar to the idea I had in my head for my meadow and I took inspiration from her layout for my cover page. I had intended to have a go at creating a watercolour painting but I liked the effect of her designs with felt tip markers and fineliners so I decided to have a go.
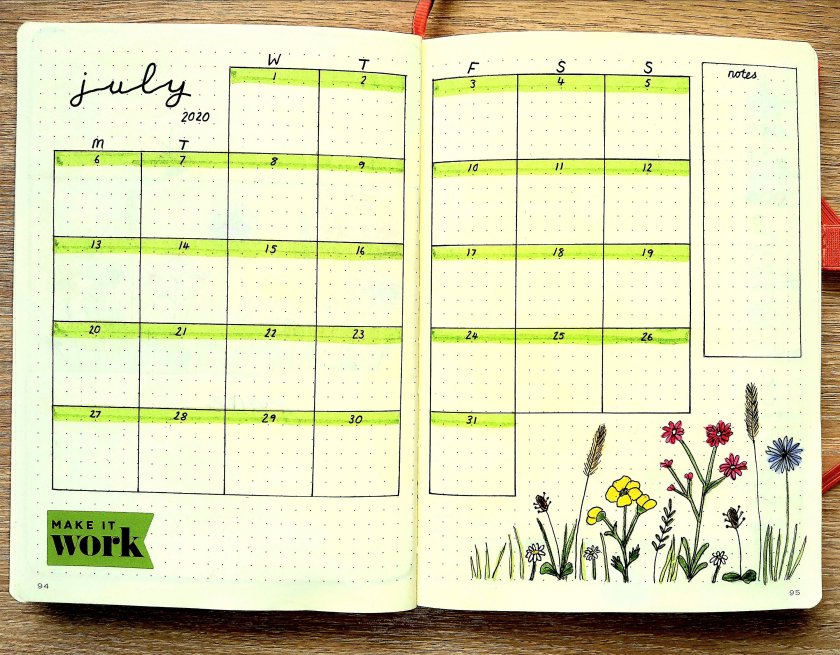
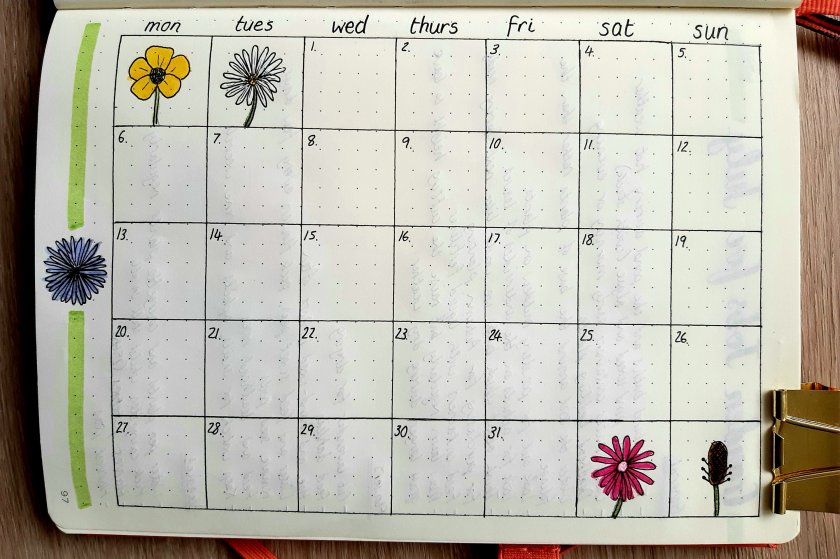
For my calendar page, I stuck with a two-page spread as I like plenty of room to write down when I have published as blog post and any appointments or birthdays. I did a mini meadow in the bottom right hand corner and used one of the grass colours to for my boxes. The ‘make it work’ sticker is from a Happy Planner sticker booklet and I thought it finished that side of the page off nicely, whilst reminding me to keep going and find pleasure in life despite the restrictions due to Covid.
I kept my exercise trackers the same as June but changed the colours and added floral decoration to my workout chart. I found they worked really well for me last month and I was motivated to keep up with filling them in each morning and night.
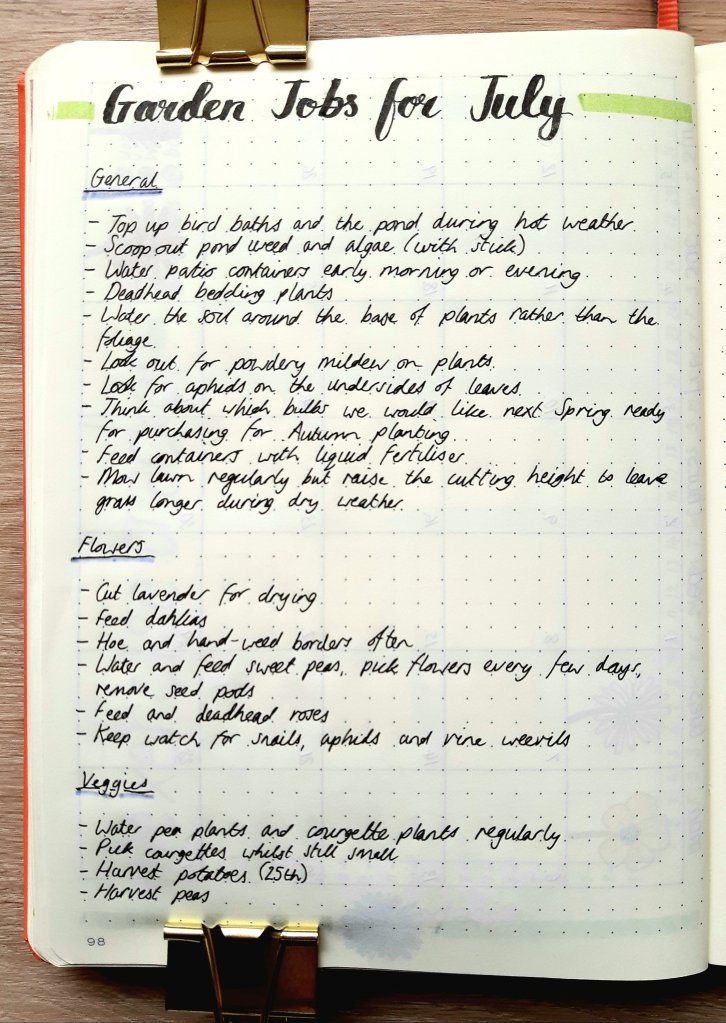
Finally, I created a Garden Jobs for July double page spread so that I know what to focus on for the next month. I used the Gardener’s World and RHS websites for this as they both contain really helpful advice.
I would love to know what theme you have chosen for your bullet journal spreads for July. Let me know in the comments and add a link to your blog if you have one so that I can take a look.
Hobbies are a great way to focus on the present, reduce stress and anxiety levels, leaving you feeling calm and relaxed and with a wonderful sense of achievement. What’s more, they’re an excellent form of mindfulness which is proven to benefit you in a number of ways both mentally and emotionally. Here’s some hobbies that I currently enjoy, have tried and loved in the past and one that I would love to try in the future.
Zentangles
I had a go at producing some Zentangles quite a few years ago when they were featured in a magazine (I think in Breathe). I found information from the article that I’d cut out in one of my journals a few days ago but I couldn’t actually find the patterns that I did. I do remember that I found them really relaxing to do and was pleased with the results so I decided to give them another go.
The Zentangle method was created in 2003 by an American couple called Maria Thomas and Rick Roberts. They describe it as an ‘easy-to-learn, relaxing, and fun way to create beautiful images by drawing structure patterns’ which they call tangles. The three and a half inch tangles are drawn on a small square of paper, and are made using a combination of dots, lines, simple curves and orbs. You have no idea what your finished piece will end up like as you focus on the process rather than worrying about the results. To find out more about the method and to see some beautiful examples visit the official website. For now, here’s some from a complete beginner (me!):
My first attempt at Zentangle in a long time. Photo credit: Laura Jones for Keeping it creative.
Birdwatching
I love birdwatching in my own garden, whilst out for nature walks and from various hides in local reserves and parks. It’s such a relaxing activity yet one which requires plenty of concentration and patience. Although our back garden is relatively small, we have a range of feeders in a little wildlife area and have recently purchased a new covered table which the birds are just starting to take to. We also have a small pond, several bird baths, plenty of shrubs, plus a fence covered in ivy which is full of spiders and their webs. Our space has recently become really popular with a range of small and larger birds and we even had a sparrow hawk visiting last month!
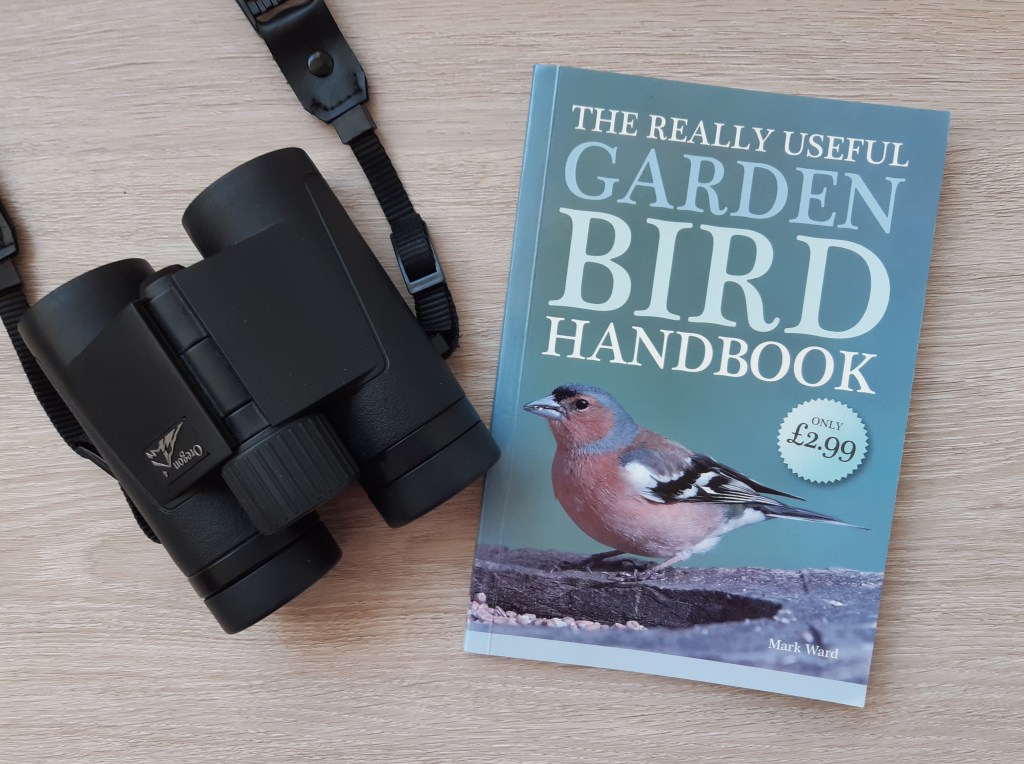
I bought a pair of binoculars last year so I could see birds up close when I visit the hides in nature reserves across the North East but you really don’t need to have any equipment to enjoy birding – just your eyes and your ears, making it a cheap as well as mindful hobby.
Photo credit: Laura Jones for Keeping it Creative
Journalling
Mindful journalling is all about the act of expressing your thoughts and feelings on paper and is a wonderful tool for reflecting, evaluating and processing all that is going on in your life. Done regularly, journalling has many benefits including stress reduction, improved mood, emotional regulation, more self confidence, better immunity, a sharper memory, increased productivity and the ability to empathize with others.
I’ve been journaling for a long time now and it has become a part of my daily routine and something I would really miss if I stopped doing it. I mainly tend to put pen to paper in the evening as I like to reflect on my day, record what I grateful for and write about what I’m looking forward to the next day or what I’m anxious about (click here to see my previous post which describes the ‘putting the day to rest’ technique in detail).
I do sometimes do some journalling in the morning as a way of starting my day on a positive and creative note and find the book ‘Five Minutes in the Morning – A Focus Journal’ provides some great prompts to help me decide what to write about. I managed to pick it up really cheaply in my local bookshop but it’s also available on Amazon as an ebook which you could use if you bought a special notebook to write in.
Photo credit: Laura Jones for Keeping it Creative
The journal is split into different sections, each with a particular focus and considers topics such as the power of writing, creating clarity, considering what’s important in your life, developing an attitude of abundance, solving problems and challenges, productivity and goal setting. It’s up to you how you use the book, you could either work through each prompt in order or you could just pick and page at random and see what you find.
Another book that I really love for prompt ideas is ‘Mindful Journaling’ by Tara Ward. The focus of this book is on exploring mindfulness in a variety of ways and then recording and evaluating your experiences of doing the different tasks. Recently, I completed an activity where you put something in front of you that you would like to eat and reflect on how the food stuff reached your bowl or plate and all of the processes involved in sourcing the ingredients and creating the product. I chose some Crunchy Nut Cornflakes and had so much to write about and it made me eat them much more mindfully afterwards too.
Photo credit: Laura Jones for Keeping it Creative
Sketching
I used to hate drawing as I thought I was no good at it but recently I’ve started to really enjoy developing my skills. My favourite things to draw are plants and other aspects of nature such as leaves, berries and fruit. I always really take my time and focus in on the outline shape of the objects and then add detail carefully. Apparently this style of drawing is known as a ‘Zen method’ which is all about observing and following the contours of the object with your eyes whilst letting your hands draw. You can find out more in renowned Dutch artist Frederick Franck’s book ‘Zen seeing, Zen drawing’ which I have neither seen or read but it sounds like it is focused on mindful drawing as a meditative technique for observing and discovering the world around you.
My first attempt at still life fruit sketching! Photo credit: Laura Jones for Keeping it Creative
Watercolour painting
As those of you who follow my blog will know, I got into watercolouring about 9 months ago and have enjoyed experimenting with different techniques including creating washes, wet on dry and wet on wet methods. Now I’ve learnt the basics, I’ve started to try out my skills on creating actual art pieces. This is my first try at wet on wet poppies and adding stems using wet on dry. In order to create my piece I spent some time looking at photographs of poppies and the work of other watercolour artists. I then really focused on the process of mixing colours, getting the right consistency of pigment to water and then allowing the colours to blend on the page. I wasn’t concerned about the finished look but I think it turned out well, for a beginner anyway!
Photo credit: Laura Jones for Keeping it Creative
Pottery
I’ve done two ceramics courses at a local wellbeing centre and found them to be amazingly beneficial. I met some wonderful, like-minded people who I got on really well with and involving myself in playing with the clay to explore different techniques and then designing and making my own pieces was so relaxing. The sessions were three hours long and in that time, I found that my mind was fully focused on the tasks at hand and the level of concentration required helped me to switch off from my anxious thoughts and feelings. Most weeks, we also got some of our freshly fired work back and it was so exciting to see our pieces at various stages of the making process and celebrate what we had achieved as we developed our skills.
Photo credit: Laura Jones for Keeping it Creative
Obviously, at the moment, there are no ceramics classes available which you can attend due to lockdown restrictions still being in place but it is certainly something I would recommend looking into in the future if you enjoy getting creative with your hands.
Flower arranging
This is a mindful activity that I would love to have a go at in the future as I imagine it’s really interesting to learn the various techniques involved and you can produce some stunning pieces to decorate your home and bring you joy. There are loads of free video tutorials and tips available online from florists and expert flower arrangers if you want to discover the basics or if you sign up to Skillshare you can do a full online course at home. I know my local college usually offer beginner’s floristry sessions but it may be a while before they are able to start them up again.
Photo credit: James Coleman, Unsplash
Do you do any of the activities I’ve listed already or do you have other favourites? Have you found you have more time to do hobbies because of the lockdown restrictions?
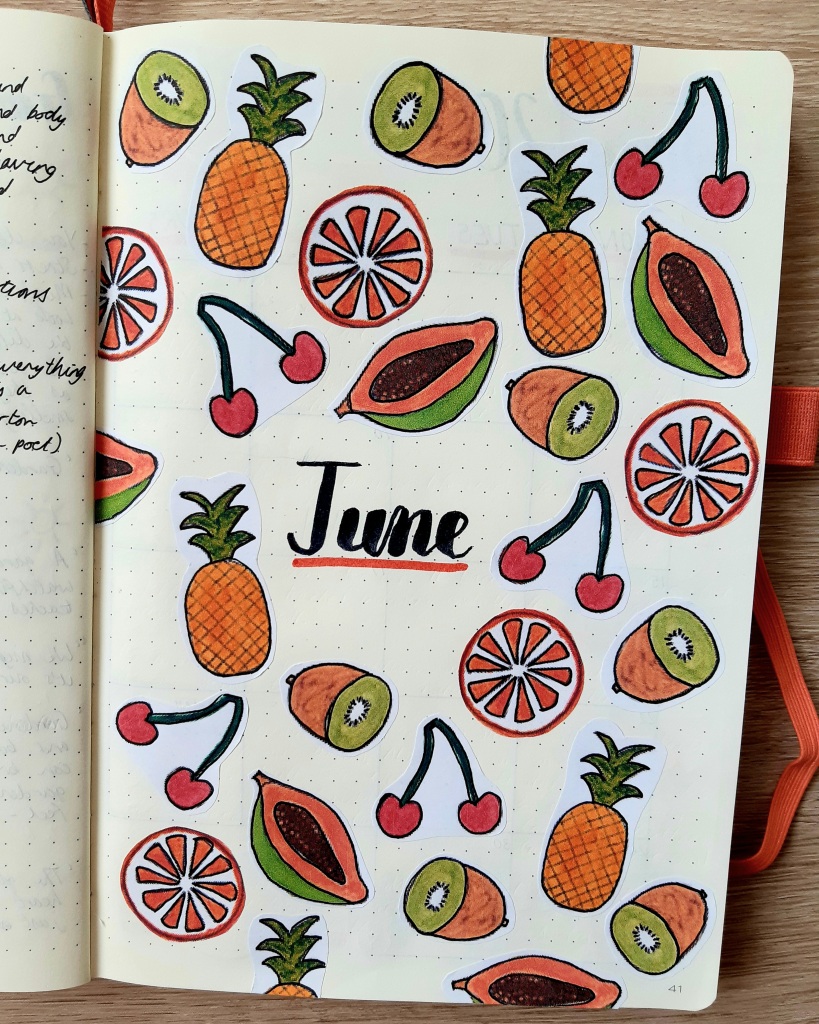
This month I’ve gone for a bright and colourful Summer fruits theme and have included my own little fruit watercolour paintings which I scanned in and worked on using Photoshop on my computer and then turned them in to little stickers. I’ve not totally got to grips with all of the different things you can do on this program but I followed a great little tutorial which I’ll share below.
For my front cover, I created five different fruits, namely papaya, orange, kiwi, cherries and pineapple. I started by sketching them with pencil and then when I was happy with how they looked, I went over the outline and some details using a 0.2 UniPin fineliner. I then mixed colours from my Daler Rowney travel set and used a tiny brush to paint them. Each one is less than 4cm so I really took my time to ensure accuracy and it was a great mindful watercolouring activity. After scanning the paintings, I edited the background to make it white and removed some minor blemishes. Check out this great tutorial on YouTube for how to do this.
For my month at a glance I used the same kind of layout as usual with 6×6 dot boxes and again made my own stickers from some fruity artwork. I successfully covered up part of the date using some paper washi style stickers as I accidently wrote the beginning of the year as 200 instead of 2020. I did the spread late in the evening and think I was overly tired and that’s when I tend to make lots of mistakes. I also messed up on the next page too with is why I have a red paper background to the words ‘exercise tracker’.
As you can see, there’s a distinct lack of things happening in June due to the continuation of lockdown restrictions! My husband and I have started to go out to places but we tend to go on a whim rather than pre-planning.
I’m continuing to monitor my workouts in June and have just made a few small modifications and changed the colour scheme to fit with the Summer fruits theme. I’ve decided to make the steps tracker larger and have changed the scale on the graph to make it easier to fill in.
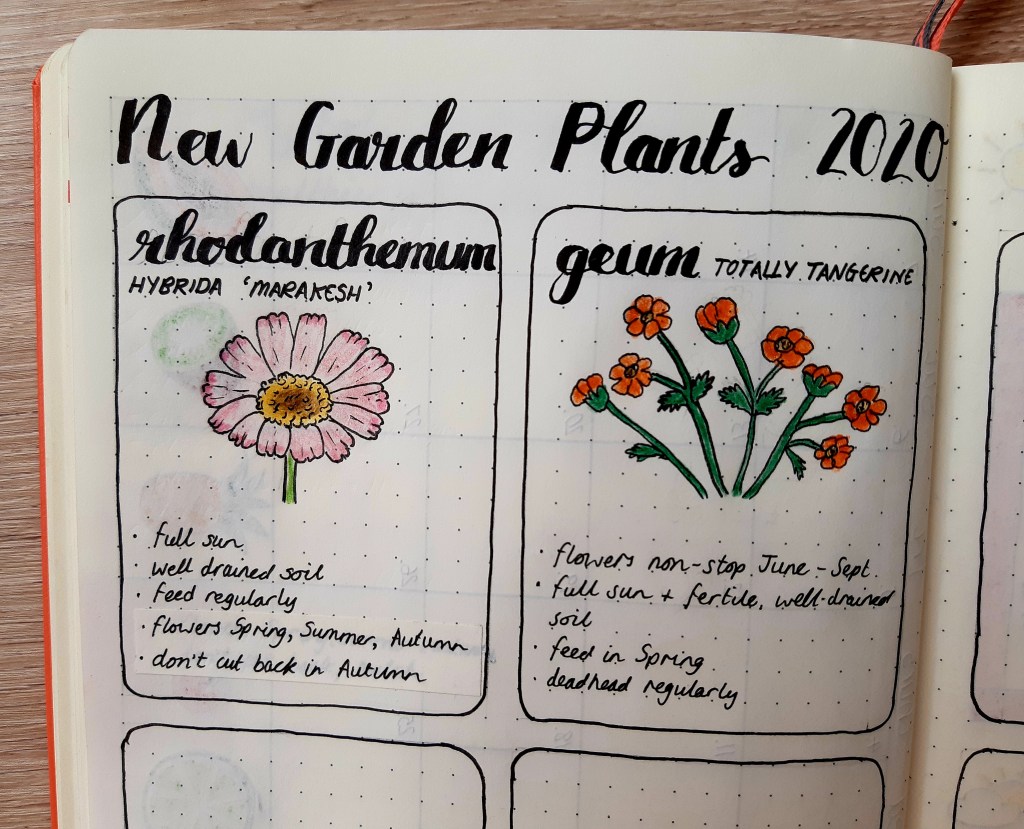
Finally, this month I’ve decided to make a record of the plants we’ve bought at the garden centre this year and include key information from each of the labels that came in the pots. I’ve also added a small drawing and coloured it in for each entry so that I’m also practising my drawing skills. The art work isn’t perfect but I’m getting better the more I give sketching a go. The layout of the spread is inspired by Emma at emusing-emma.blogspot.com who did something similar for her houseplants a few years ago in her bullet journal.
That’s all my spreads for this month. I have more plants to add to my record but won’t get them drawn until later on. If you would like to see more of my plant information, let me know and I’ll add them on to my BuJo set up for July.
A few weeks ago, I shared my experiences of using the wet on wet method for watercolour washes. Today, I’m going to show you the results of some really cool wet on wet techniques using a range of household items which you should already have readily available to you. Let the fun begin…
Applying cling film
This technique is so easy to do but creates some really amazing effects. Simply wet your paper with water and then apply either a single paint colour or blend several together. Next, apply your cling film over the top, allowing it to crinkle in various places. Place a weight over the film e.g. a heavy book and leave it to dry. Remove the cling film and admire the weird and wonderful results (left hand image).
You can also work a different way where you place the cling film flat onto your table, add some clean water and then apply pools of paint directly to the plastic wrap (you could try maybe two or three different colours. After doing this, place your watercolour paper directly on top of the cling film. Flip it over and then either leave the plastic wrinkled where it is or move it around slightly to disperse the colour. When you’re happy with your creation, carefully remove the cling film and leave your paper to dry (right hand image).
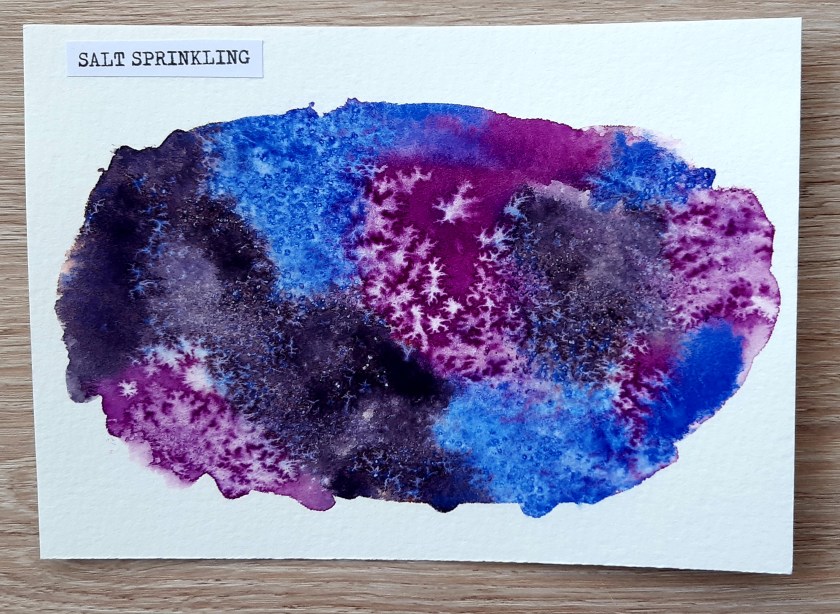
Salt
For this one, you need to search for some salt in your kitchen store cupboard or pantry – any kind will do but I used some coarse sea salt which we had in our mill. I attempting this technique quite a few times and I got different results, some more interesting and effect than others. Begin by wetting a small piece of paper with clean water. Now paint the area with one, two or three colours. Ensure that the area is damp and shiny but not too wet. Dry off any excess with small amounts of kitchen towel if you have any puddles. Add a small amount of salt either by pinching and sprinkling it or using a mill like I did. Let the paint dry and leave the salt to work its magic. Brush off the salt with your hand or use a small ruler to gentle scrape it away.
Applying rubbing alcohol
This was one of my favourite techniques. Rubbing alcohol AKA surgical spirit is usually part of our first aid kit (I use mine to clean my silver earrings too!). But did you know, you can use it to create some interesting effects on wet watercolour paint? Place a small amount of rubbing alcohol into a dish and put aside for later. Wet the area of your paper you want to work on and then add some paint. Now, dip your finger or a cotton bud (I used a cotton bud for the first example) into the surgical spirit. Tap your finger or the cotton bud onto the painted area. Repeat as many times as you like. You can also use cotton wool balls for larger blobs (as shown in the second piece).
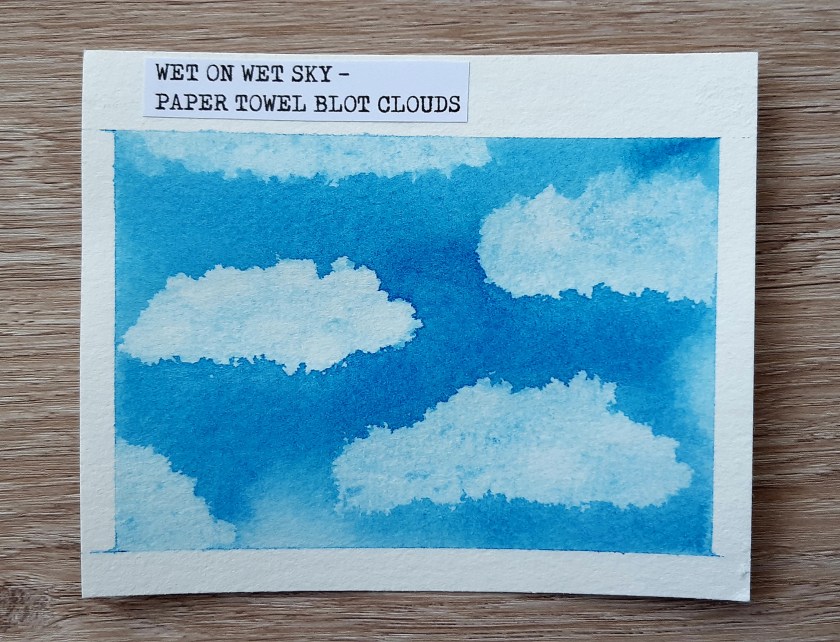
Lifting paint with paper towel
This is also a good technique to use if you make a mistake in your work or you have excess pooled paint or water on you paper. Mask off the edges of your paper for a clean line around the edge. Wet the whole surface until it is shiny and then apply a wash of colour. Use a scrunched up piece of kitchen towel to blot away the colour. As you can see, I made little cloud shapes in my mid blue sky wash. Doesn’t it look great?
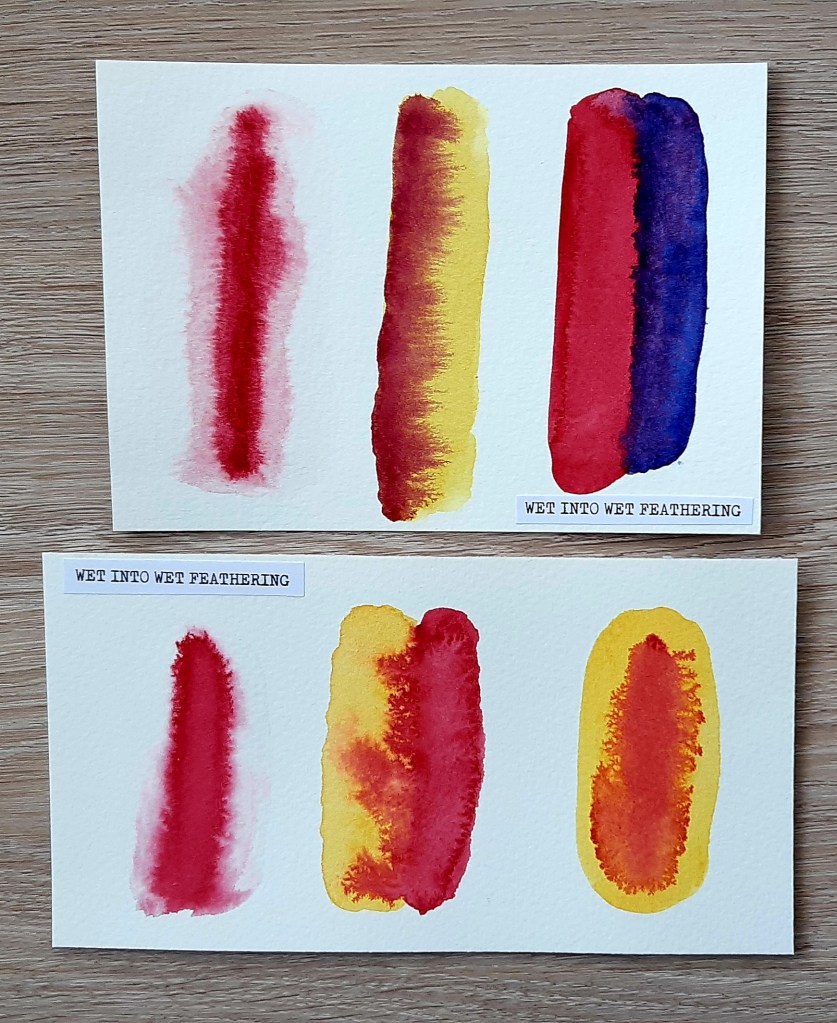
Feathering
You can feather the paint in a range of different ways. The first example (on the top and bottom paper) involves wetting a section of the paper and then applying a single stroke of slightly diluted paint in a downwards motion. This causes the colour to spread to create a feathery effect. For the second examples (number two and three on the top paper and in the middle of the second paper, I applied a strip of pinky red and then applied another colour in the same shape, touching the very right hand edge of the first colour. This causes the first colour to feather into the second and vice versa. The wetter and more diluted your paints the more it feathers. For the final example on the second piece of paper, I applied yellow paint and then rain a strip of pinky red down the centre.
I thought these techniques would be good for using to create variegated tree bark and petals. Do you agree?
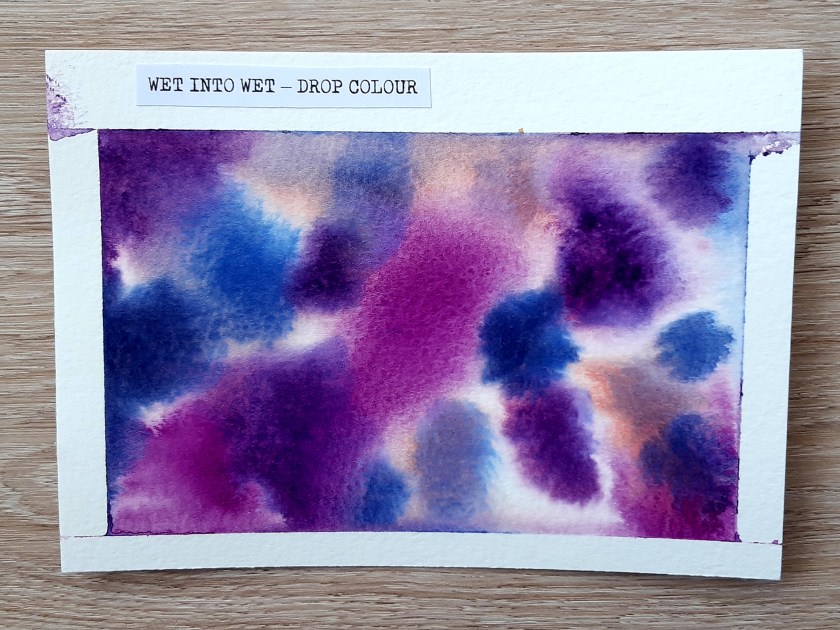
Blooms and drop colour
Another really simple but effective technique is to drop colour onto a pre-wetted piece of paper. You can either apply lots of drops using a large brush to blend the colours or you can drop small blobs of paint and watch them bloom. Again, the wetter the paper and more diluted the colour, the more the paint will spread.
As you can see, I had a little bit of a problem with the paint leaking under the masking tape on the second one. I’m not sure if I applied too much water or if the cheap three rolls of tape for £1 didn’t help the situation!
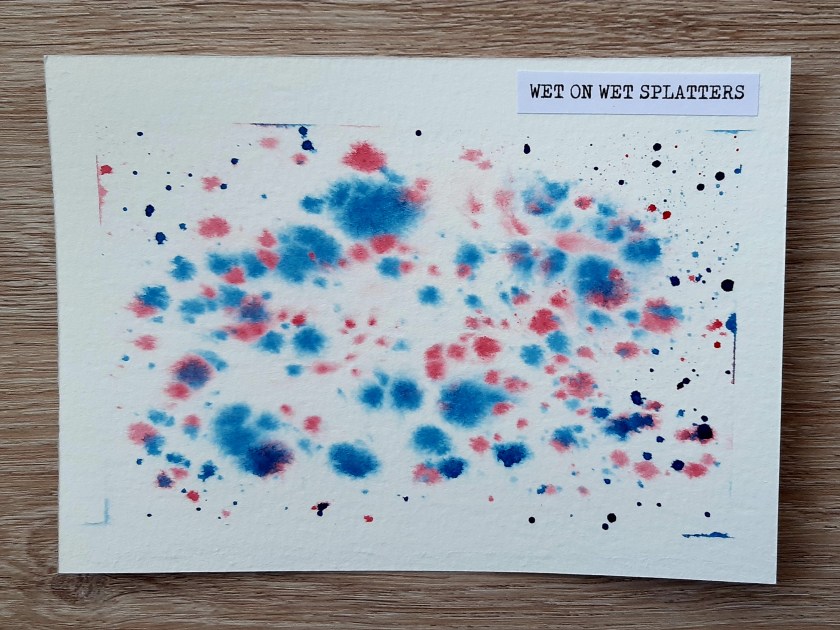
Splattering
I covered this technique in my wet on dry post but as you can see, the splatters look different when applied to wet paper. On this example, below, the paper was wetter in the centre and so the splatters there spread further than those at the very edge of the area.
I hope you have enjoyed looking at my watercolour experiments. I had great fun exploring the different techniques and found it really calming and relaxing. If you’re looking for something creative to do during lockdown I would totally recommend giving it a go and I think it would be something great to do with kids too.
A few weeks ago, I shared my vision board for the lockdown period in which I set some things to work on whilst we are social distancing and spending more time at home. One of these was to do more watercolour painting. A while back I started an online 7 day challenge but unfortunately, circumstances dictated that I didn’t get it finished. I got myself all stressed out about doing it and it basically became a chore when it was meant to be enjoyable (sometimes I get too serious!). This time around, I’ve done a lot more research (to develop my confidence), binge watched lots of YouTube videos and read lots of information on various websites (some were much better at explaining than others. I’ve also made notes on what I have learned. In this post, I want to share with you some wet on dry techniques that I tried out and really enjoyed. Hopefully it will encourage you to have a go yourself. I’ll be doing wet on wet techniques soon so look out for that popping up on my blog.
So what is Wet on Dry?
Also known as wet into dry, this technique involves using dry paper and applying wet paint to your page (which is demonstrated here). It also refers to adding wet paint to a dried area of paint already on the paper using layering (something I will explore at a later time). Wet on dry is regularly used by artists as it allows plenty of control over the paint. There are lots of wet on dry techniques and I loved experimenting on small pieces of watercolour paper. I actually split up a few large sheets into sections using masking tape and then left them to dry and used my paper trimmer to make little labelled cards showing the different examples.
Washes
The first technique I tried was washes. These basically involve adding paint to your paper in a smooth uniform way. There are three main types of wash – flat, graded and variegated. With a flat wash you apply the same colour and tone across the whole of the area you are working on. With a graded wash you graduate the colour from a light to dark tone or from dark to light. And in a variegated wash the colour and tone changes in various places of the work area.
With the flat wash, I wet my brush in clean water and then half loaded it with paint. Starting in the top left hand corner, I swept horizontally to the top right hand corner. I then repeated that action adding more paint for each stroke all of the way down the marked out piece of paper (I used masking tape to get neat edges). As you are working wet on dry, you need to work quickly to ensure that the paint in the wash area you are working on stays wet. You also need to slightly overlap your brush strokes so you are working into the bead of paint that forms at the base of each line. If you find when you get to the bottom that too much paint solution has formed at the end, you can mop it up with a paper towel dried clean brush to avoid streaking or a back wash being created which is where the solution bleeds back up the paper and creates an unwanted blooming effect.
For the graduated wash (also known as a graded wash), I started with a little water and lots of pigment. I then did one sweep horizontally like in the flat wash. For the second sweep I added a little more water. You then continue adding more water to lighten the colour until you have very little pigment on your brush by the bottom of the page to create a very gradual change in tone. As you can see with my example, you can sometimes see the brush strokes which I guess is one of the drawbacks of using a wet on dry technique.
You can also do a graduated wash in reverse from light to dark by adding more pigment to your paintbrush each time but I found this much more difficult and so have not included the results here! I’m sure some of you would be quite happy to see my failed attempts but I’m afraid I filed them in a special place under my desk 😀 ha ha!
I found the variegated wash the most difficult and again, had a fair few failed attempts. In the end, I found the best method was to start with one colour at the top of the page and graduate to the middle and then repeat the process in reverse with another colour from the bottom of the page. I then blend the colours whilst they were still wet in the middle. This may not suit everyone and I may find I develop my technique differently as I become more proficient with the medium. I would recommend experimenting and finding what works for you personally.
You can vary the density of the colour in the flat wash by using a lot of pigment and a little water for an opaque wash or a small amount of pigment and lots of water for a lighter translucent shade as shown in the second photograph. Whatever kind of wash you are doing, it’s a really good idea to use small pieces of cheaper watercolour paper to play around with different washes so you can develop your technique. As I said before, I found I needed quite a few goes at the variegated wash before I was happy with the results.
Since doing my washes, I’ve found a watercolour tips website which suggests that if you are left handed, like me, you might be better off working from right to left (as I sometimes wish I could do when writing!). I will be sure to try this next time as I think it might make things a little easier.
Dry brushing
As the name suggests, this technique involves using a dry brush and wet paint. However, it is a good idea to wet the brush and then dry it off on paper towel so it is a little bit damp before you start. I experimented with a flat brush working with the very edge and then the whole brush in a downward motion to create different effects. I then used a pointed round paint brush and kind of smooshed it onto the paper and then used a vertical wiping motion at the bottom of the paper. I think these techniques would be great for adding texture to clothing or buildings in a painting.
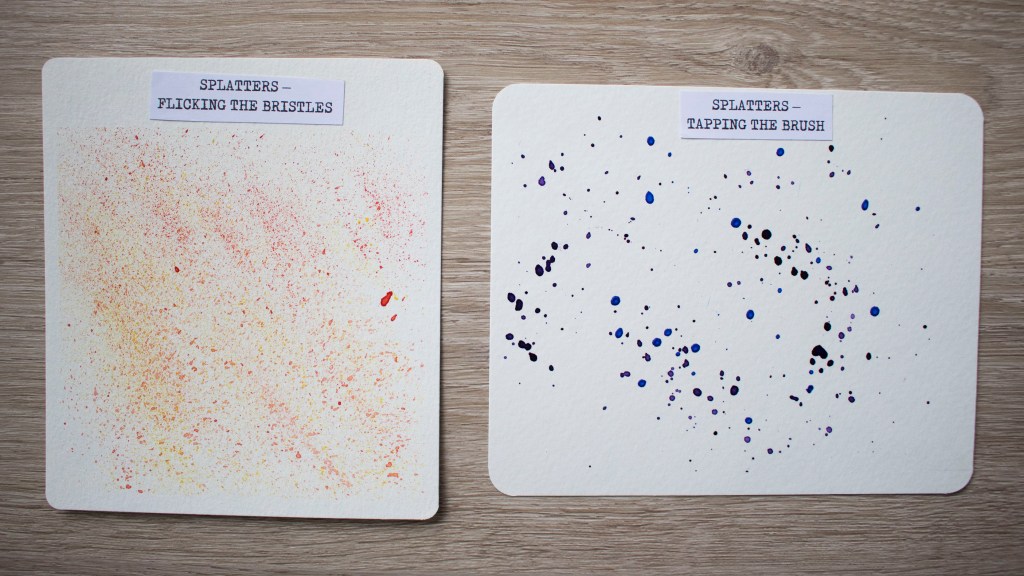
Splatters
Next I had great fun trying different splattering techniques, The first method involved flicking the bristles gently with my finger. I used a flat brush for this and it produced a fine splattering which I could control pretty well. I’ve actually used this before in my Autumn tree painting which I shared as part of my bullet journal set up for October 2019. The second method involved tapping the handle of the brush. For this one, I used a round brush and had to load quite a lot of slightly watered down paint onto the full head. I tried tapping with my finger on the handle and then using another brush handle which I found was easier. Both got quite messy so I would recommend covering any areas of paper you don’t want to work on and using a plastic cover on your table!
Another way to create splatters is by blowing. This can be done using your mouth only or using a straw. With both methods, you need to apply a blob of paint to your page and then blow in the direction you want the colour to splatter. I found that I could get much more control when I used a straw and didn’t need anywhere near as much puff!
Pulling
This technique involves adding a fairly concentrated area of pigment to your page and then using a wet brush to pull the colour in different directions. I created kind of flower shapes by adding a blob of paint and then using a wet brush I lightly touched and pulled the colour outwards from this central point. In the second example I used a more controlled pulling method to create five petal star shaped flowers by placing blobs of paint to mark the very edges of the five petals and then pulling into the centre, again using a brush wetted in clean water. I much preferred creating the looser flowers and definitely need more practise with the detailed work. For the detailed pulling, I found it hard to create an image in my head of where I needed the five petal points to go.
Feathering
I really loved this technique which involved using dry paper but a kind of wet into wet technique to make the paint bloom. For the first one, I painted a line of highly pigmented paint vertically to my paper. Then I touched the paint gently with a wet brush on either side working downwards to create a feathery effect. For the second example, I repeated the process but this time using different colours of paint. It’s a really cool effect isn’t it!
Drips
This technique involves adding a splodge of paint at the top, lifting your paper at an angle and then dabbing into it with a water and paint solution to create a bead. Eventually the bead of paint will become so heavy that gravity will cause the paint to drip down. Depending on how much solution is added and how much the paper is lifted the drip may even run off the page. I used masking tape at the bottom so it created a straight edge but you could leave the paper un-masked and allow the paint to run as far as you want. I found a great little watercolour piece using the dripping technique here which I might try at some point soon.
That’s all the techniques I tried using wet on dry. If you want to find out more from real artists who have played with watercolour a lot more than me, here are some great websites and YouTube channels I came across whilst perusing the internet.
– Anthony shares tips and tricks here for complete beginners and has really good explanations and photos. He goes into depth about washes and how to improve your technique.
– Shelby goes over basic techniques and also provides lots of ideas for using watercolour paint in your bullet journal. Find her at https://littlecoffeefox.com/ I would love to do perfect my techniques and be ready to do some spreads in my BuJo but I’m certainly not at that stage yet!
– Hieu (AKA kelogsloops) who is an aspiring artist from Melbourne in Australia, provides funny but informative demos on this part of his YouTube channel He uses thicker paper than me but as I’m just a beginner, I figured cheaper stuff was good enough for now and better than nothing!
I hope you have enjoyed seeing my wet on dry watercolour work. I really encourage you to give them a go as you might find a new favourite and relaxing hobby during this lockdown period. I’ve got quite a collection of brushes and paints and a couple of blocks of relatively cheap watercolour paper now but you don’t need much equipment to get started. I began with a couple of brushes, a travel tin of Daler Rowney half pan paints and a gummed pad of coldpress watercolour paper.
Let me know if you fancy giving these techniques a go and which you think might be your favourites to play around with.