

A few weeks ago, I shared my vision board for the lockdown period in which I set some things to work on whilst we are social distancing and spending more time at home. One of these was to do more watercolour painting. A while back I started an online 7 day challenge but unfortunately, circumstances dictated that I didn’t get it finished. I got myself all stressed out about doing it and it basically became a chore when it was meant to be enjoyable (sometimes I get too serious!). This time around, I’ve done a lot more research (to develop my confidence), binge watched lots of YouTube videos and read lots of information on various websites (some were much better at explaining than others. I’ve also made notes on what I have learned. In this post, I want to share with you some wet on dry techniques that I tried out and really enjoyed. Hopefully it will encourage you to have a go yourself. I’ll be doing wet on wet techniques soon so look out for that popping up on my blog.
So what is Wet on Dry?
Also known as wet into dry, this technique involves using dry paper and applying wet paint to your page (which is demonstrated here). It also refers to adding wet paint to a dried area of paint already on the paper using layering (something I will explore at a later time). Wet on dry is regularly used by artists as it allows plenty of control over the paint. There are lots of wet on dry techniques and I loved experimenting on small pieces of watercolour paper. I actually split up a few large sheets into sections using masking tape and then left them to dry and used my paper trimmer to make little labelled cards showing the different examples.
Washes
The first technique I tried was washes. These basically involve adding paint to your paper in a smooth uniform way. There are three main types of wash – flat, graded and variegated. With a flat wash you apply the same colour and tone across the whole of the area you are working on. With a graded wash you graduate the colour from a light to dark tone or from dark to light. And in a variegated wash the colour and tone changes in various places of the work area.
With the flat wash, I wet my brush in clean water and then half loaded it with paint. Starting in the top left hand corner, I swept horizontally to the top right hand corner. I then repeated that action adding more paint for each stroke all of the way down the marked out piece of paper (I used masking tape to get neat edges). As you are working wet on dry, you need to work quickly to ensure that the paint in the wash area you are working on stays wet. You also need to slightly overlap your brush strokes so you are working into the bead of paint that forms at the base of each line. If you find when you get to the bottom that too much paint solution has formed at the end, you can mop it up with a paper towel dried clean brush to avoid streaking or a back wash being created which is where the solution bleeds back up the paper and creates an unwanted blooming effect.
For the graduated wash (also known as a graded wash), I started with a little water and lots of pigment. I then did one sweep horizontally like in the flat wash. For the second sweep I added a little more water. You then continue adding more water to lighten the colour until you have very little pigment on your brush by the bottom of the page to create a very gradual change in tone. As you can see with my example, you can sometimes see the brush strokes which I guess is one of the drawbacks of using a wet on dry technique.
You can also do a graduated wash in reverse from light to dark by adding more pigment to your paintbrush each time but I found this much more difficult and so have not included the results here! I’m sure some of you would be quite happy to see my failed attempts but I’m afraid I filed them in a special place under my desk 😀 ha ha!
I found the variegated wash the most difficult and again, had a fair few failed attempts. In the end, I found the best method was to start with one colour at the top of the page and graduate to the middle and then repeat the process in reverse with another colour from the bottom of the page. I then blend the colours whilst they were still wet in the middle. This may not suit everyone and I may find I develop my technique differently as I become more proficient with the medium. I would recommend experimenting and finding what works for you personally.

You can vary the density of the colour in the flat wash by using a lot of pigment and a little water for an opaque wash or a small amount of pigment and lots of water for a lighter translucent shade as shown in the second photograph. Whatever kind of wash you are doing, it’s a really good idea to use small pieces of cheaper watercolour paper to play around with different washes so you can develop your technique. As I said before, I found I needed quite a few goes at the variegated wash before I was happy with the results.

Since doing my washes, I’ve found a watercolour tips website which suggests that if you are left handed, like me, you might be better off working from right to left (as I sometimes wish I could do when writing!). I will be sure to try this next time as I think it might make things a little easier.
Dry brushing
As the name suggests, this technique involves using a dry brush and wet paint. However, it is a good idea to wet the brush and then dry it off on paper towel so it is a little bit damp before you start. I experimented with a flat brush working with the very edge and then the whole brush in a downward motion to create different effects. I then used a pointed round paint brush and kind of smooshed it onto the paper and then used a vertical wiping motion at the bottom of the paper. I think these techniques would be great for adding texture to clothing or buildings in a painting.

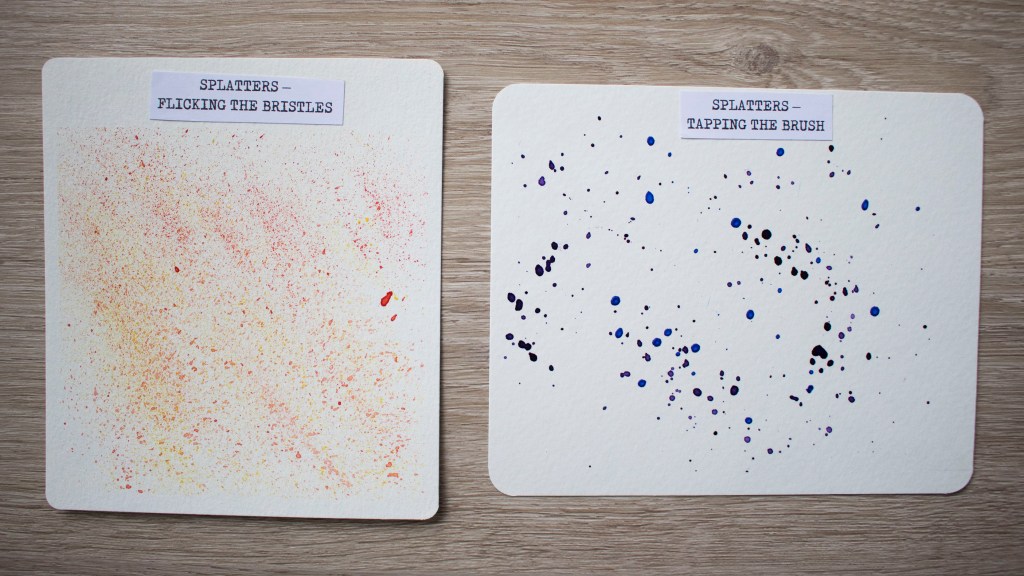
Splatters
Next I had great fun trying different splattering techniques, The first method involved flicking the bristles gently with my finger. I used a flat brush for this and it produced a fine splattering which I could control pretty well. I’ve actually used this before in my Autumn tree painting which I shared as part of my bullet journal set up for October 2019. The second method involved tapping the handle of the brush. For this one, I used a round brush and had to load quite a lot of slightly watered down paint onto the full head. I tried tapping with my finger on the handle and then using another brush handle which I found was easier. Both got quite messy so I would recommend covering any areas of paper you don’t want to work on and using a plastic cover on your table!
Another way to create splatters is by blowing. This can be done using your mouth only or using a straw. With both methods, you need to apply a blob of paint to your page and then blow in the direction you want the colour to splatter. I found that I could get much more control when I used a straw and didn’t need anywhere near as much puff!

Pulling
This technique involves adding a fairly concentrated area of pigment to your page and then using a wet brush to pull the colour in different directions. I created kind of flower shapes by adding a blob of paint and then using a wet brush I lightly touched and pulled the colour outwards from this central point. In the second example I used a more controlled pulling method to create five petal star shaped flowers by placing blobs of paint to mark the very edges of the five petals and then pulling into the centre, again using a brush wetted in clean water. I much preferred creating the looser flowers and definitely need more practise with the detailed work. For the detailed pulling, I found it hard to create an image in my head of where I needed the five petal points to go.

Feathering
I really loved this technique which involved using dry paper but a kind of wet into wet technique to make the paint bloom. For the first one, I painted a line of highly pigmented paint vertically to my paper. Then I touched the paint gently with a wet brush on either side working downwards to create a feathery effect. For the second example, I repeated the process but this time using different colours of paint. It’s a really cool effect isn’t it!

Drips
This technique involves adding a splodge of paint at the top, lifting your paper at an angle and then dabbing into it with a water and paint solution to create a bead. Eventually the bead of paint will become so heavy that gravity will cause the paint to drip down. Depending on how much solution is added and how much the paper is lifted the drip may even run off the page. I used masking tape at the bottom so it created a straight edge but you could leave the paper un-masked and allow the paint to run as far as you want. I found a great little watercolour piece using the dripping technique here which I might try at some point soon.

That’s all the techniques I tried using wet on dry. If you want to find out more from real artists who have played with watercolour a lot more than me, here are some great websites and YouTube channels I came across whilst perusing the internet.
– Anthony shares tips and tricks here for complete beginners and has really good explanations and photos. He goes into depth about washes and how to improve your technique.
– Shelby goes over basic techniques and also provides lots of ideas for using watercolour paint in your bullet journal. Find her at https://littlecoffeefox.com/ I would love to do perfect my techniques and be ready to do some spreads in my BuJo but I’m certainly not at that stage yet!
– Hieu (AKA kelogsloops) who is an aspiring artist from Melbourne in Australia, provides funny but informative demos on this part of his YouTube channel He uses thicker paper than me but as I’m just a beginner, I figured cheaper stuff was good enough for now and better than nothing!

I hope you have enjoyed seeing my wet on dry watercolour work. I really encourage you to give them a go as you might find a new favourite and relaxing hobby during this lockdown period. I’ve got quite a collection of brushes and paints and a couple of blocks of relatively cheap watercolour paper now but you don’t need much equipment to get started. I began with a couple of brushes, a travel tin of Daler Rowney half pan paints and a gummed pad of coldpress watercolour paper.
Let me know if you fancy giving these techniques a go and which you think might be your favourites to play around with.
Happy watercolouring,


2 thoughts on “Wet on Dry washes and 5 Super Fun Wet on Dry Techniques to get you started with the Basics of Watercolour Painting”