

Last week, I wrote a blog post all about wet on dry watercolour including basic washes and fun techniques you can try to get interesting effects. This week, I’m exploring wet on wet washes and cool effects. Again, I’m sharing what I have learnt and some photographs of my actual work which I hope you will agree, isn’t too bad for a beginner!
What is ‘wet on wet’ (or wet into wet)?
As the name suggests, wet on wet refers to using wet paint and applying it to wet paper. It is also used to describe the addition of another wet colour to wet paint which is already on the page (commonly known as charging).
The wet on wet method is great for creating smooth transitions between colours, gradient effects and soft lines and edges. Artists typically use it for painting landscapes, simple skies and soft, flowing washes. Wet on wet can be a little unpredictable but that is what makes it so exciting as you are never absolutely sure of what you are going to get.
What are the issues with using the wet on wet method?
There are a few things that can go wrong when using wet on wet so it’s a good idea to explore the technique using small pieces of cheaper watercolour paper like I did before embarking on a larger piece. You will definitely find that you run into a range of issues along the way when you are experimenting but that’s part of the learning process and the fun of working with watercolour paints.
As you are working with very wet paper, one of the issues that can arise is paper buckling or cockling. This is more common (or pronounced) with thinner paper but can happen regardless of how thick your paper is. So why does it happen and what are the problems with it?
When the paper fibers absorb water they expand lengthwise, and they take on a more random alignment. When the paper dries, the fibers contract again. But to some extent the fibers retain their irregular alignment. This change in the structure of the fibers is what causes raised ridges and low valleys to form on the surface of the paper which we see as buckling… ridges and depressions… make paint flow difficult to control. It’s a nuisance which all watercolor artists have to deal with. This is pretty annoying because as you continue to paint, pigment tends to run into the low valleys and settle in pools. Stretching your paper is the common solution.’
Anthony @ Watercoloraffair.com
The method I used for stretching my paper was to soak it by immersing it in a tub of water for 5 minutes until it turns limp. As my cheaper watercolour paper is only 200 gsm this is all of the time that was needed because the thicker the paper, the longer it needs. I then fastened the wet paper to a plywood board and taped the edges with masking tape before leaving it to dry overnight. Unfortunately, the masking tape I have is pretty cheap stuff and so it doesn’t particularly stick very well.


Another issue can occur if you use too much water. If you soak your paper and use heavily watered down paint, you can end up with ugly marks on your paper. I’ve seen a range of names for these including ‘blooms’, ‘blossoms’, ‘backruns’, ‘cabbages’ and ‘cauliflowers’ but they’re caused when the paint runs to the edges of a pool of liquid. You can avoid these by controlling the amount of water you have on your page by wetting your paper evenly all over until it has a nice sheen to it and then only slightly dampening your paint with a small amount of clean water. If you do find that water collects on your paper, you can use a dry brush to soak it up or a small amount of kitchen towel to absorb the excess. You especially need to check the edges of your work where you have affixed the tape as liquid has a habit of collecting there! I found the best way to learn is by experimenting to see what works best. I bought a few blocks of 10 A4 sheets of cold press paper, then cut each sheet into smaller pieces.
The final issue I want to mention today is the opposite to the previous problem – not using enough water. With the wet on wet technique, it’s very important to ensure that your paper is nice and damp. To ensure your work surface doesn’t dry out you should mix all of your colours first before wetting your paper. You also need to make sure you work quickly which can be hard when you first start out as you are concentrating on ‘getting it right’. This is why it helps to do some exploratory pieces with cheaper watercolour paper so you can get used to how the paint behaves.
Wet on wet washes
Using the wet on wet method has the advantage over wet on dry because it prevents lines of paint being seen. This ensures your wash is smooth and even whether you are creating a flat wash, graduated wash or variegated wash.
For the flat wash, first prepare your puddle of paint by adding a small amount of water to your pigment (you don’t need a lot as the water on the paper will dilute it further). Next, wet your paper all over with clean water. I used a large flat wash brush for this as it enabled me to work quickly. When you are applying the paint, you don’t need to be as careful as with the wet on dry method because the mixture will spread easily. You do, however, need to ensure that you are not left with any excess watery paint so remember to use a dry brush or small amount of paper towel to mop up any excess moisture so you don’t get those backruns I mentioned earlier.

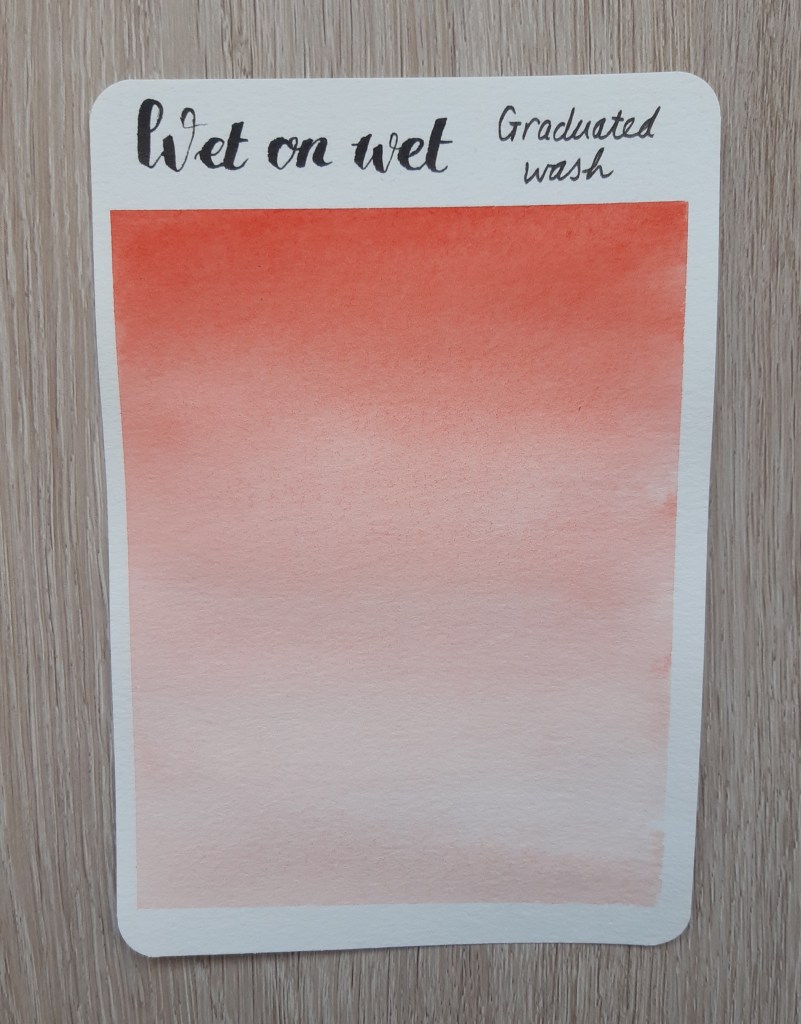
For the graduated wash (also know as gradient wash), you should make a puddle of barely diluted paint then wet your paper evenly as with the flat wash. Then take some paint and sweep from one side of the paper to the other (if you read last week’s post, you’ll know that I suggested working from right to left if you are left handed like me). Then for each new sweep, you’ll need to add a little more water to the mix or to the brush each time. When you reach the bottom of your paper, the wash should be almost completely transparent. It helps to have your board on a slight incline for this to encourage the paint to seep down the wet paper.
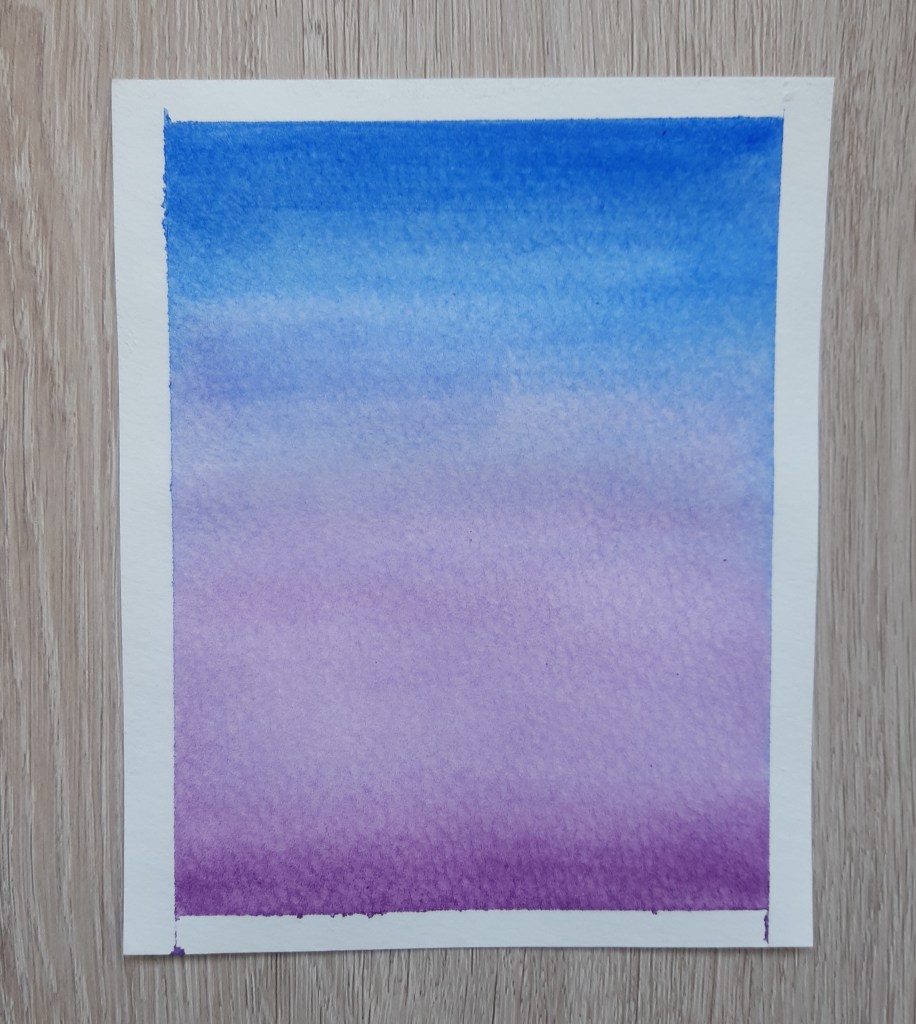
Finally, for the variegated wash, create two fairly concentrated puddles of paint in your palette. Then, wet your paper as before. If you want a smooth transition between colours, you may want to tilt your board again. For this, sweep your first colour on in horizontal strokes either to the end of the paper or to somewhere near the centre. Then, rinse and dry off your brush a little on paper towel before adding the second colour to the still wet paint. Because the paper is wet, the two colours will blend together to create a variegated effect (Image 1). If you want a more random mixing of colours, you can simple tap colour onto wet paper in whatever pattern you like so it blooms and spreads (Image 2). Then do the same with your second colour. You can use as many different paint colours as you like but I recommend sticking to about 3 so that you don’t end up getting muddy brown colours when they bleed into each other. Like with the other washes, look out for pools of paint that you need to soak up with a dry brush or paper towel to avoid backruns.

That’s all of the wet on wet techniques I’m going to share today because I’ve run out of watercolour paper and have decided to order some more online to enable social distancing! I’ll post the results of my experimentation either next week or the week after depending how long it takes for my order to arrive. Hopefully, I won’t get as much cockling with my new paper as it is quite a bit thicker than what I have now.
Until next time, keep finding space in your life to be creative during this lockdown period and if you have any finished projects to share on your own blog, let me know in the comments and I’ll be sure to check out your work.


One thought on “Getting to grips with wet on wet: Watercolour basics”