Posted in art, creativity, watercolour painting

7 simple but effective watercolour techniques using the wet on wet method that you just have to try

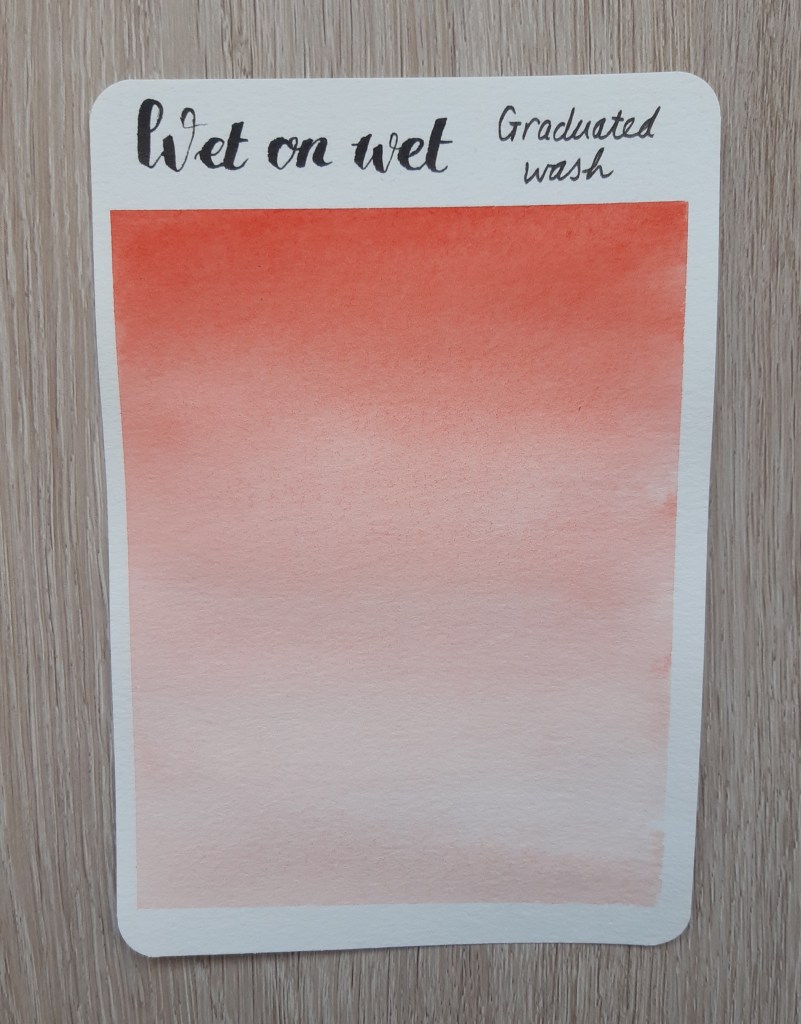
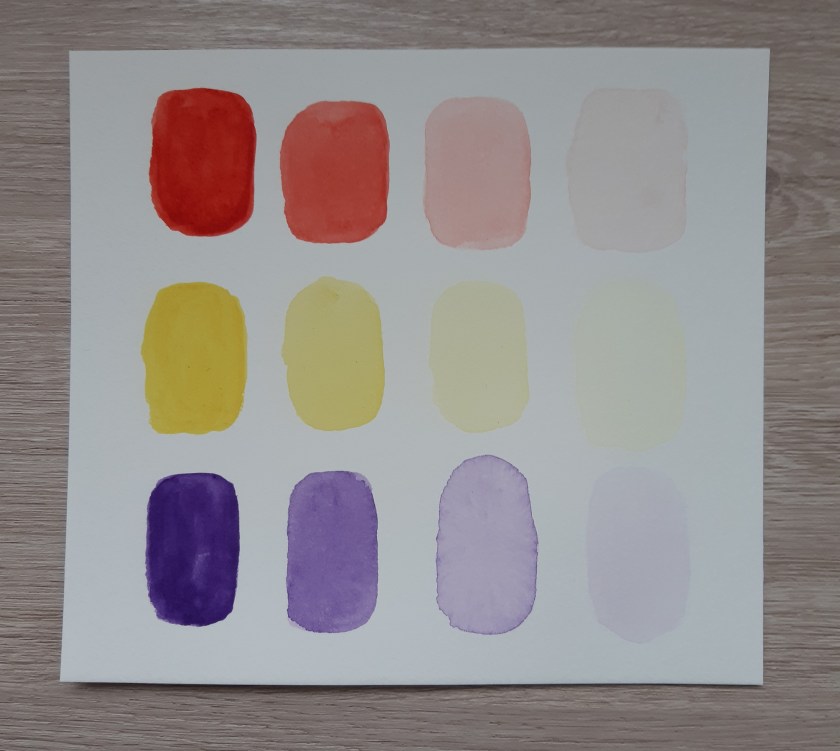
A few weeks ago, I shared my experiences of using the wet on wet method for watercolour washes. Today, I’m going to show you the results of some really cool wet on wet techniques using a range of household items which you should already have readily available to you. Let the fun begin…

Applying cling film

This technique is so easy to do but creates some really amazing effects. Simply wet your paper with water and then apply either a single paint colour or blend several together. Next, apply your cling film over the top, allowing it to crinkle in various places. Place a weight over the film e.g. a heavy book and leave it to dry. Remove the cling film and admire the weird and wonderful results (left hand image).

You can also work a different way where you place the cling film flat onto your table, add some clean water and then apply pools of paint directly to the plastic wrap (you could try maybe two or three different colours. After doing this, place your watercolour paper directly on top of the cling film. Flip it over and then either leave the plastic wrinkled where it is or move it around slightly to disperse the colour. When you’re happy with your creation, carefully remove the cling film and leave your paper to dry (right hand image).
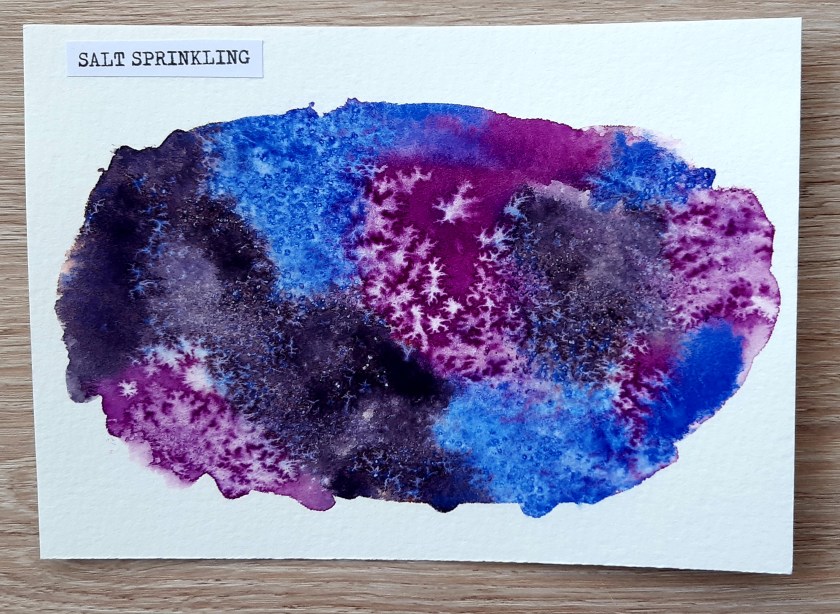
Salt

For this one, you need to search for some salt in your kitchen store cupboard or pantry – any kind will do but I used some coarse sea salt which we had in our mill. I attempting this technique quite a few times and I got different results, some more interesting and effect than others. Begin by wetting a small piece of paper with clean water. Now paint the area with one, two or three colours. Ensure that the area is damp and shiny but not too wet. Dry off any excess with small amounts of kitchen towel if you have any puddles. Add a small amount of salt either by pinching and sprinkling it or using a mill like I did. Let the paint dry and leave the salt to work its magic. Brush off the salt with your hand or use a small ruler to gentle scrape it away.

Applying rubbing alcohol

This was one of my favourite techniques. Rubbing alcohol AKA surgical spirit is usually part of our first aid kit (I use mine to clean my silver earrings too!). But did you know, you can use it to create some interesting effects on wet watercolour paint? Place a small amount of rubbing alcohol into a dish and put aside for later. Wet the area of your paper you want to work on and then add some paint. Now, dip your finger or a cotton bud (I used a cotton bud for the first example) into the surgical spirit. Tap your finger or the cotton bud onto the painted area. Repeat as many times as you like. You can also use cotton wool balls for larger blobs (as shown in the second piece).

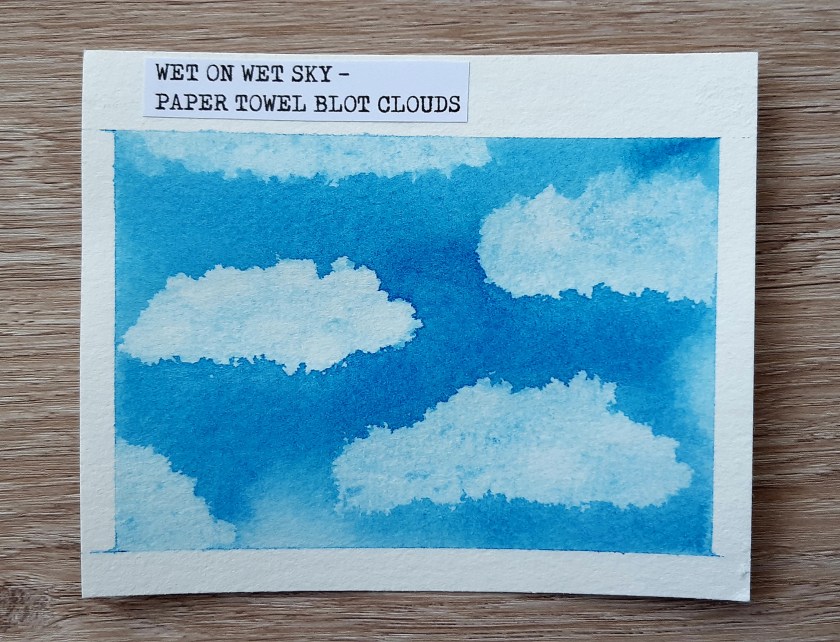
Lifting paint with paper towel

This is also a good technique to use if you make a mistake in your work or you have excess pooled paint or water on you paper. Mask off the edges of your paper for a clean line around the edge. Wet the whole surface until it is shiny and then apply a wash of colour. Use a scrunched up piece of kitchen towel to blot away the colour. As you can see, I made little cloud shapes in my mid blue sky wash. Doesn’t it look great?
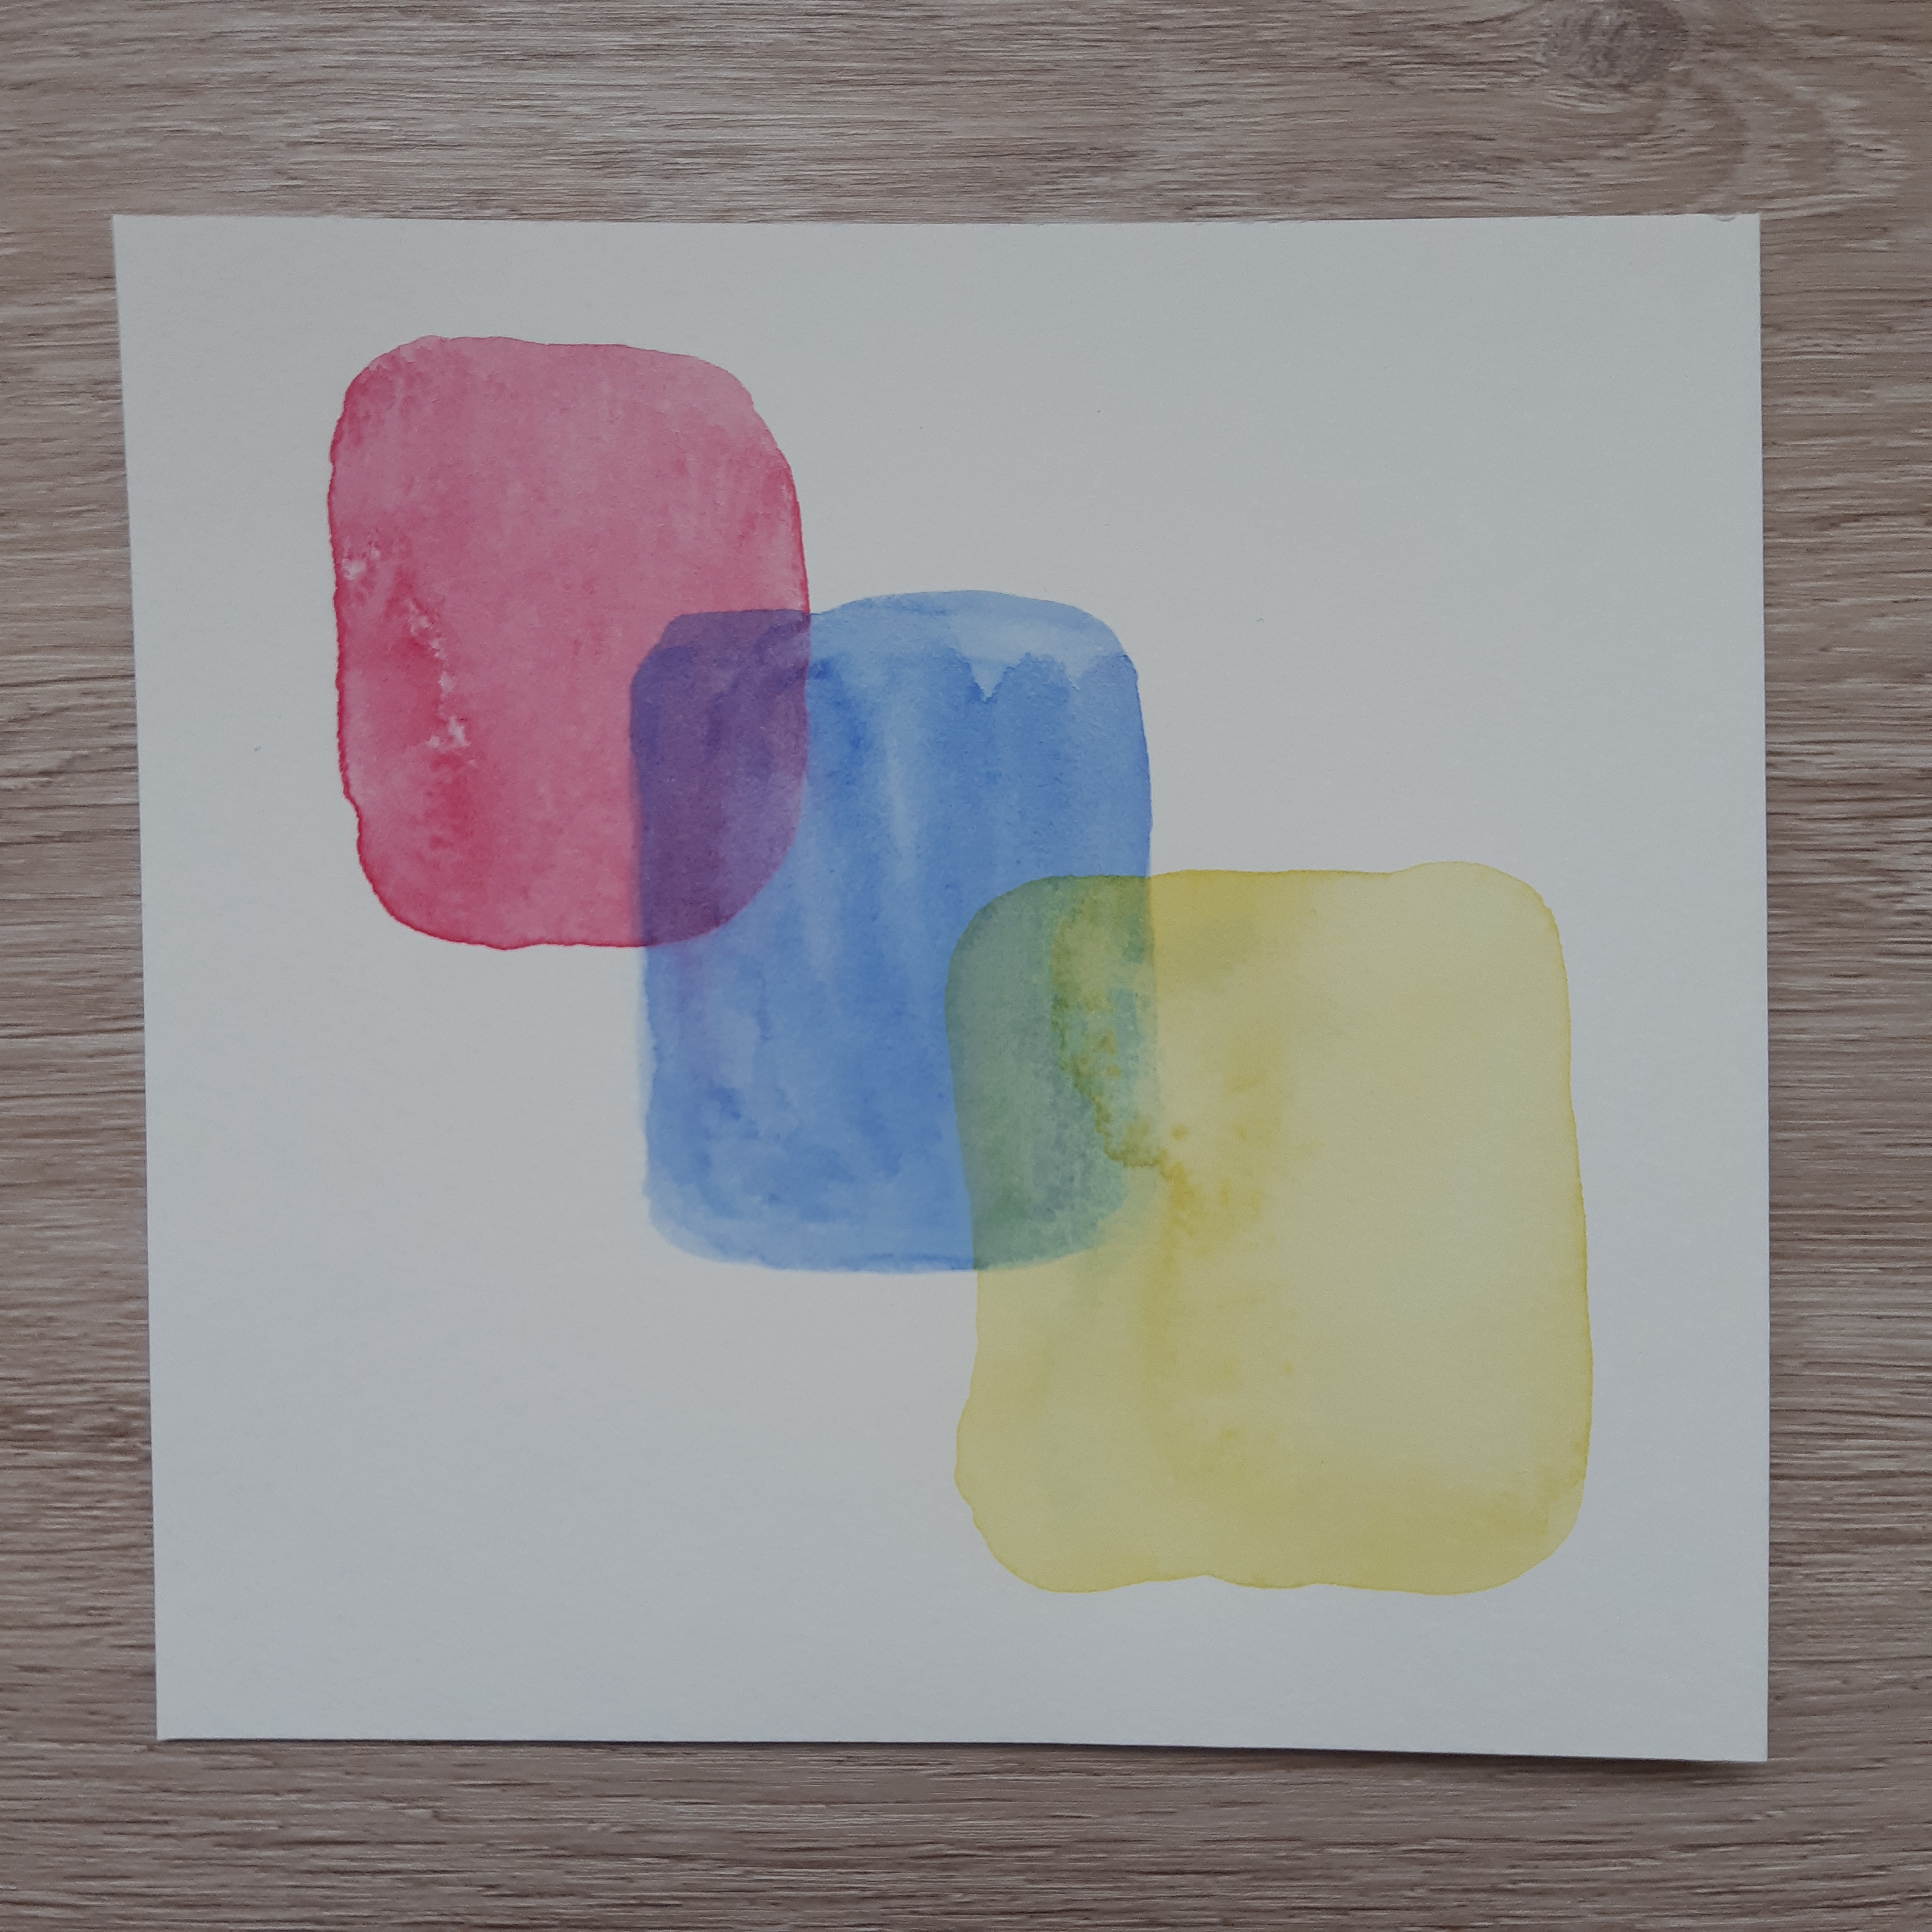
Feathering

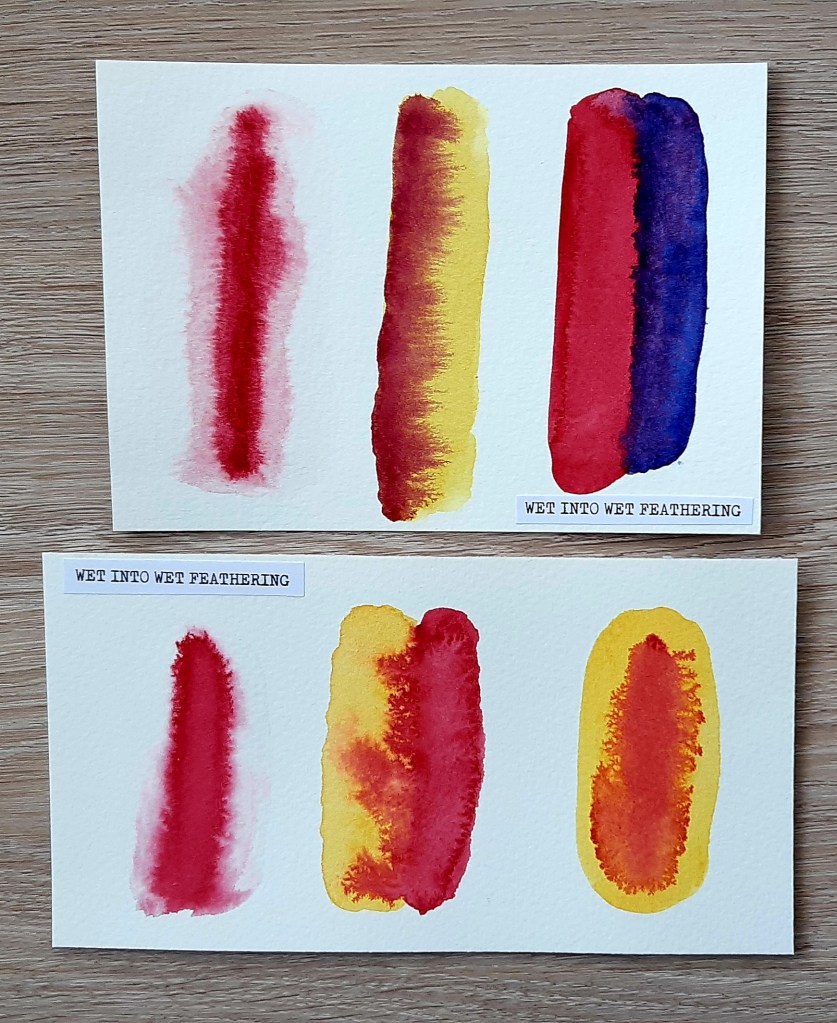
You can feather the paint in a range of different ways. The first example (on the top and bottom paper) involves wetting a section of the paper and then applying a single stroke of slightly diluted paint in a downwards motion. This causes the colour to spread to create a feathery effect. For the second examples (number two and three on the top paper and in the middle of the second paper, I applied a strip of pinky red and then applied another colour in the same shape, touching the very right hand edge of the first colour. This causes the first colour to feather into the second and vice versa. The wetter and more diluted your paints the more it feathers. For the final example on the second piece of paper, I applied yellow paint and then rain a strip of pinky red down the centre.

I thought these techniques would be good for using to create variegated tree bark and petals. Do you agree?

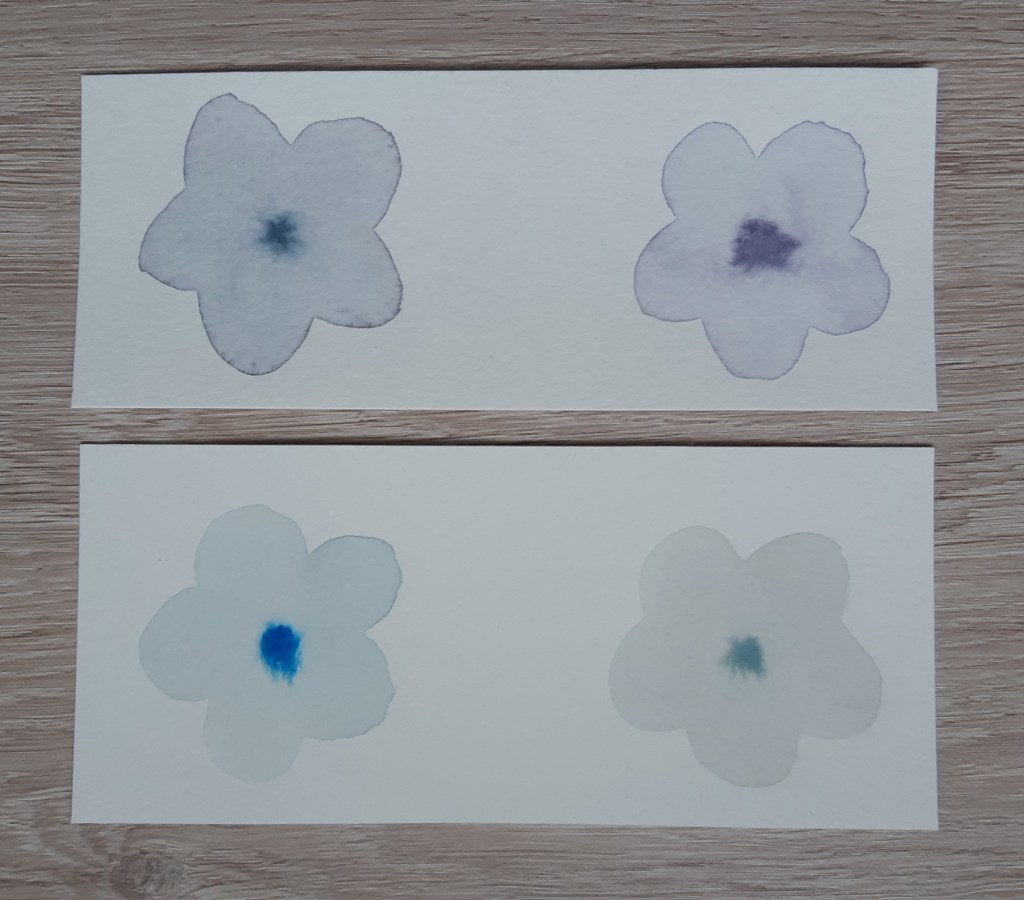
Blooms and drop colour

Another really simple but effective technique is to drop colour onto a pre-wetted piece of paper. You can either apply lots of drops using a large brush to blend the colours or you can drop small blobs of paint and watch them bloom. Again, the wetter the paper and more diluted the colour, the more the paint will spread.

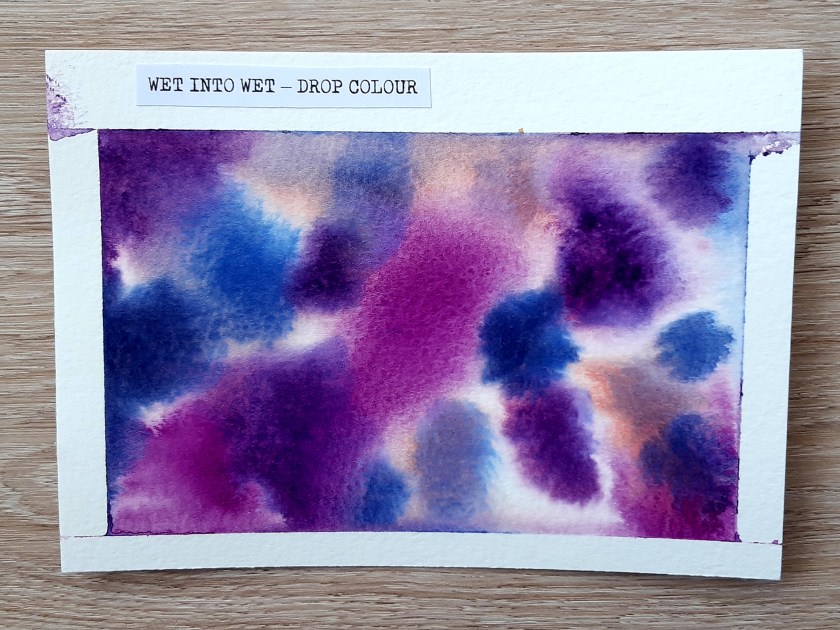
As you can see, I had a little bit of a problem with the paint leaking under the masking tape on the second one. I’m not sure if I applied too much water or if the cheap three rolls of tape for £1 didn’t help the situation!
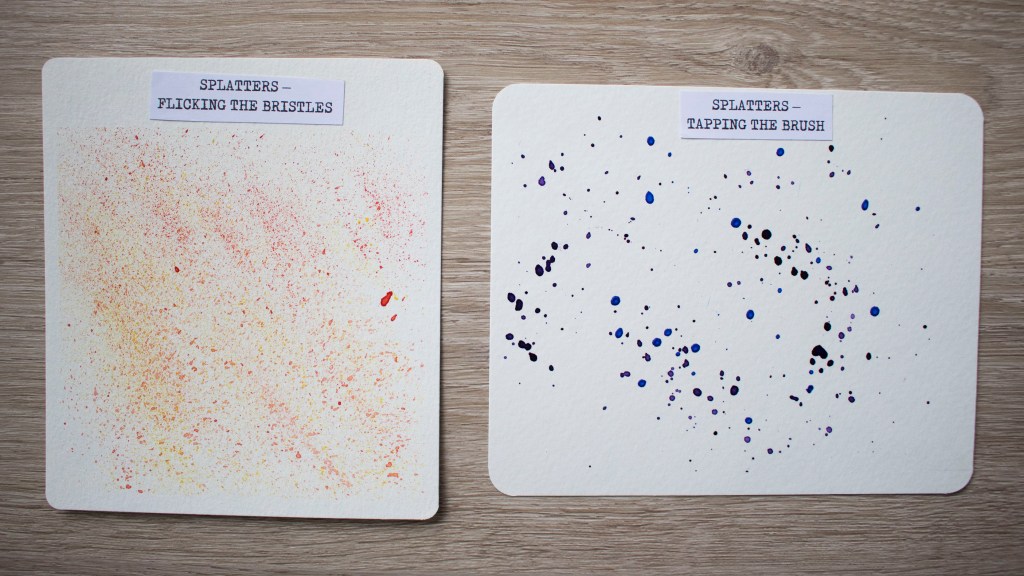
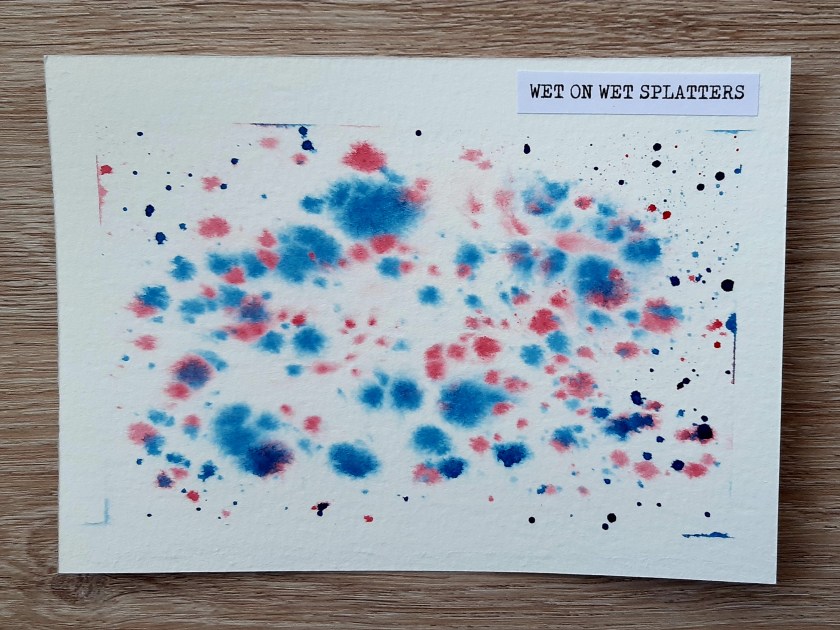
Splattering

I covered this technique in my wet on dry post but as you can see, the splatters look different when applied to wet paper. On this example, below, the paper was wetter in the centre and so the splatters there spread further than those at the very edge of the area.

I hope you have enjoyed looking at my watercolour experiments. I had great fun exploring the different techniques and found it really calming and relaxing. If you’re looking for something creative to do during lockdown I would totally recommend giving it a go and I think it would be something great to do with kids too.

Posted in art, watercolour painting

Getting to grips with wet on wet: Watercolour basics

Last week, I wrote a blog post all about wet on dry watercolour including basic washes and fun techniques you can try to get interesting effects. This week, I’m exploring wet on wet washes and cool effects. Again, I’m sharing what I have learnt and some photographs of my actual work which I hope you will agree, isn’t too bad for a beginner!

What is ‘wet on wet’ (or wet into wet)?

As the name suggests, wet on wet refers to using wet paint and applying it to wet paper. It is also used to describe the addition of another wet colour to wet paint which is already on the page (commonly known as charging).

The wet on wet method is great for creating smooth transitions between colours, gradient effects and soft lines and edges. Artists typically use it for painting landscapes, simple skies and soft, flowing washes. Wet on wet can be a little unpredictable but that is what makes it so exciting as you are never absolutely sure of what you are going to get.

What are the issues with using the wet on wet method?

There are a few things that can go wrong when using wet on wet so it’s a good idea to explore the technique using small pieces of cheaper watercolour paper like I did before embarking on a larger piece. You will definitely find that you run into a range of issues along the way when you are experimenting but that’s part of the learning process and the fun of working with watercolour paints.

As you are working with very wet paper, one of the issues that can arise is paper buckling or cockling. This is more common (or pronounced) with thinner paper but can happen regardless of how thick your paper is. So why does it happen and what are the problems with it?

When the paper fibers absorb water they expand lengthwise, and they take on a more random alignment. When the paper dries, the fibers contract again. But to some extent the fibers retain their irregular alignment. This change in the structure of the fibers is what causes raised ridges and low valleys to form on the surface of the paper which we see as buckling… ridges and depressions… make paint flow difficult to control. It’s a nuisance which all watercolor artists have to deal with. This is pretty annoying because as you continue to paint, pigment tends to run into the low valleys and settle in pools. Stretching your paper is the common solution.’

Anthony @ Watercoloraffair.com

The method I used for stretching my paper was to soak it by immersing it in a tub of water for 5 minutes until it turns limp. As my cheaper watercolour paper is only 200 gsm this is all of the time that was needed because the thicker the paper, the longer it needs. I then fastened the wet paper to a plywood board and taped the edges with masking tape before leaving it to dry overnight. Unfortunately, the masking tape I have is pretty cheap stuff and so it doesn’t particularly stick very well.  

Another issue can occur if you use too much water. If you soak your paper and use heavily watered down paint, you can end up with ugly marks on your paper. I’ve seen a range of names for these including ‘blooms’, ‘blossoms’, ‘backruns’, ‘cabbages’ and ‘cauliflowers’ but they’re caused when the paint runs to the edges of a pool of liquid. You can avoid these by controlling the amount of water you have on your page by wetting your paper evenly all over until it has a nice sheen to it and then only slightly dampening your paint with a small amount of clean water. If you do find that water collects on your paper, you can use a dry brush to soak it up or a small amount of kitchen towel to absorb the excess. You especially need to check the edges of your work where you have affixed the tape as liquid has a habit of collecting there! I found the best way to learn is by experimenting to see what works best. I bought a few blocks of 10 A4 sheets of cold press paper, then cut each sheet into smaller pieces.

The final issue I want to mention today is the opposite to the previous problem – not using enough water. With the wet on wet technique, it’s very important to ensure that your paper is nice and damp. To ensure your work surface doesn’t dry out you should mix all of your colours first before wetting your paper. You also need to make sure you work quickly which can be hard when you first start out as you are concentrating on ‘getting it right’. This is why it helps to do some exploratory pieces with cheaper watercolour paper so you can get used to how the paint behaves.

Wet on wet washes

Using the wet on wet method has the advantage over wet on dry because it prevents lines of paint being seen. This ensures your wash is smooth and even whether you are creating a flat wash, graduated wash or variegated wash.

For the flat wash, first prepare your puddle of paint by adding a small amount of water to your pigment (you don’t need a lot as the water on the paper will dilute it further). Next, wet your paper all over with clean water. I used a large flat wash brush for this as it enabled me to work quickly. When you are applying the paint, you don’t need to be as careful as with the wet on dry method because the mixture will spread easily. You do, however, need to ensure that you are not left with any excess watery paint so remember to use a dry brush or small amount of paper towel to mop up any excess moisture so you don’t get those backruns I mentioned earlier.

For the graduated wash (also know as gradient wash), you should make a puddle of barely diluted paint then wet your paper evenly as with the flat wash. Then take some paint and sweep from one side of the paper to the other (if you read last week’s post, you’ll know that I suggested working from right to left if you are left handed like me). Then for each new sweep, you’ll need to add a little more water to the mix or to the brush each time. When you reach the bottom of your paper, the wash should be almost completely transparent. It helps to have your board on a slight incline for this to encourage the paint to seep down the wet paper.

Finally, for the variegated wash, create two fairly concentrated puddles of paint in your palette. Then, wet your paper as before. If you want a smooth transition between colours, you may want to tilt your board again. For this, sweep your first colour on in horizontal strokes either to the end of the paper or to somewhere near the centre. Then, rinse and dry off your brush a little on paper towel before adding the second colour to the still wet paint. Because the paper is wet, the two colours will blend together to create a variegated effect (Image 1). If you want a more random mixing of colours, you can simple tap colour onto wet paper in whatever pattern you like so it blooms and spreads (Image 2). Then do the same with your second colour. You can use as many different paint colours as you like but I recommend sticking to about 3 so that you don’t end up getting muddy brown colours when they bleed into each other. Like with the other washes, look out for pools of paint that you need to soak up with a dry brush or paper towel to avoid backruns.

That’s all of the wet on wet techniques I’m going to share today because I’ve run out of watercolour paper and have decided to order some more online to enable social distancing! I’ll post the results of my experimentation either next week or the week after depending how long it takes for my order to arrive. Hopefully, I won’t get as much cockling with my new paper as it is quite a bit thicker than what I have now.

Until next time, keep finding space in your life to be creative during this lockdown period and if you have any finished projects to share on your own blog, let me know in the comments and I’ll be sure to check out your work.

Posted in art, creativity, watercolour painting

Wet on Dry washes and 5 Super Fun Wet on Dry Techniques to get you started with the Basics of Watercolour Painting

A few weeks ago, I shared my vision board for the lockdown period in which I set some things to work on whilst we are social distancing and spending more time at home. One of these was to do more watercolour painting. A while back I started an online 7 day challenge but unfortunately, circumstances dictated that I didn’t get it finished. I got myself all stressed out about doing it and it basically became a chore when it was meant to be enjoyable (sometimes I get too serious!). This time around, I’ve done a lot more research (to develop my confidence), binge watched lots of YouTube videos and read lots of information on various websites (some were much better at explaining than others. I’ve also made notes on what I have learned. In this post, I want to share with you some wet on dry techniques that I tried out and really enjoyed. Hopefully it will encourage you to have a go yourself. I’ll be doing wet on wet techniques soon so look out for that popping up on my blog.

So what is Wet on Dry?

Also known as wet into dry, this technique involves using dry paper and applying wet paint to your page (which is demonstrated here). It also refers to adding wet paint to a dried area of paint already on the paper using layering (something I will explore at a later time). Wet on dry is regularly used by artists as it allows plenty of control over the paint. There are lots of wet on dry techniques and I loved experimenting on small pieces of watercolour paper. I actually split up a few large sheets into sections using masking tape and then left them to dry and used my paper trimmer to make little labelled cards showing the different examples.

Washes

The first technique I tried was washes. These basically involve adding paint to your paper in a smooth uniform way. There are three main types of wash – flat, graded and variegated. With a flat wash you apply the same colour and tone across the whole of the area you are working on. With a graded wash you graduate the colour from a light to dark tone or from dark to light. And in a variegated wash the colour and tone changes in various places of the work area.

With the flat wash, I wet my brush in clean water and then half loaded it with paint. Starting in the top left hand corner, I swept horizontally to the top right hand corner. I then repeated that action adding more paint for each stroke all of the way down the marked out piece of paper (I used masking tape to get neat edges). As you are working wet on dry, you need to work quickly to ensure that the paint in the wash area you are working on stays wet. You also need to slightly overlap your brush strokes so you are working into the bead of paint that forms at the base of each line. If you find when you get to the bottom that too much paint solution has formed at the end, you can mop it up with a paper towel dried clean brush to avoid streaking or a back wash being created which is where the solution bleeds back up the paper and creates an unwanted blooming effect.

For the graduated wash (also known as a graded wash), I started with a little water and lots of pigment. I then did one sweep horizontally like in the flat wash. For the second sweep I added a little more water. You then continue adding more water to lighten the colour until you have very little pigment on your brush by the bottom of the page to create a very gradual change in tone. As you can see with my example, you can sometimes see the brush strokes which I guess is one of the drawbacks of using a wet on dry technique.

You can also do a graduated wash in reverse from light to dark by adding more pigment to your paintbrush each time but I found this much more difficult and so have not included the results here! I’m sure some of you would be quite happy to see my failed attempts but I’m afraid I filed them in a special place under my desk 😀 ha ha!

I found the variegated wash the most difficult and again, had a fair few failed attempts. In the end, I found the best method was to start with one colour at the top of the page and graduate to the middle and then repeat the process in reverse with another colour from the bottom of the page. I then blend the colours whilst they were still wet in the middle. This may not suit everyone and I may find I develop my technique differently as I become more proficient with the medium. I would recommend experimenting and finding what works for you personally.

You can vary the density of the colour in the flat wash by using a lot of pigment and a little water for an opaque wash or a small amount of pigment and lots of water for a lighter translucent shade as shown in the second photograph. Whatever kind of wash you are doing, it’s a really good idea to use small pieces of cheaper watercolour paper to play around with different washes so you can develop your technique. As I said before, I found I needed quite a few goes at the variegated wash before I was happy with the results.

Since doing my washes, I’ve found a watercolour tips website which suggests that if you are left handed, like me, you might be better off working from right to left (as I sometimes wish I could do when writing!). I will be sure to try this next time as I think it might make things a little easier.

Dry brushing

As the name suggests, this technique involves using a dry brush and wet paint. However, it is a good idea to wet the brush and then dry it off on paper towel so it is a little bit damp before you start. I experimented with a flat brush working with the very edge and then the whole brush in a downward motion to create different effects. I then used a pointed round paint brush and kind of smooshed it onto the paper and then used a vertical wiping motion at the bottom of the paper. I think these techniques would be great for adding texture to clothing or buildings in a painting.

Splatters

Next I had great fun trying different splattering techniques, The first method involved flicking the bristles gently with my finger. I used a flat brush for this and it produced a fine splattering which I could control pretty well. I’ve actually used this before in my Autumn tree painting which I shared as part of my bullet journal set up for October 2019. The second method involved tapping the handle of the brush. For this one, I used a round brush and had to load quite a lot of slightly watered down paint onto the full head. I tried tapping with my finger on the handle and then using another brush handle which I found was easier. Both got quite messy so I would recommend covering any areas of paper you don’t want to work on and using a plastic cover on your table!

Another way to create splatters is by blowing. This can be done using your mouth only or using a straw. With both methods, you need to apply a blob of paint to your page and then blow in the direction you want the colour to splatter. I found that I could get much more control when I used a straw and didn’t need anywhere near as much puff!

Pulling

This technique involves adding a fairly concentrated area of pigment to your page and then using a wet brush to pull the colour in different directions. I created kind of flower shapes by adding a blob of paint and then using a wet brush I lightly touched and pulled the colour outwards from this central point. In the second example I used a more controlled pulling method to create five petal star shaped flowers by placing blobs of paint to mark the very edges of the five petals and then pulling into the centre, again using a brush wetted in clean water. I much preferred creating the looser flowers and definitely need more practise with the detailed work. For the detailed pulling, I found it hard to create an image in my head of where I needed the five petal points to go.

Feathering

I really loved this technique which involved using dry paper but a kind of wet into wet technique to make the paint bloom. For the first one, I painted a line of highly pigmented paint vertically to my paper. Then I touched the paint gently with a wet brush on either side working downwards to create a feathery effect. For the second example, I repeated the process but this time using different colours of paint. It’s a really cool effect isn’t it!

Drips

This technique involves adding a splodge of paint at the top, lifting your paper at an angle and then dabbing into it with a water and paint solution to create a bead. Eventually the bead of paint will become so heavy that gravity will cause the paint to drip down. Depending on how much solution is added and how much the paper is lifted the drip may even run off the page. I used masking tape at the bottom so it created a straight edge but you could leave the paper un-masked and allow the paint to run as far as you want. I found a great little watercolour piece using the dripping technique here which I might try at some point soon.

That’s all the techniques I tried using wet on dry. If you want to find out more from real artists who have played with watercolour a lot more than me, here are some great websites and YouTube channels I came across whilst perusing the internet.

– Anthony shares tips and tricks here for complete beginners and has really good explanations and photos. He goes into depth about washes and how to improve your technique.

– Shelby goes over basic techniques and also provides lots of ideas for using watercolour paint in your bullet journal. Find her at https://littlecoffeefox.com/ I would love to do perfect my techniques and be ready to do some spreads in my BuJo but I’m certainly not at that stage yet!

– Hieu (AKA kelogsloops) who is an aspiring artist from Melbourne in Australia, provides funny but informative demos on this part of his YouTube channel He uses thicker paper than me but as I’m just a beginner, I figured cheaper stuff was good enough for now and better than nothing!

I hope you have enjoyed seeing my wet on dry watercolour work. I really encourage you to give them a go as you might find a new favourite and relaxing hobby during this lockdown period. I’ve got quite a collection of brushes and paints and a couple of blocks of relatively cheap watercolour paper now but you don’t need much equipment to get started. I began with a couple of brushes, a travel tin of Daler Rowney half pan paints and a gummed pad of coldpress watercolour paper.

Let me know if you fancy giving these techniques a go and which you think might be your favourites to play around with.

Happy watercolouring,

Posted in art, compassion, creativity, Planning and journaling, Setting goals and intentions

Creating a lockdown vision board

With the country in lockdown for the foreseeable future many of our routines will have changed and so will our priorities in life. With this in mind, I decided to create a vision board which focuses on what I want for myself right now. This post is all about how I made it and includes a brief explanation of each of the elements. I’m really pleased with how it turned out.

As one of my goals for the moment is to experiment more with watercolour techniques, I created the background for the board by using a wet-on-wet technique and a limited palette of three colours. I used coldpress watercolour paper which did wrinkle a little but you couldn’t tell when I put it into the photocopier part of my printer. I copied it twice and then orientated them differently to create the two page spread.

After creating the backdrop, I thought carefully about my hobbies and interests and how I can engage in them further. I came up with nine ideas:

  1. to work on my drawing and painting skills
  2. to increase my strength and fitness
  3. to continue to work on my brush lettering (being a leftie makes it hard!)
  4. to grow my blog by posting regularly
  5. to develop my macro photography by using my DSLR in the garden to snap insects
  6. to focus on being grateful for my life even in these difficult circumstances
  7. to practise mindfulness to enable me to live in the moment more
  8. to use my compassion based learning to improve my self love and kindness
  9. to do much more journalling

Drawing and painting

There are some amazing online tutorials out there and I’ve already subscribed to a number of YouTube channels. One of my favourites at the moment, is Shayda Campbell’s florals work which includes lots of sketches of flowers and watercolour techniques which are really easy to follow. Another arty channel that I’ve recently started following is Hullo Alice for watercolour tutorials and bullet journal spreads.

Strength and fitness

I’ve already mentioned my daily yoga practice in a previous post and I’m continuing to develop my ability to do a variety of poses. The style I do is called Iyengar and I’m currently using this channel. I’ve recently ordered a folding chair which I’m hoping in sturdy enough to use.

Brush lettering

I’ve been doing brush lettering using my Tombow dual tips and Fudenosuke hard tip pen for a long time now but still find certain letters difficult. I’ve decided to practise more by doing the lower and upper case alphabets on alternate days and at least one quote per week in my BuJo. The practise sheets I’ve been using are from the magazine publication Simply Lettering. I’ve already made progress but I still think it’s super hard for lefties like me!

This blog

Whilst I was struggling with depression and anxiety I really didn’t have the confidence in myself to work on my blog. I had no ideas and no inclination to put pen to paper. But now, I’m pleased to say that I’m brimming with topics I want to write about and the words flow onto the page with ease. I’m back doing my Monday Matters series and I’m enjoying using my bullet journal again. Also, I hope to share with you some of what I’m doing to work towards the items on my vision board.

Macro photography

My DSLR has been in its case for months now and I’ve just been using my camera phone to take the odd snap. I splashed out on a macro lens a couple of years ago but haven’t really experimented much with it yet. I figure now, as we’re getting lots of insects in the garden, would be a great time to work on developing my skills in this area of photography. I’m not saying I’m going to get shots as wonderful as the one on my vision board but I’m going to give it a go!

Gratefulness

It’s easy to focus on all of the negative aspects of the lockdown but that’s a guaranteed way of getting myself depressed again so I’ve decided that one of the things I’m going to do each day as I socially distance myself, is to record what I’m grateful for. I bought a journalling book from Paperchase a while back called ‘5 Minutes Before Bed’ which includes space to write down your thoughts. There are a variety of different prompts and motivational quotes to keep me focused.

Mindfulness

I attended a mindfulness course at my local wellbeing centre last year and found it really beneficial. However, I haven’t really kept up the practise and really struggled to stay mindful during my period of poor mental health. But, I’m determined to focus on living in the moment and I’ve bought a journaling book to help me do this. The book provides a variety of activities to do to increased mindfulness and a space to write how you got on doing each task. I intend to do a blog post on this when I’ve completed some more of the book.

Self love and kindness

When you are struggling with your mental health, self love and kindness tend to go completely out of the window. I personally found that I had no capacity for self compassion and would constantly beat myself up over how I was feeling. Now, with an increase to my medication, I’m well again and able to show love and kindness to myself and others. I chose the bright heart hands image to remind myself that whilst working towards my goals, I want to remember to approach things with a gentle kindness.

Journalling

I’ve already mentioned the two journals which I’m using at the moment but I intend to reflect on how I’m doing my writing in my bullet journal regularly too. I find journaling really therapeutic and an important way of focusing the mind so it’s definitely something I want to do each day.

I hope you’ve enjoyed reading about my vision board. As you can see, I’ve got plenty of ideas for self development that I want to put in place over the next few months. Maybe it’s given you inspiration for things you’d like to do whilst in lockdown mode. However, if this is not where your head is at right now and you find yourself lacking in motivation due to the current situation, then just accept that this is the case and focus on self care and self love to get you through. There’s nothing wrong with having lots of down time right now as you get used to life whilst social distancing. However you intend to structure your life in the coming weeks, remember to keep safe by keeping your distance and celebrate any small achievements along the way.

Until next time, take care,

Posted in art, creativity, watercolour painting

Back to basics: Watercolour techniques Days 1, 2 and 3. More colour mixing and layering

As the colour mixing chart took so long to complete, I left the rest of the lessons for Day 1 and combined them with Days 2 and 3 for a mammoth painting session. Although I enjoyed the actual painting I was spending more time trying to clean up my set of colour pans and washing out the mixing palettes so in the the end, I popped to The Range and bought some squeezy tubes and two more mixing trays. This meant I had exactly the same colours as the painting tutor and I could leave my dollops of colour in the palettes to use at a later time. I learnt lots more about mixing colours and had great fun trying out the different techniques.

As I said in my first basic watercolour techniques post, the colour chart took me a long time to do, so although I watched all of the lessons for Day 1, I didn’t complete all of the practical tasks. When I got my new paints, I decided to make the chart again using the new colours so I could see how they would mix.

The second lesson was on colour value which basically means how light or dark a colour is. We learnt how to change the hue of a paint colour by gradually adding more water. Here are the results with different colours:

Finally, we learnt how to mix colours and dilute them to make almost black and white shades. The first two swatches were made by blending all of the different dark colours on my palette and tiny amounts of the warmer colours. It took a while to get the colour right but was worth persevering. Our teacher advised that these shades are softer than pure black and compliment the lighter shades that were going to be painting later on.

For almost white shades, we were taught to make a grey mixture and dilute it with lots of water to create super soft, pale tones. This then creates a very translucent colour which also shows the white of the paper. I made a couple of flower shapes to demonstrate and then added darker colour to the centre.

Day 2 was all about layering different colours. We started off by layering ‘wet into wet’ by tapping one colour into another. For this technique, we created a diluted colour swatch on our paper and then tapped another diluted colour into the corner of the swatch. This made the colour bleed into the first colour and created a lovely gradient effect. The trick was to ensure the paint was watery enough to create a glistening sheen on the paper when you tilted it in the light.

For the second lesson, we layered wet paint over dry. We started by making a colour swatch (permanent rose) on the paper and then left it to dry before adding a different colour (cobalt blue), slightly overlapping the first. We then let it dry again, before adding another colour (lemon yellow), overlapping the second. This allows you to create even more colour variations such as the purple and green which was created here:

On Day 3, we were introduced to colour bleeds. This involved adding a rectangular swatch of colour to your paper and then adding a second swatch right beside it whilst the paint is still wet and touching the tip of the brush to the first swatch. This makes the colours bleed into it each other and creates some wonderful effects. The amount of bleed is dependent upon how much water is used. As you can see, my yellow and red paints didn’t work as well as I didn’t use enough water.

I hope you’ve enjoyed looking at my water colour techniques work and maybe it has inspired you to have a go yourself. In the coming lessons were going to be using what we’ve learnt to create an abstract piece and then we’re going to learn how to create florals. I’m super excited to do some more.