

A few weeks ago, I decided to create a colour wheel using my Winsor & Newton Cotman watercolours to explore colour value and secondary and tertiary colours that could be made using the three primaries of red, yellow and blue. Although I already have ones of those little reference colour wheels that you can buy really cheaply on eBay of Amazon, it’s not made with actual paints so is of limited use. I really enjoyed the activity and the wheel will be a useful reference when I’m colour mixing and creating washes. It’s also good that it’s made with my actual paints as colours will be slightly different depending on the actual shades of the primary paint colour used e.g. lemon yellow will give different results to say cadmium yellow when mixed with cadmium red deep or a scarlet lake.
Drawing the colour wheel
My Helix circle drawing tool came in really handy for creating the wheel as I was able to draw the circles with it and also section them off using the angle measurer. I wanted to include primary, secondary and tertiary colours and also explore what happened when I lightened the colours by adding more water to the paint on my brush.
If you want to have a go at making one of this size using your own paints, the dimensions here are a circle the exact size of my Helix circle drawing tool (just over 14cm), 12 segments of 30 degrees each (360 degrees divided by the number of segments required) and two inner circles at 2.5cm in and 4.5cms in. My measurer was super helpful but you could also create one using a pair of compasses and a protractor.
Painting the primary colours
I began by painting the primary colours of red, yellow and blue. I started with the yellow segment as I read some advice that said you should always do the lighter colour first and finish with the darkest – makes total sense! To create a lighter colour value, I swished my brush in my water a little then took off some of the excess with paper towel before applying to the segment of the wheel. I then swished again to get an even light colour value.
Tip: before applying a lighter shade of the colour, dry off the segment a little in order to avoid colour bleeds.
N.B. In case you were wondering, colour value refers to the lightness of the colour.
Mixing the secondary colours
To mix the secondary colours, namely orange, green and purple (I called the purple segment violet because that’s what it said on the colour mixing wheel I purchased before), I used equal parts of two of the primary colours each time. So, red and yellow to make orange, blue and yellow to make green and red and blue to make purple (violet). I then repeated the swishing method to create lighter colour values.
Mixing the tertiary colours
Tertiary colours are those which are made by mixing equal parts of a primary colour with a secondary colour. These are then labelled with the name of the primary, followed by the name of the secondary e.g. yellow green, red orange etc. Again I mixed the colour with a little amount of water and then gradually diluted it.
Finishing off my colour wheel
I wanted to label the colours directly onto the paint but knowing that fineliner pens aren’t too good at writing over paint, I used my Dymo LetraTag on the smallest font, printing on transparent plastic tape. I think I probably wouldn’t have been able to write that small anyway!
Tip: Write the name of the paints you used on the back e.g. Winsor & Newton Cotman Watercolours, and the names of the three primary colours you used e.g. lemon yellow, cadmium red deep and cobalt blue hue so you don’t forget.
The finished result
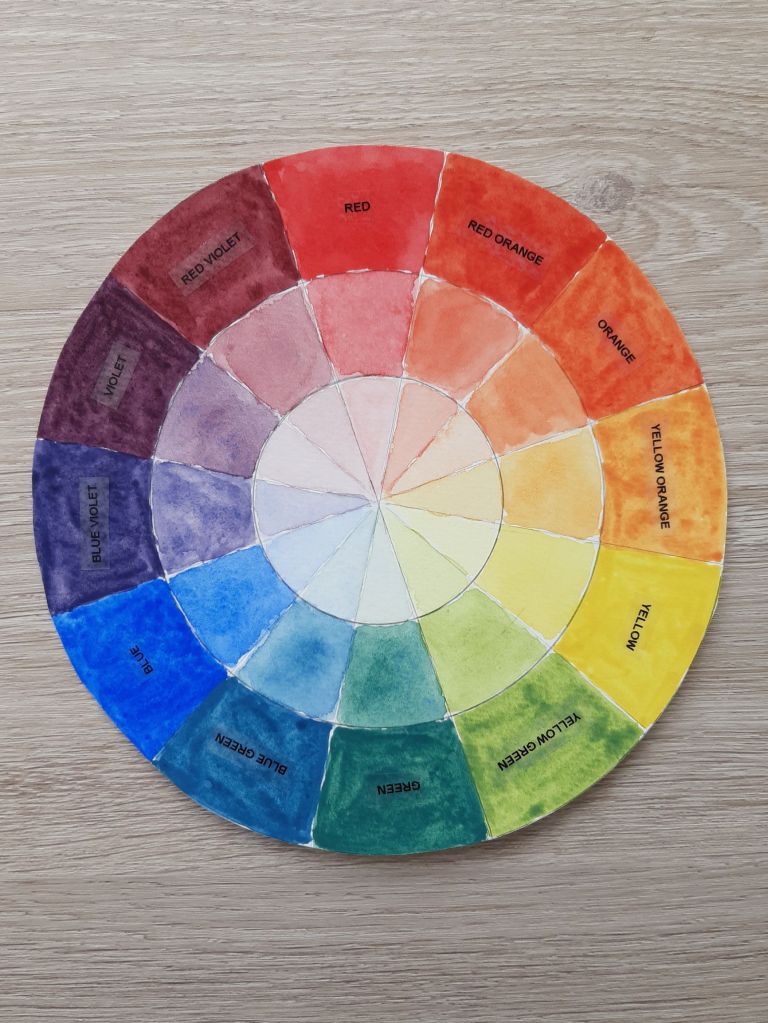

You could neaten your finished colour wheel by going over the pencil lines with a fineliner pen but I decided to leave my looking a little rough around the edges.
I hope this post has encouraged you to have a go at creating your own colour wheel. It took a while to do and I had a number of mixing palettes on the go at once but I think it’s well worth the effort. It’s also something I’d recommend doing for each of your sets of paint if you have more than one like I do as different brands tend to have slightly different colour compositions.


It turned out beautifully!
LikeLiked by 2 people
Thanks my lovely x
LikeLiked by 2 people